
An Interest In:
Web News this Week
- April 26, 2024
- April 25, 2024
- April 24, 2024
- April 23, 2024
- April 22, 2024
- April 21, 2024
- April 20, 2024
Some of Our Sources
- Mashable
- Smashing Apps
- Vandelay Design
- You The Designer
- Fuel Your Creativity
- CSS Globe
- Line 25
- Specky Boy
- Web Resource Source
- Codrops
Help Webnuz
Referal links:
Adding a Next.js Administration Dashboard to your site in seconds
Making an administration dashboard for all my freelance clients is always a challenge. It's just annoying to create a new database, add it to your site, enable authentication, etc.
It's understandable why a lot of people use Wordpress instead of raw code, mainly for the reason of the dashboard and how easy it is to edit things.
Guess what? I just changed that for all you React and Next.js developers out there. You won't have to use Wordpress over your favorite stack anymore or spend hours sweating your brain out coding an admin dashboard. All it takes to implement this is a git clone, editing some JSON and ENV values, and your dashboard is ready to go!
Take a look at the demo and try it out!
https://next-admin.ironcladdev.repl.co/
Getting the Code
Open your favorite code editor and run git clone https://github.com/Conner1115/next-admin.git. You won't even have to run npx create-next-app since all the files are already there for you. Simply run npm run dev and then start building your site around that.
Customizing Authentication
Before you start on the admin dashboard go to the .env file. Set a strong password, which is the one you'll be using to log in and out of your dashboard, and a long random string for the session cookie. This enables security and prevents brute-forcing.
You'll need to set two fields in the .env file. ADMIN_SESSION which is the long random string and ADMIN_PASSWORD which is the password you'll use to log in.
Don't worry, I've already applied Rate Limiting on the password 'n all (three failed login attempts per thirty minutes), so no worries on the bad guys getting in your site and messing up all the content.
Customizing the Dashboard
Go to the data folder and then open up data.json. This is where you will control the different types of data that can be edited.
If you went to the admin page in the demo, which is probably corrupted to a massive extent, and played around with it, you can see that the fields consist of single string fields, multiple strings fields, and arrays.
Create a single String Field
Open up data.json, clear out all the existing fields, and add an item "homepage".
{ "homepage": "This is the text that goes on the homepage"}Run npm run dev in the terminal and go to http://localhost:3000/admin.
You should be seeing something already after you log in.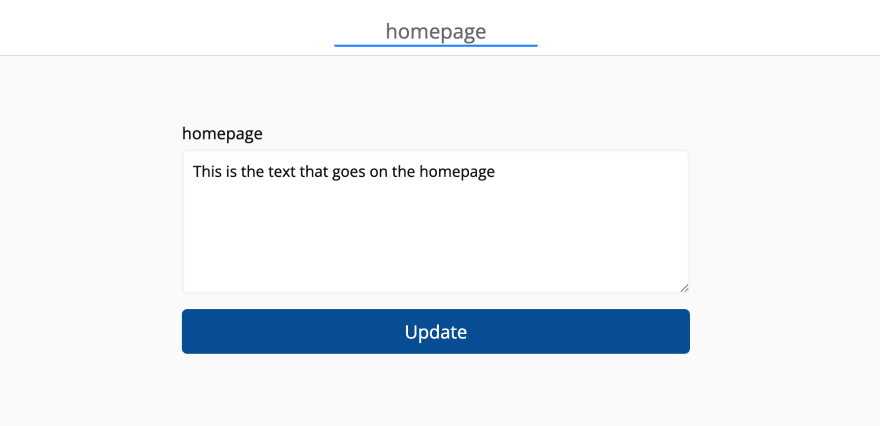
Single-text-fields can be useful for editing short headlines, descriptions, paragraphs, and more. As for pages that have multiple paragraphs, features, or other things that require more content, you can use Multi-string fields.
Create a Multi-string field
Open up data.json and add a field "paragraphs" as an array of strings. This array can be of any length.
{ "homepage": "This is the text that goes on the homepage", "paragraphs": ["This is paragraph One", "This is paragraph Two", "I'm the third paragraph"]}In this example, the length of this array will be three and generate three editable text fields.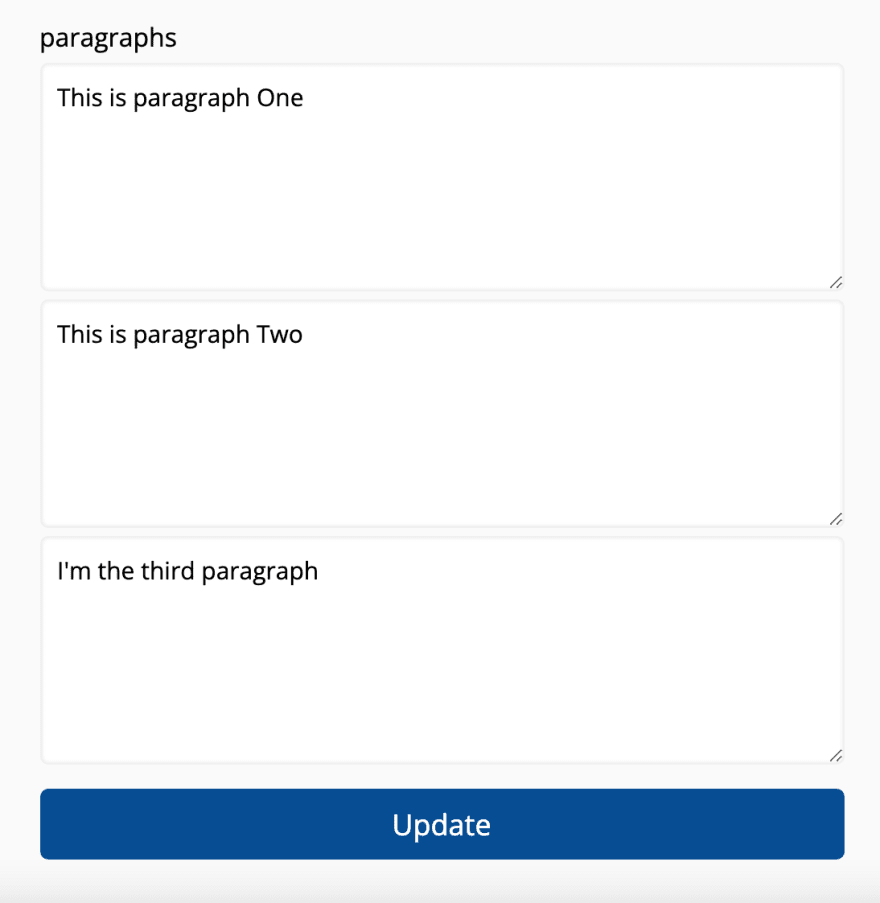
Array Field
Array Fields are particularly useful for simple blogs and other storage functions where authentication isn't required.
Create a new field "posts" and set it to an empty array.
{ "homepage": "This is the text that goes on the homepage", "paragraphs": ["This is paragraph One", "This is paragraph Two", "I'm the third paragraph"], "posts": []}Go schemas.json and add an object "posts". From there you can set the input fields. Make sure the field in schemas.json is the same name as data.json.
{ "posts": { "title": "text", "text": "textarea", "date": "date", "luckynumber": "number" }}That, of course, is just an example. "date" and "luckynumber" exist as examples to show what types of inputs there are. The type of input (besides "textarea") will always be a type in an html <input> tag. If "textarea" is used, a <textarea> tag will be generated.
Now go to your admin dashboard and try it out. After creating a post, you should see a new element added to your schema array in data.json.
{ ... "posts": [ { "title": "Title", "text": "Test Text", "date": "2022-01-21", "luckynumber": "1", "id": "d8d2ef38-b02c-496b-9833-c53fa3b063c9" } ]}All schema-type array fields automatically will be given a random uuid.
You may add as many fields to the data.json object as you want. All top-level object keys will be added and editable in the dashboard.
Accessing the data
To get the data from data.json and use it in your pages, simply import it in one of your pages and use it as a valid javascript object.
import json from '../../data/data.json';export default function Home(){ return ( <div> <h1>{json.headline}</h1> </div> );}You can access the json file from the client side of your application as well as the server side.
Writing to data.json
Writing to data.json from anywhere else besides the original admin api routes can be done from another api route. You may use the writeJSON function which is located under scripts/util.js.
The writeJSON function takes a single parameter, which is a function that should return an object.
The object returned will overwrite the entire json file completely.
{ "field": "value"}writeJSON((json) => ({ ...json, //updating a field "field": "newvalue", //adding a new field "field2", "value"}))Have fun, try your best to not abuse the playground demo too much, and feel free to use this admin page in any of your projects.
Liked this? Be sure to follow me on dev, subscribe to me at my website, and support this post with a couple of reactions!
Original Link: https://dev.to/ironcladdev/adding-a-nextjs-administration-dashboard-to-your-site-in-seconds-7jb
Dev To
More About this Source Visit Dev To