
An Interest In:
Web News this Week
- April 1, 2024
- March 31, 2024
- March 30, 2024
- March 29, 2024
- March 28, 2024
- March 27, 2024
- March 26, 2024
Some of Our Sources
- Slashdot
- BoingBoing
- The Logo Smith
- You The Designer
- Creative Curio
- FanExtra - PSD
- Specky Boy
- Android Dissected
- Willems Lab
- TechPowerUp
Help Webnuz
Referal links:
Working with an Amazon SES account
Why would you need an email service though? Well, with many hosting providers, sending a lot of emails (perhaps you have a great deal of customers using your web shop) can be an issue as hosts tend to have limitations. The standard alternative is to use Gmail to send emails, however, that has limitations as well. This is where SES comes in as it is designed for this exact purpose. SES makes sending emails more reliable, and, using a touch of magic, it also helps your emails avoid SPAM folders.
Pricing
When you sign up to Amazon, you can use their free tier. The free tier will give you access to all of the Amazon services, but with fair limitations. For example, SES is limited to 2,000 messages per day if you opt for their EC2 hosting.
Otherwise the cost is $0.10 per thousand messages. They consider a single message as one message to a single recipient. So if you send one email to 1000 email addresses it would cost you 10 dollar cents.
Two options for Using SES
- Simple Mail Transfer Protocol (commonly known as SMTP)
- The SDK API
Both the options work differently, The SMTP allows you to link directly into the email server, whereas the API method allows you to send emails through the AWS SES Service. In this post we'll cover use of the SMTP server only, the second method is new to me so I am working on it.
Step 1 : Creating an Amazon SES account
To start using Amazon SES, the first thing you need to do is to create an account.
- From your browser, head to https://aws.amazon.com/ses.
- Next, click the orange Get started with Amazon Simple Email Service.
Complete the 5 step signup process. You will need to enter your email address, choose a password, decide on your AWS account name, select your region, address, and more. Additionally, you will have to answer questions like "How do you plan to use AWS?" (Business/personal).
Once youve created your account, you can log into the Management Console.
Step 2: Create SMTP Credentials
- Click the SES Email Sending Service option.
- In the left navigation bar, click the SMTP Settings option.
- Click the Create My SMTP Credentials button.
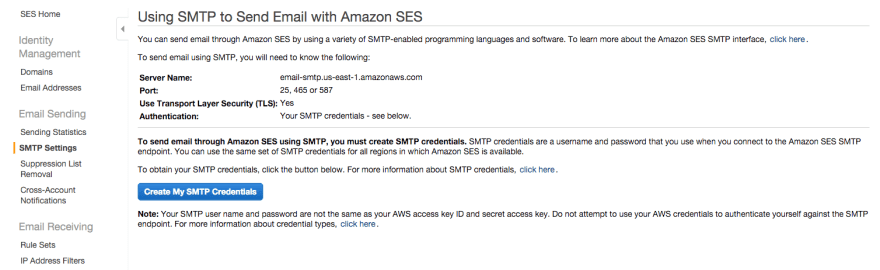
Copy your credentials or click the Download Credentials button as the password will not be shown again.
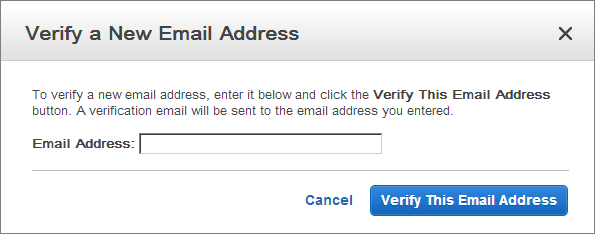
Step 3: Verify An Email Address
Add and verify your email address following these steps:
- Log into the Amazon SES Console.
- Click the Verify a New Email Address link.
- In the Verify a New Email Address dialog, enter the email address you wish to send messages from and click the Verify This Email Address button.
You should now receive a verification message from Amazon SES asking you to confirm that you are the owner of the email address. Click the verification link in the message.
Check the status of the email address in the Amazon SES Console. The status of the email address should change from pending verification to verified.
You can now use Amazon SES to send email messages from this address. To send a test email, check the box next to the verified email address, and then click the Send a Test Email. Refer to the Amazon SES documentation for more information.
Step 4: Request Removal Of Amazon SES Restrictions
To protect customers from fraud and abuse, Amazon SES does not immediately grant unlimited Amazon SES usage to new users. A number of restrictions are initially in effect, such as only being able to send email to and from verified email addresses and being limited to a maximum of 200 messages in every 24-hour period.
To remove these restriction on recipient addresses and increase the sending limits, request a higher level of access in the Amazon Support Center.
Step 5: Configure Your Application To Use Amazon SES
The final step is to configure your Bitnami application to use Amazon SES. The procedure to do this varies from application to application but typically, you will need to configure the application with the correct SMTP server information and credentials. This may be done either by directly editing application configuration files or by entering the required information using the application user interface.
Here's an example of configuring email settings for Amazon SES. The USERNAME and PASSWORD placeholders should be replaced with the correct values from the credentials created in Step 1, while the EMAIL_ADDRESS placeholder should be replaced with any SES-verified email address.
SMTP hosts = email-smtp.us-east-1.amazonaws.comSMTP port = 465SMTP security = SSLSMTP username: USERNAMESMTP password: PASSWORDFrom address: EMAIL_ADDRESSOriginal Link: https://dev.to/ghantala/working-with-an-amazon-ses-account-5d71
Dev To
More About this Source Visit Dev To