
An Interest In:
Web News this Week
- April 14, 2024
- April 13, 2024
- April 12, 2024
- April 11, 2024
- April 10, 2024
- April 9, 2024
- April 8, 2024
Some of Our Sources
- Slashdot
- Engadget
- Simplebits
- The Logo Smith
- Spoon Graphics
- Smashing Apps
- Vandelay Design
- Creative Curio
- Line 25
- The Verge
Help Webnuz
Referal links:
Drag and Drop with React (with no libraries) part 2
Intro
In this tutorial I will show how to make a Drag and Drop component from scratch (no libraries) using React.
I already made a post on Drag and Drop in React, so why make a new one?
Well, many of us learn new things and think we have a good understanding of it. But then we learn more and realize that there was more to know. So I made a new Drag and Drop that uses better methodologies. Enjoy.
Important info
There exists
e.dataTransferwhich helps with drag and drop functionality, but as we're using React I find using state to be simpler.Make sure to check out the Code Sandbox. I may add a few things that aren't reflected below, but the code below is complete.
You might know a better way to do this! If you think you can improve the code please comment.
Drag and Drop in HTML5
There are a few new elements that we will be using (we're not using all of the HTML5 Drag and Drop elements).
draggablemakes a div draggable (instead of highlighting)onDragStartfires when you begin to dragonDragEnterfires ONCE when the dragged div enters another.onDragOverfires CONTINUOUSLY when dragging over a divonDropfires when the mouse click is released
The final 4 of these we will pass to JavaScript to give it the DND logic.
Getting Started.
Let's make a some groups to drag between and some items to be dragged around.
Dnd.js
import React, { useState } from "react";import "./Dnd.scss";export default function Dnd() { // my groups to be dragged between const groups = ["group1", "group2", "group3", "noDrop"]; // My items to be dragged around const initialItems = [ { id: 1, group: "group1", value: "drag 1" }, { id: 2, group: "group1", value: "drag 2" }, { id: 3, group: "group1", value: "drag 3" } ]; return ( <> // Creating the group divs <div className="groups"> {groups.map((group) => ( <div className="group"> <h1 className="title">{group}</h1> <div> // Creating our items to drag and drop {items .filter((item) => item.group === group) .map((item) => ( <div key={item.id} id={item.id} className="item" // THIS MAKES THE ITEM DRAGGABLE!!! draggable > // item title {item.value} </div> ))} </div> </div> ))} </div> </> );}Dnd.scss
.groups { display: flex; margin: 5px; padding: 5px; flex-wrap: wrap; .group { margin: 2px; padding: 20px; min-height: 16rem; background-color: green; .title{ color: white; padding: 0; margin-top: 0; } }}.item { background-color: yellow; color: blue; margin: 5px; padding: 5px; border: 2px green; cursor: grab;}This creates something that looks like this: 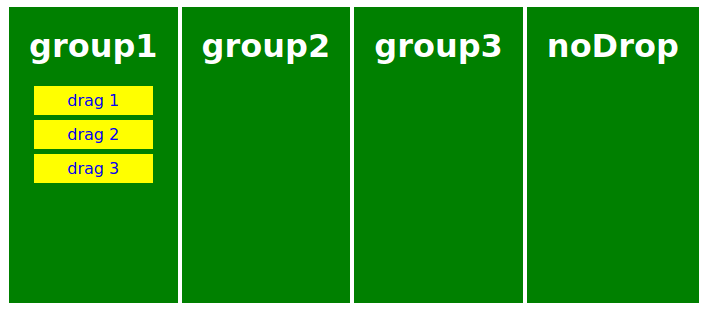
Now we'll add the events and event handlers. Make sure to read the comments in the code as that's where the explanations are. I think this is simpler than describing everything.
Hint: The comments are easier to read in the Code Sandbox.
Dnd.js
import React, { useState } from "react";import "./Dnd.scss";export default function Dnd() { // Initial groups to drag between const groups = ["group1", "group2", "group3", "noDrop"]; // Initial items to be dragged const initialItems = [ { id: 1, group: "group1", value: "drag 1" }, { id: 2, group: "group1", value: "drag 2" }, { id: 3, group: "group1", value: "drag 3" } ]; // Sets the state of the items. I may add an "add" function later // Can be used to add items const [items, setItems] = useState(initialItems); // Data about a things id, origin, and destination const [dragData, setDragData] = useState({}); // Are we hovering over the noDrop div? const [noDrop, setNoDrop] = useState(""); // onDragStart we setDragData. // useState instead of e.dataTransfer so we can transfer more data const handleDragStart = (e, id, group) => { setDragData({ id: id, initialGroup: group }); }; // If we enter the noDrop zone the state will be updated // Used for styling. const handleDragEnter = (e, group) => { if (group === "noDrop") { setNoDrop("noDrop"); } }; // DND will not work without this. const handleDragOver = (e) => { e.preventDefault(); }; // setNoDrop to nothing to return styling to normal const handleDragLeave = (e) => { setNoDrop(""); }; // 1. makes copy of items (newItems) // 2. changes category of the item to its new group // 3. setItem to our NewItems const changeCategory = (itemId, group) => { const newItems = [...items]; newItems[itemId - 1].group = group; setItems([...newItems]); }; // 1. setNoDrop in case item was dropped in noDrop // 2. gets the item id // 3. doesn't allow drop in noDrop // 4. changeCategory (see above) const handleDrop = (e, group) => { setNoDrop(""); const selected = dragData.id; if (group === "noDrop") { console.log("nuh uh"); } else { changeCategory(selected, group); } }; return ( <> <div className="groups"> {/* iterate over groups */} {groups.map((group) => ( <div // change styling if dragging into noDrop zone className={`${ group === "noDrop" && noDrop === "noDrop" ? noDrop : "group" }`} // event handlers onDragEnter={(e) => handleDragEnter(e, group)} onDragOver={handleDragOver} onDragLeave={handleDragLeave} onDrop={(e) => handleDrop(e, group)} key={group} > <h1 className="title">{group}</h1> <div> {/* iterate over items */} {items .filter((item) => item.group === group) .map((item) => ( <div key={item.id} id={item.id} // change style if dragged over noDrop className={`${ group === "noDrop" && noDrop === "noDrop" ? "notAllowed" : "item" }`} // MAKES THE ITEM DRAGGABLE!!!! draggable // event handler onDragStart={(e) => handleDragStart(e, item.id, group)} > {/* The name of each item */} {item.value} </div> ))} </div> </div> ))} </div> </> );}Dnd.scss
.groups { display: flex; margin: 5px; padding: 5px; flex-wrap: wrap; .group { margin: 2px; padding: 20px; min-height: 16rem; background-color: green; .title{ color: white; padding: 0; margin-top: 0; } } .noDrop { margin: 2px; padding: 20px; min-height: 16rem; background-color: red; cursor: not-allowed !important; .title{ color: white; padding: 0; margin-top: 0; } }}.item { background-color: yellow; color: blue; margin: 5px; padding: 5px; border: 2px green; cursor: grab;}.notAllowed { background-color: yellow; color: blue; margin: 5px; padding: 5px; border: 2px green; cursor: not-allowed;}This is what it looks like

Conclusion
This is the basic gist of it. If you need something simple that works this is it, otherwise feel free to install a library.
Watch it in action! See the Code Sandbox
Original Link: https://dev.to/wolfmath/drag-and-drop-with-react-519m
Dev To
More About this Source Visit Dev To