
An Interest In:
Web News this Week
- April 28, 2024
- April 27, 2024
- April 26, 2024
- April 25, 2024
- April 24, 2024
- April 23, 2024
- April 22, 2024
Some of Our Sources
- Slashdot
- Technology Review
- Team Treehouse
- Spoon Graphics
- Web Designer Depot
- Crazy Leaf Design
- Specky Boy
- CSS Tricks
- Freelance Switch
- Daily Now
Help Webnuz
Referal links:
How to Draw Animals: Cats and Their Anatomy


Cats rule the Internet! No doubt one day they'll take complete control over our lives. To prepare for this day, we need to know the enemy. By drawing a cat, you'll understand what they really are made of. So grab a pencil, and I'll show you what cats are made of!
This cat drawing tutorial will show you how to draw a cat step by step. Also, this realistic cat drawing tutorial can serve as inspiration if you're looking for cat logo designs for your brand or business.


From black cat logos to cool gaming cat logos, Placeit is the place to go if you need a cat logo in minutes. The Placeit logo maker helps you make a cat logo design without leaving your browser.
Scroll down after this tutorial to find a selection of top cat logo ideas from the Placeit logo maker!
What You'll Learn in this Realistic Cat Drawing Tutorial
- How to draw a cat's skeletal structure
- How to draw a cat's muscle structure
- How to draw a cat's paws
- How to draw a cat's face proportions
- How to draw a cat's eye
- How to draw a cat's nose
- How to draw a cat's ears
- How to draw a cat's whiskers
- How to draw a cat's fur
If you want some references to work from, you can find plenty of cat photos over on Envato Market. Just make sure that you don't get too distracted by all that cuteness, and remember to come back and finish the tutorial!
1. How to Draw a Cat's Skeleton Structure
Step 1
Let's start this cat anatomy drawing tutorial with the base. Learning the skeletal structure is the first step to creating a believable pose. The bones are a support for the muscles, and the joints between them define the range of motion.

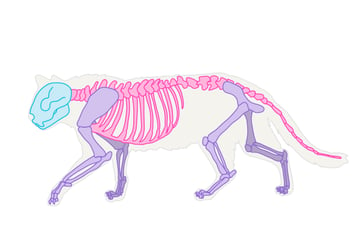
Step 2
Luckily, you don't need to remember the exact shape of the bones. You just need to know how long they are and how they're connected to each other. The good news is, most four-legged animals have the same bone structure, with the bones' length and the distance between them being the only differences. Learn it once, and you're set forever!
You should remember your skeleton as a group of ovals (joints, skull, chest, hips) and lines (bones, backbone). Once you've remembered this structure, you can easily draw every pose. Drawing cat poses will be easier.


Step 3
There's one more thing you need to remember: every joint has a specified range of motion. When you break their limits, your animal will look broken. To understand it, take a good look at this running animation. While running, a cat uses a full range of motion, so you can see which movements are natural.


What you should observe in the cat's anatomy and movement:
- The jump is starting; the hind legs push the ground back.
- As the hind legs recede, the forelegs go forward.
- When the legs push the ground, the part of the body they're attached to stays on the default level. The other one can go up.
- Notice that the hind legs' bones never make a straight line, even when fully expanded.
- It's flying! No leg on the ground, body fully expanded.
- The forelegs are preparing to land as far as possible.
- The forelegs are fully expanded now, and again, no straight line.
- Again, see the difference in levels.
- Landing done; the hind legs will now try to land at the same point.
- Pay attention to this point; it can't move without dragging the whole chest with it.
- The tail's root direction is based on the hip's pose.
- When all the paws are on the ground, the front and rear stay at the same level.


If you want to take a better look at the running cycle, here's a great reference: a video of a cheetah in slow motion.
Step 4
Let's talk about some cat pose drawing tips. You may say, "I don't need it, I can feel the proper pose". Well, maybe, but there are a few mistakes a lot of people make from simple ignorance.
This is a very popular interpretation of an animal's skeleton. It comes from confusing the hind and forelegs. They are not the same! Just compare your hands and feet.


Well, this pose isn't universally wrong—it'll work quite well in cartoons, where the characters use their legs as propellers. In the real world, though, the hind legs reach at most 120 degrees rotation (even with cheetahs). Also, the cat will try to keep its head in the same position while running—unless it's some mad zombie-cat (check the animation again for the proof).


Wow, that's an interesting skeleton! It comes from adapting the bones purely to the cat's thigh shape. The problem is it's not only bones that make the thigh shape—it's mostly muscles, and you can't ignore that. Also, the first pose has a crouching foreleg and a sitting hind leg. Small cats eat in this pose, but their chest isn't on the ground then.


Another problem comes from a weird habit of cats. They use a "pacing" gait when walking—they move two legs from one side first, and then two legs from the other side. This mistake will not be noticed by most people, but hey, it's still a mistake! Luckily, cats change to a "diagonal" gait when speeding up.


Step 5
Once you've learned everything about building a pose, sketch your own cat pose drawings.


2. How to Draw a Cat's Muscle Structure
Step 1
Muscles give shape to the cat's anatomy. You can draw a body without knowing the muscle structure, but guessing is not the best way to go about it. You may think it's too complicated to learn, but I can show you that it's not that hard.
First, cover your pose with simplified muscle masses. Yes, it's that easy! If your cat is going to be very furry, it's actually all you need. The muscles won't show anyway.

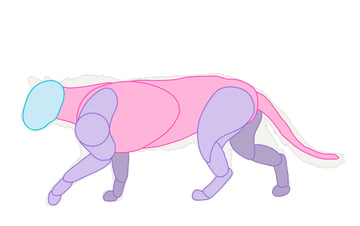
Step 2
That's my cat covered with basic muscle masses.


Step 3
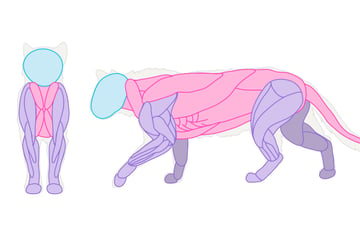
To keep the cat proportions, those of us who prefer short- or medium-haired cats need to learn some more. Still, it can be simplified too. These are big masses that can be visible under the skin. If you want to learn it painlessly, just use this reference to start. After a few exercises, this structure will sink in itself.

Step 4
Now my cat has muscles too!


Step 5
There's one more thing. Cats have quite loose skin; in some areas it's not used to cover the muscles. If you have a cat, try to touch the area between the thigh and the calf—you'll feel only skin and fur! Thanks to this additional skin, you can't see the thigh or calf when a cat is sitting.


Step 6
Draw the additional skin too to complete the body shape.


3. How to Draw a Cat's Paws
Step 1
Let's talk about cat paw anatomy. A cat's hind and forepaws are different, just like your hands and feet. You can use them to imagine a paw structure. Cats walk on their fingertips, using just a part of the "palm" for support. They also have a little thumb (dewclaw) and a small appendix on the wrist (pisiform), but only on the forepaws. The hind paws are actually very similar to our feet.


Step 2
Cat paw anatomy is totally unique in the animal world. Their claws are retractable, but this doesn't really work like most of us imagine. A claw is attached to the last bone of a finger. Surprisingly, this part is placed next to the previous bone, not on the end of it. Only when it's retracted does it come close to the end.
What does that mean for us? The claws, including the little bones they're attached to, are placed at the outer side of every finger. It means they're not symmetrical. If the illustration below confuses you, check out photos of sphinx cats—as they have "no fur", the claws are more visible.
From viewing these, you can easily see why declawing is a controversial issue.


Step 3
Here we have the left and right forepaw, both with claws retracted. Try to do the same position with your hand to learn where the forearm ends and where the paw starts.


Step 4
Let's learn how to draw the cat paw anatomy.
- For the front view: draw four lines ending in a "stone" shape.
- For the side view: draw four lines starting in an oval, and then draw a step at the end of each. The steps in the middle should be slanting.


Step 5
- For the front view: draw four "eggs" at the ends of the lines, within the stone shape.
- For the side view: draw four "eggs" to cover the last angle. Connect the eggs with the first parts of the lines.


Step 6
You may need to add the pisiform (outer view) or the dewclaw (inner view), if you're drawing the forepaws.


Step 7
Now cover the whole shape with fur. The claws have their special, thin coat, covering them only on the top and sides.


Step 8
OK, those were fluffy, soft paws. What about paws à la Angry Kitty? They're easy too once you know the anatomy.


Step 9
Now my cat has complete paws.


4. How to Draw a Cat's Face Proportions
Next up, the cat face drawing. Cat facial proportions differ among breeds, but there are some rules you can use for a "typical" cat.
Step 1
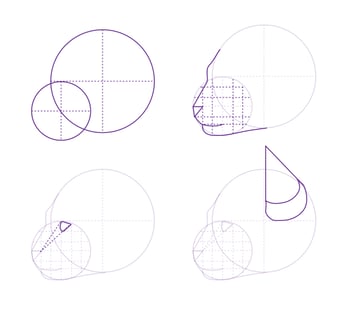
Draw two circles, one big and one smaller. This is the rough shape of the head and muzzle.


Step 2
Divide the smaller circle into six roughly equal parts.


Step 3
Divide the middle line into six equal parts. It will help us find the right place for the nose and mouth.


Step 4
Put a simple triangle between the lines, as shown below. You can also start the mouth.


Step 5
Draw the rest of the muzzle using the lines as landmarks.


Step 6
Now we're going to set a place for the eyes. Add four guides using the lines we've already established.


Step 7
You can now easily add the eyes.


Step 8
When you want to draw a kitten, you need to change the proportions a bit to get bigger, round eyes.


Step 9
To complete the head shape in this cat face drawing, add ears and structures for the cheeks.


Step 10
Drawing a head in profile isn't really hard once you know how to place the guide lines.

Step 11
So now we know how to draw the head of a cat, but it's still just the base for a real drawing. In the next steps, we'll take care of every single element of a cat's face.


5. How to Draw a Cat's Eye
Step 1
Next up, a little cat eye drawing tutorial. If you followed my previous tips, you should have an oval/circle as an eye base.


Step 2
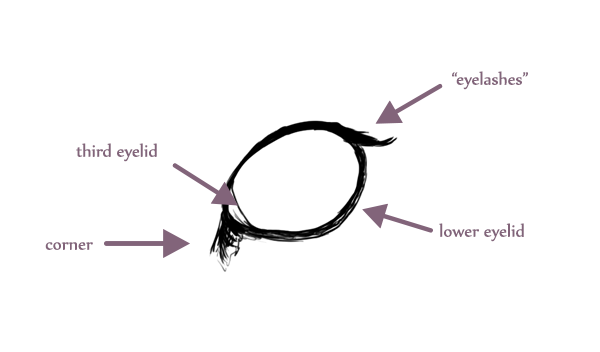
We can see three elements around the cat eye drawing: the edge of the lower eyelid, a row of upper eyelashes, and a dark area in the inner corner. Part of the third eyelid can be shown too.

Step 3
Add a pupil:
- Small cats have slit pupils; they're round only in weak light.
- Big cats have rounded pupils; in strong light they only get smaller, not narrower.
The size of the pupils can be important for a picture's authenticity. If you draw a cat with big, round pupils, and it's on a sunny beach (or in front of a fire), it will look unnatural.


Step 4
Add dark "veins" around the pupils and lighter ones everywhere else, branching off radially from the center of the eye.


Step 5
It's not only the eyeball that makes the eye. If you were drawing a human face, you'd add eyelids, eyelashes, and probably eyebrows too, to make it more complete. For a cat eye, we can add lighter areas around it, and also a dark, narrow ellipse over the eye—it's the place where a few whiskers come out from.


Step 6
When the eye is closed, it becomes a dark line. Both the light areas around it get closer too.


Step 7
The side view may be a little tricky. From this view, a transparent dome of the lens is visible, and the rest of the eye seems flat (try looking at photos of cats to see this).


Step 8
Once you know how the eyes should look, you can add them to the face.


6. How to Draw a Cat's Nose
Step 1
Start with a long diamond. Its bottom is usually darker.


Step 2
Add two "wings" for the nostrils.


Step 3
Draw the holes. They're not similar to human inner nostrils, so be careful here.


Step 4
Add the nose bridge. It should be round on top. Also, the sides of this bridge will be slightly darker, and the fur will be a lot shorter.


Step 5
Our kitty has now got its cute nose!


7. How to Draw a Cat's Ears
Step 1
Cat ears are not really as simple as we would think. They're not just triangles or even cones—they're a complicated structure that you will need to learn in order to make your drawings more realistic.


Step 2
To draw an ear from the front, start with a circle. Then divide it into four parts, drawing the lines at a small angle.


Step 3
Use the guides to draw the outlines of the ear.


Step 4
Cats have a weird fold on the outer side of their ears, called a "tragus". It's quite hard to draw from the front, but it's necessary—draw it and people will think you're a cat expert!


Step 5
Now you can add hair tufts. Their amount will depend on the breed, but generally it's best to attach them to the inner side and leave the outer part bare.


Step 6
But hey, there's more! Cats can rotate their ears, so what about other "poses"? You can use the same method for them. Just keep in mind that ears are bigger than what we usually see. You can cover this bottom part with soft fur. If you compare the ears of long hair and "no hair" cats, you'll see what a difference fur makes in terms of how large the ears appear.


Step 7
Our cat can now hear!


8. How to Draw a Cat's Whiskers
Step 1
Whiskers are a cat's additional sense. They have them on their mouths, above the eyes, under the chin, and behind the paws. Whiskers grow out of little, dark "holes" in the fur. We've already drawn the "whisker spots" above the eyes, so now add some little ones on the muzzle.


Step 2
Generally, cats have 12 whiskers on every side, but you don't need to stick to this number. Having 13 on the left and 15 on the right is OK too! Just keep them very thin and light. They also should be longer than half of the head.


9. How to Draw a Cat's Fur
Step 1
The amount of fur determines the shape of the head. A cat head without fur is triangular. Then, when some short fur is added, its shape softens. Add longer fur and the head will become round (also, kittens look cuter and younger with round heads). When you add extremely long fur, the head becomes a trapezoid.


Step 2
Also, the shape of the body depends on the length of fur. Short or flat-laying fur will accent the slim body of a cat, while long, thick fur will make the silhouette bigger. Always start with a slim body when you're drawing a cat, and add the fur later, changing the silhouette to your needs.


Purrfect Job, Well Done!
Great work! You know everything about cat proportions, their skeleton and muscles, and all the rules that make cats cats! Now you know the enemy, you can create your own cat drawings.
5 Top Cat Logo Designs From Placeit Logo Maker
You know how to draw a cat step by step and everything about the cat anatomy drawing process. Now, if you need cat logo ideas, we've got you covered too.
You don't need design software to create professional cat logos. You can make incredible cat logo designs from your browser, using the Placeit logo maker.
Just create an account, choose the cat logo you like the most, customize it in minutes, and download it. That's it. Here's a selection of cat logo ideas to get you inspired:
1. Abstract Black Cat Logo


Do you love black cats? Then you'll love this sophisticated black cat logo with an abstract and elegant aesthetic. This multipurpose cat logo design can work for any type of business or brand. Easily customize this black cat logo in the Placeit logo maker.
2. Cool Cat Logo Design for Clothing Stores


If you're launching a clothing line and want a memorable logo, consider this cool cat logo design. This cat logo template features a hand-drawn cat wearing glasses. Customize the details and text to achieve a unique result.
3. Cute Cat Logo for Streetwear


Who doesn't love cute cat logo designs? This might be one of the cutest cat logos you can find. This example is for an urban clothing line, but you can adapt it to any business. And the best part? You can customize it and download it in just a few minutes.
4. Stray Cats Logo Template


Looking for more cat logo design inspiration? What about this cute scratching cat logo? Use this stray cat logo for clothing, pet stores, pet accessories, and more.
5. Cat Logo for Gaming Teams


Cat logo designs are also very popular for gaming and eSports teams. This cool cat logo could be your next team logo. Customize the colors and text in minutes using the Placeit logo maker.
Find More Cat Drawing and Cat Logo Inspiration
I hope you enjoyed this realistic cat drawing tutorial. Now it's your time to practice a cat face drawing, a cat eye drawing, and cat proportions. But if you're looking for even more cool drawing tutorials, along with more logo inspiration, check out these resources before you leave:

 DrawingHow to Draw Animals: Dogs and Wolves, and Their Anatomy
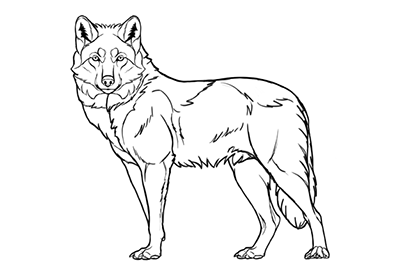
 DrawingHow to Draw a Wolf Step by Step
 ComicsCartoon Fundamentals: How to Draw a Cartoon Face Correctly
 Drawing100 Easy Drawing Tutorials for Beginners and Beyond!
 Logo Design20 Modern Bakery Shop & Cafe Logo Design Ideas for 2022
 Logo Design20+ Cool Clothing & T-Shirt Company Brand Logo Designs for 2021
 Logo Design19 Cool Sports Team Logo Designs (+Make Your Own Online Now)
- PlaceitHow to Design a Monogram Logo (Using a Monogram Maker)


Editorial Note: This post has been updated with contributions from Maria Villanueva. Maria is the Associate Editor of the Tuts+ Design channel.
Original Link: https://design.tutsplus.com/articles/how-to-draw-animals-cats-and-their-anatomy--vector-17417
TutsPlus - Design
More About this Source Visit TutsPlus - Design