
An Interest In:
Web News this Week
- April 29, 2024
- April 28, 2024
- April 27, 2024
- April 26, 2024
- April 25, 2024
- April 24, 2024
- April 23, 2024
Some of Our Sources
- Techcrunch
- Technology Review
- Simplebits
- TutsPlus - Design
- Vandelay Design
- Web Designer Depot
- Line 25
- Wal You
- Codrops
- Hashedout
Help Webnuz
Referal links:
How to Use Calendly for Better Team & Group Scheduling in 2021
Collaboration is key. With more teams working remotely than ever before, the need to connect for meetings is a must. Your team might be distributed across the globe, so you need the help of a tool like Calendly group scheduling that makes it easy to meet.


Calendly team scheduling is the easiest way to bring your group together. In this tutorial, you're going to learn all about Calendly group scheduling and why it's the best way to set up team meetings.
Use Calendly to Improve Team & Group Scheduling (QuickStart Video)
Do you need to do a better job with scheduling team or other group meetings? Calendly can help. Here's a short video to get you started quickly:
For a more in-depth look at Calendly team and group scheduling, study the rest of the tutorial. You'll discover:
- why you should use team scheduling
- how to use Calendly scheduling for teams
Why You Should Use Calendly Team Scheduling
You might already be using a tool like Outlook or Google Calendar to set up meetings. If you're comfortable with one of these options, why should you shift to Calendly Team Scheduling?
Those other tools aren't the most intuitive way to set up appointments. There's simply too much back-and-forth via email to find the proper times for every attendee. It's all about simplifying scheduling so that you can get back to doing the work that matters.
Here are three reasons that Calendly makes team scheduling easier and more powerful:
Automatically assign meetings based on availability. This feature is fantastic if your team works in shifts. Based on working hours and available time slots, Calendly automatically schedules meetings.
Monitor availability. With every team member added to your Calendly team, it's easy to visualize the overlapping work hours and ensure every time is covered.
Shift the scheduling to the invitee. It's simply easier to ask the invitee to select the ideal meeting time. Calendly scheduling lets your team set their availability, then shifts the scheduling to your invitee to find a time that works for all.
In this tutorial, we're going to bring our team together, set the available hours for work, then create a URL for easy-to-schedule meetings.
How to Use Calendly Scheduling For Teams and Groups
Now that you've seen the power of Calendly team scheduling, let's walk through an example of setting it up. We'll create an easy-to-book meeting between our team and a invitee.
Let's get started:
1. Sign Up For Calendly
If you aren't already using Calendly scheduling, you'll need to sign up with an account.


Calendly offers a free plan that's got plenty of power. To take advantage of team and group scheduling, you'll need to jump to the appropriate multi-user plans, but here's the good news: you can follow this tutorial thanks to the free trial. For 14 days, try out all the advanced features like Calendly team scheduling.
Calendly makes it easy to sign up. Sign in with your Google Account, or create an account tied to your email address.
2. Add Calendly Users
Now, it's time to share with your team that you're using Calendly team scheduling. Make sure that everyone on your team has also signed up for a Calendly account. Remember that you'll need everyone to either be on the first 14 day free trial or sign up for a multi-user Calendly plan.
Once you log in to Calendly, navigate to the Account > Admin Management page. You'll see a list of all connected users, which should currently show as blank. Then, click on the + New User button.


At this point, it helps to have a list of your teammates' email address. Specifically, ensure that this list is one that includes the email address each user signs into Calendly with. On the Invite Users page, paste in that list with each email address on one line. Then, click Next.


Now, it's time to select the event types. These are the styles of meetings that are included by default for each user you add to your Calendly team. You can always change these later, so feel free to click Finish to finalize adding your users if you're still thinking about what types of events you need.


Now, you've added other users to your Calendly workspace. That makes them eligible to be added to a team you set up. Read on to start building your Calendly team.
2. Set User Availability
Now, it's time to ask your team members to set their availability. It's important that every user accurately dials in their availability so that Calendly group scheduling works smoothly.
This change takes place in each individual user's account. Click on Availability at the top of Calendly to jump to setting individual user availability.
On the Availability page, take these three steps to ensure that Calendly can handle the magic of team scheduling:
Set the time zone. Navigating multiple time zones is one of the best reasons to use Calendly team scheduling. Set this first and all settings will follow.
Tick available days. Maybe your team members want to earmark specific days for meeting days versus focused work days. Ensure that any day you're available is enabled with the adjacent checkboxes.
Set your times. Key in available meeting times for each day of the week that was enabled. This shows a potential invitee what times are free. These times are each in local time having already set the time zone in a previous step.


Availability is an important input to highlight the power of Calendly group scheduling. With every user's availability added, Calendly helps to find the commonly available times so that meetings are scheduled seamlessly.
3. Create a Calendly Team
We've connected to other users, and now it's time to create our Calendly team. On your Calendly home page, click on the Create > New Team option.

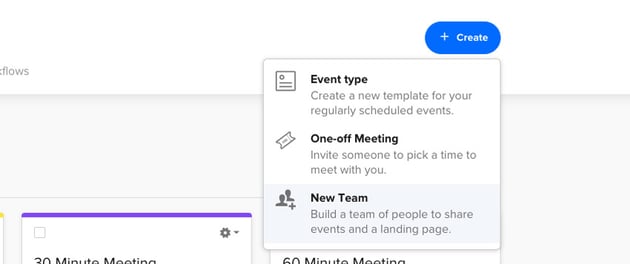

Now, we're ready to add some details. It helps to think about how users reach your Calendly team scheduling page. The great thing about Calendly team scheduling is that it'll give you a URL for a landing page so that the invitee can set up their own meeting.
For our walkthrough example, let's say that we're going to use this team scheduling page to help a user set up an interview. Then, depending on our settings, we can auto-assign an interviewer. Make sure to fill in a Team Name and Welcome Message and leave the team page URL setup for Calendly to auto-assign.


Now, let's add members to the team. Remember the users we added in the prior step? Type them in the Team Members box and click on the associated name to add them to the team. You don't have to add all your users to each team; instead, use a team for a specific purpose (like interviewing, marketing, or payroll questions for example.)


For this example, I'll add two users to my team. Make sure to set your default time zone as well, and you're ready to move to the next step.
4. Choose a Meeting Type
Now, you've set up your team and it's time to add a meeting type. This step requires a bit of consideration, so let's start by looking at the options in the screenshot below.


There are many types of meetings you may wish to host, and Calendly accommodates each of them. Let's review the three options for Calendly team scheduling:
Round Robin. This helps connect a invitee to an available team member. This is a great option for Calendly scheduling if your team works across many time zones and can each cover a part of the need to meet.
Collective. Need all your team to join a meeting? You'll want to choose a Collective to help you schedule a meeting that works for all invitees.
Group. This is best for multiple invitee meetings, like a webinar or course. Basically, it allows many different invitees (invitees) to reserve a time in a meeting that likely has a pre-set time.
For our example, let's continue with a Collective type meeting. Remember that for our example, we're setting up an interview meeting, and we'll make it a group interview.
5. Set Up The Event Type Description
Now, it's time to set the details for how our Collective meeting will work. We need to set these details so that scheduling goes smoothly, and appointments are available at the intended times.


Start by setting the Event Name. Keep in mind that your invitee sees this when they book an appointment. Also, make sure to add a short description in case they receive the link to the page without context. Use this space to describe the purpose of the appointment.
6. Set Team Members & Location
On the next section, titled Team Members & Location, we've got two key settings to configure for each meeting type.
First, set the Location. This is the type of meeting you'll host, such as a phone call or Zoom meeting.


Also, make sure to set the team members you should include. If you're working with a large team, it's possible that you don't need everyone available for each meeting. For the given collective meeting, we'll leave every name ticked.
7. Change Date and Time Range
Let's change the date and time range to control when our invitees can book a meeting. First, set a scheduled range. This is how far in advance (or within a range) invitees can choose dates for the meeting. It's a good idea to control this to ensure meetings aren't too far in the future.
Also, set the Duration for the default meeting length.


Now, we need to set the available hours for our meetings. Since this is a Collective type meeting, let's set the meetings to the default. This means that our meeting will be available when everyone is online so that the entire group can meet.


Also, it's ideal to add time before or after the meeting in the lower-left corner of this section. Adding the buffer time ensures that you don't book too many sequential meetings. It gives your team time to recharge and coordinate shortly before the meeting.
8. Publish and Share
We're nearly finished setting up the meeting. Let's make sure to toggle the box that reads Your event type is to On so that the team meeting is ready for use.


Click on the view live page button to jump to the finished meeting invite page. This page is now live, and you can share it with an invitee. They'll choose an available time to create a meeting, then you'll receive a notification.


That's it! You've created a ready-to-share meeting link that's ready to send and share. You're ready to host meetings with your invitee with less work needed to schedule.
Start Using Calendly Group Scheduling Today
You've seen that Calendly group scheduling is the best way to work together as a team. With less work involved to create meetings, you can focus on the discussion itself. A team meeting brings everyone together for easier collaboration.
If you aren't already using Calendly scheduling, start today at no cost using the Basic (free) plan. It's the best way to see just how easy it is to schedule team meetings.
Original Link: https://business.tutsplus.com/tutorials/calendly-team-group-scheduling--cms-36848
Freelance Switch
More About this Source Visit Freelance Switch