
An Interest In:
Web News this Week
- April 26, 2024
- April 25, 2024
- April 24, 2024
- April 23, 2024
- April 22, 2024
- April 21, 2024
- April 20, 2024
Some of Our Sources
- BoingBoing
- Pearsonified
- Six Revisions
- TutsPlus - Design
- Noupe
- Web Design Ledger
- CSS Tricks
- Spyre Studios
- Design Modo
- Android Dissected
Help Webnuz
Referal links:
How to mint an NFT via CLI
Introduction
In this article we will create a script with NodeJS to create an NFT via CLI, passing in its private address and a URL containing the NFT metadata.
To do this tutorial, I recommend looking at our series to understand the previous steps and see how we got here
How to create a Smart Contract to mint an NFT
How to deploy a Smart Contract to Rinkeby Testnet using Infura and Hardhat
Boilerplate
To be faster, I will provide a boilerplate containing the babel, typescript, file structure, packages, scripts, environment variables...
Click here to go to the GitHub with boilerplate
Our boilerplate contains the following packages to run the script:

Taking the Provider
Our application provider will help us interact with our contract by defining the network we want to access as mainnet or testnet.
Note: To get the provider we are going to use Infura, you can see my previous article on how to use Infura: How to deploy a Smart Contract to Rinkeby Testnet using Infura and Hardhat
Going into the getProvider file in the src/getProvider.ts directory we will take the code below and edit it to get our provider.
getProvider.ts
import { ethers } from "ethers"; //Library to connect to the ethereumimport dotenv from 'dotenv' // Library to get the enviroment variablesdotenv.config() // starting the dotenvexport const getProvider = () => {}; // function to get providerNow we are going to edit our file and leave it the same as below(I will explain in the code what each line does).
getProvider.ts
import { ethers } from "ethers";import dotenv from 'dotenv'dotenv.config()export const getProvider = () => { const infuraProvider = new ethers.providers.InfuraProvider( process.env.NETWORK, // Our enviroment variable with network (rinkeby, mainnet, ropsten) process.env.PROJECT_ID // Our environment variable with the id of our project in infura ); // Function in ethers to connect to Infura return infuraProvider; // returning the provider};Ready, we finished our first function!
Contract Addresses
In the contractAddresses.ts file in src/contractAddresses.ts we have an export of the environment variable which is the address of the contract we deployed in the previous article.
contractAddresses.ts
import dotenv from 'dotenv'dotenv.config()export const FactoryNFTAddress = process.env.CONTRACT_ADDRESS;Creating the Mint Script
Now finally let's create our script to mint an NFT using only 1 command.
We have some basic settings to run our script:
In the mintNFT.ts file in src/mintNFT.ts we have some basic settings to run our script, let's complete by adding the desired functions.
mintNFT.ts
import { ethers } from "ethers";const run = async () => {};(async () => { try { await run(); } catch (err) { // eslint-disable-next-line console.log("err: ", err); process.exit(1); } process.exit(0);})();Getting the args
Let's start by getting the two arguments that are privateKey and tokenURI and validating if at least 2 arguments were sent.
mintNFT.ts
import { ethers } from "ethers";const run = async () => { const [, , ...unsanitizedArgs] = process.argv; // getting the args if (unsanitizedArgs.length !== 2) { // eslint-disable-next-line console.log("yarn es ./src/mintNft <privatekey> <tokenuri>"); return; } // validating whether the 2 arguments were sent const [privateKey, tokenUri] = unsanitizedArgs; // destructuring to get the arguments};(async () => { try { await run(); } catch (err) { // eslint-disable-next-line console.log("err: ", err); process.exit(1); } process.exit(0);})();Getting the Provider
After we get the arguments we need to know which address is being used to mint the NFT and sign the contract.
mintNFT.ts
import { ethers } from "ethers";const run = async () => { const [, , ...unsanitizedArgs] = process.argv; // getting the args if (unsanitizedArgs.length !== 2) { // eslint-disable-next-line console.log("yarn es ./src/mintNft <privatekey> <tokenuri>"); return; } // validating whether the 2 arguments were sent const [privateKey, tokenUri] = unsanitizedArgs; // destructuring to get the arguments};(async () => { try { await run(); } catch (err) { // eslint-disable-next-line console.log("err: ", err); process.exit(1); } process.exit(0);})();Connecting with the wallet and the contract
First, we need to import some things which are the ABI of our contract that we got after compiling it, the address of our contract, and our getProvider
mintNFT.ts
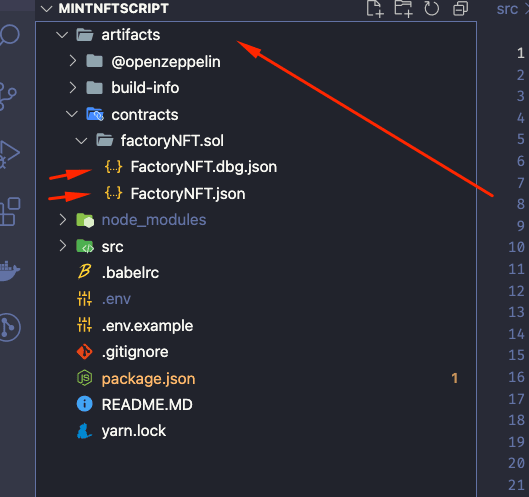
import { ethers } from "ethers";import { getProvider } from "./getProvider";import FactoryNFT from "../artifacts/contracts/factoryNFT.sol/FactoryNFT.json";import { FactoryNFTAddress } from "./contractAddresses";const run = async () => { const [, , ...unsanitizedArgs] = process.argv; // getting the args if (unsanitizedArgs.length !== 2) { // eslint-disable-next-line console.log("yarn es ./src/mintNft <privatekey> <tokenuri>"); return; } // validating whether the 2 arguments were sent const [privateKey, tokenUri] = unsanitizedArgs; // destructuring to get the arguments};(async () => { try { await run(); } catch (err) { // eslint-disable-next-line console.log("err: ", err); process.exit(1); } process.exit(0);})();You can get your ABI contract after compiling your contract, just dragging the artifacts folder to the root folder.
Now we need to pass the wallet that we are using for our transaction to our contract, for that we will use ethers on both occasions.
mintNFT.ts
import { ethers } from "ethers";const run = async () => { const [, , ...unsanitizedArgs] = process.argv; // getting the args if (unsanitizedArgs.length !== 2) { // eslint-disable-next-line console.log("yarn es ./src/mintNft <privatekey> <tokenuri>"); return; } // validating whether the 2 arguments were sent const [privateKey, tokenUri] = unsanitizedArgs; // destructuring to get the arguments const wallet = new ethers.Wallet(privateKey, provider); // getting your wallet const factoryNFTContract = new ethers.Contract( FactoryNFTAddress, // your contract address FactoryNFT.abi, // your contract ABI wallet // your wallet ); // getting the contract};(async () => { try { await run(); } catch (err) { // eslint-disable-next-line console.log("err: ", err); process.exit(1); } process.exit(0);})();Making the transaction
And now the last step is to use our contract to make our transaction.
mintNFT.ts
import { ethers } from "ethers";const run = async () => { const [, , ...unsanitizedArgs] = process.argv; // getting the args if (unsanitizedArgs.length !== 2) { // eslint-disable-next-line console.log("yarn es ./src/mintNft <privatekey> <tokenuri>"); return; } // validating whether the 2 arguments were sent const [privateKey, tokenUri] = unsanitizedArgs; // destructuring to get the arguments const wallet = new ethers.Wallet(privateKey, provider); // getting your wallet const factoryNFTContract = new ethers.Contract( FactoryNFTAddress, // your contract address FactoryNFT.abi, // your contract ABI wallet // your wallet ); // getting the contract}; console.log("minting"); const transaction = await factoryNFTContract.createToken(tokenUri); // interacting with the contract const tx = await transaction.wait(); // waiting the minting of the block const event = tx.events[0]; const value = event.args[2]; const tokenId = value.toNumber(); // getting the created tokenId console.log({ transaction, tx, tokenId, }); // returns(async () => { try { await run(); } catch (err) { // eslint-disable-next-line console.log("err: ", err); process.exit(1); } process.exit(0);})();Now you can run the command below and see the result in the console.
yarn es ./src/mintNft <privatekey> <tokenuri>Result: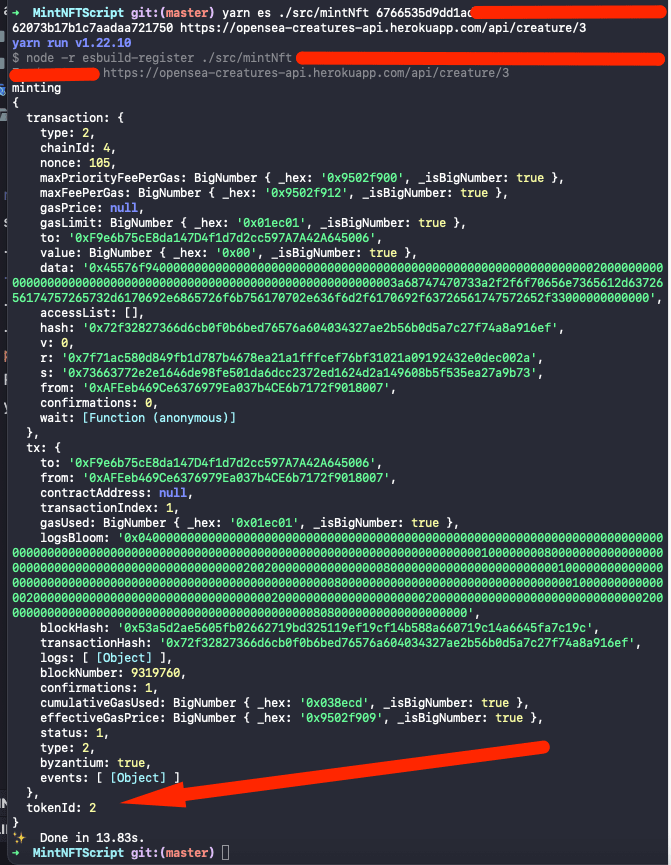
The script is done, now you can get your tokenID and consult the contract that will return your metadata.
thanks Sibelius for helping with the script.
Now you can Follow me on Twitter
Project Repository(Complete): https://github.com/EmanuelCampos/mint-nft-script/tree/master
Project Repository(Blank Template): https://github.com/EmanuelCampos/mint-nft-script/tree/boilerplate
Original Link: https://dev.to/emanuelferreira/how-to-mint-an-nft-via-cli-25ea
Dev To
More About this Source Visit Dev To