
An Interest In:
Web News this Week
- April 26, 2024
- April 25, 2024
- April 24, 2024
- April 23, 2024
- April 22, 2024
- April 21, 2024
- April 20, 2024
Some of Our Sources
- BoingBoing
- Engadget
- Spoon Graphics
- Smashing Apps
- Six Revisions
- TutsPlus - Design
- Fuel Your Creativity
- FanExtra - PSD
- Specky Boy
- TechPowerUp
Help Webnuz
Referal links:
Learning Python- Intermediate course: Day 25, Buttons, Entry and Textboxes
Today we will cover three widgets, namely button, entry and textbox.
The plain old button
We have covered check buttons, radio buttons and label in the previous parts. But now we will see how to make a simple clickable button.
The button widget can be created as shown button=tk.Button(form,text="Press Me",command=cmd)
'cmd' is the command to be executed once the button is pressed. The example below will make things clearer.
Making a blank button
import tkinter as tkform=tk.Tk()form.title("Example of Entry widget")form.geometry('400x200')button=tk.Button(form,text="Press Me")button.pack()form.mainloop()show()

On pressing the button, nothing happens. It is just a blank button. But now we will add a counter to count the number of times the button is pressed.
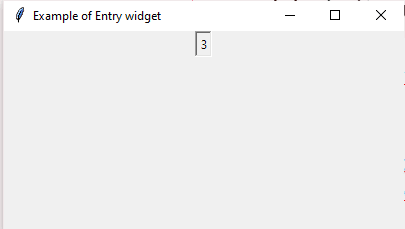
Adding counter to the button.
import tkinter as tkform=tk.Tk()form.title("Example of Entry widget")form.geometry('400x200')a=tk.IntVar()def count(): a.set(a.get()+1) button.config(text=str(a.get()))#don't forget the str()button=tk.Button(form,text="Press Me",command=count)button.pack()form.mainloop()show()On pressing the button, the text of the button changes in accordance to the number of times the button is pressed. This is achieved by using the IntVar() variable.

The Entry widget.
The entry widget is a single line textbox. The users can give in a single line input via this widget.entry = tk.Entry(parent)
We can also add other parameters to the entry widget like color, etc. Here is an example below which demonstrates a blank entry widget.
Blank entry widget.
import tkinter as tkform=tk.Tk()form.title("Example of Entry widget")form.geometry('400x200')TB1=tk.Entry(form,width = 20)TB1.pack()form.mainloop()show()
Getting value from the entry.
The value of the text can be obtained using the get() function. The below example will make things very clear.
import tkinter as tkform=tk.Tk()form.title("Example of Entry widget")form.geometry('400x200')TB1=tk.Entry(form,width = 20)TB1.pack()def show(): button.config(text=TB1.get())'''The TB1.get() method returns the string value of the text inputted into the entry widget. By using the config() method of the button, we can set the text of the button.'''button=tk.Button(form,text="", command=show)button.pack()form.mainloop()show()To process the input data, we will need the help of other widgets. Button for example. In the above example, when the button is pressed, the button text changes according to the value of the entry.


Textbox.
Textboxes are just the same as entry widgets, the only difference is that we can add multiple lines to it. Just replace 'Entry' by 'Text' and you are done!
Blank textbox.
import tkinter as tkform=tk.Tk()form.title("Example of textbox widget")form.geometry('400x200')TB1=tk.Text(form,width = 20)TB1.pack()form.mainloop()show()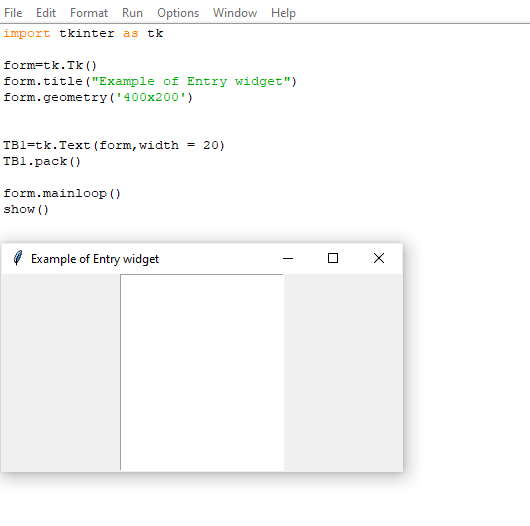
Setting the text-space
Using the height and width attributes, we can set the number of input characters in each line.
import tkinter as tkform=tk.Tk()form.title("Example of textbox widget")form.geometry('400x200')TB1=tk.Text(form,width = 5,height = 5)TB1.pack()form.mainloop()show()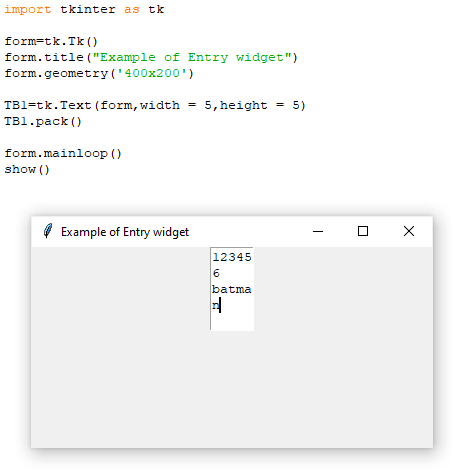
Getting input from the textbox.
We can get the input in the same manner. We need to specify two parameters to the get method. The start and the end parameter. text=TB1.get(1.0, "end-1c") will give the entire result.
import tkinter as tkform=tk.Tk()form.title("Example of Entry widget")form.geometry('400x200')TB1=tk.Text(form,width = 7,height=5)TB1.pack()def show(): button.config(text=TB1.get(1.0, "end-1c"))'''get(start, [end])where,start is starting index of required text in TextBox,end is ending index of required text in TextBox'''button=tk.Button(form,text="", command=show)button.pack()form.mainloop()show()
So friends, that was all for today. Tomorrow, we will do a password management program! So stay tuned in this course!. Follow me on GitHub for updates.
Original Link: https://dev.to/aatmaj/learning-python-intermediate-course-day-25-buttons-entry-and-textboxes-2d0n
Dev To
More About this Source Visit Dev To