
An Interest In:
Web News this Week
- April 26, 2024
- April 25, 2024
- April 24, 2024
- April 23, 2024
- April 22, 2024
- April 21, 2024
- April 20, 2024
Some of Our Sources
- Engadget
- Technology Review
- TutsPlus - Code
- Abduzeedo
- Vandelay Design
- Inspiredology
- Stylized Web
- Design Modo
- Codrops
- Hashedout
Help Webnuz
Referal links:
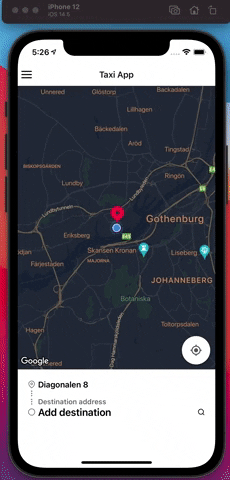
React Native Taxi App: Booking Information. Places API
Let's continue working with the Booking process. We're going to use the same UserScreen component for:
- Departure Information
- Booking Information
We already worked on Departure Information on previous parts of this tutorial. For the Booking Information let's start creating a new file for the component inside src/components/BookingInformation.js:
// src/components/BookingInformation.jsimport React from "react"import styled from "styled-components/native"import FeatherIcon from "react-native-vector-icons/Feather"import { formatPlaceName } from "../utils"import { usePlace } from "../context/PlacesManager"const Container = styled.View` flex: 1.5; background-color: #fff; padding-vertical: 20px; padding-horizontal: 20px;`export const Location = styled.View` flex-direction: row; align-items: center;`const LocationPlaceholder = styled.Text` color: #717171; font-size: 14px; margin-left: 5px; font-weight: 600;`;const Text = styled.Text` color: #000; font-size: 16px; font-weight: 600; margin-left: 5px;`export default function BookingInformation() { const { place: { currentPlace }, } = usePlace() return ( <Container> <Location> <FeatherIcon name="map-pin" size={15} color="gray" /> <Text testID="current-place-description"> {formatPlaceName(currentPlace.description)} </Text> </Location> <FeatherIcon name="more-vertical" size={15} color="gray" marginTop={-10} /> <Location> <FeatherIcon name="more-vertical" size={15} color="gray" /> <LocationPlaceholder testID="destination-label"> Destination address </LocationPlaceholder> </Location> </Container> )}We created a couple of Styled components also imported usePlace custom hook from PlacesManager Context Provider to show the selected currentPlace description. The main idea is to show the BookingInformation component from UserScreen when we toggle the Book Now button from the DepartureInformation component.
I'm going to create another custom hook component for show/hide functionality in our App. For that, let's create a new folder, taxiApp/src/hooks/index.js:
// taxiApp/src/hooks/index.jsimport {useState} from 'react';export const useShowState = (initialOpen = false) => { const [isOpen, setIsOpen] = useState(initialOpen); const onToggle = () => { setIsOpen((prevState) => !prevState); }; return [isOpen, onToggle];};Now, let's use useShowState custom hook inside our UserScreen component.
// taxiApp/src/screens/UserScreen.js/** * Sample React Native App * https://github.com/facebook/react-native * * @format * @flow strict-local */import React, {useEffect, useState} from 'react';import {StatusBar, Platform, Image} from 'react-native';import styled from 'styled-components/native';import MapView, {PROVIDER_GOOGLE} from 'react-native-maps';import {check, request, PERMISSIONS, RESULTS} from 'react-native-permissions';import Geolocation from 'react-native-geolocation-service';import {customStyleMap, MenuButtonLeft} from '../styles';import FeatherIcon from 'react-native-vector-icons/Feather';import DepartureInformation from '../components/DepartureInformation';import Geocoder from 'react-native-geocoding';import {usePlace} from '../context/PlacesManager';import {GOOGLE_MAPS_API_KEY} from '../utils/constants';import marker from '../assets/icons-marker.png';// Import BookingInformation and useShowState custom hookimport BookingInformation from '../components/BookingInformation';import {useShowState} from '../hooks';Geocoder.init(GOOGLE_MAPS_API_KEY, {language: 'en'});const Container = styled.SafeAreaView` flex: 1; background-color: #fff;`;const mapContainer = { flex: 7,};const FixedMarker = styled.View` left: 50%; margin-left: -16px; margin-top: -125px; position: absolute; top: 50%;`;const markerStyle = { height: 36, width: 36,};const UserScreen = ({navigation}) => { const [location, setLocation] = useState(null); const {place, dispatchPlace} = usePlace(); // Create a local state using the custom Hook const [showBooking, toggleShowBookingViews] = useShowState(false); const handleLocationPermission = async () => { let permissionCheck = ''; if (Platform.OS === 'ios') { permissionCheck = await check(PERMISSIONS.IOS.LOCATION_WHEN_IN_USE); if (permissionCheck === RESULTS.DENIED) { const permissionRequest = await request( PERMISSIONS.IOS.LOCATION_WHEN_IN_USE, ); permissionRequest === RESULTS.GRANTED ? console.warn('Location permission granted.') : console.warn('Location perrmission denied.'); } } if (Platform.OS === 'android') { permissionCheck = await check(PERMISSIONS.ANDROID.ACCESS_FINE_LOCATION); if (permissionCheck === RESULTS.DENIED) { const permissionRequest = await request( PERMISSIONS.ANDROID.ACCESS_FINE_LOCATION, ); permissionRequest === RESULTS.GRANTED ? console.warn('Location permission granted.') : console.warn('Location perrmission denied.'); } } }; useEffect(() => { handleLocationPermission(); }, []); useEffect(() => { Geolocation.getCurrentPosition( position => { const {latitude, longitude} = position.coords; Geocoder.from({ latitude: latitude, longitude: longitude, }).then(res => { const { formatted_address, place_id, geometry: { location: {lat, lng}, }, } = res.results[0]; setLocation({latitude, longitude}); dispatchPlace({ type: 'SET_CURRENT_PLACE', description: formatted_address, placeId: place_id, latitude: lat, longitude: lng, }); }); }, error => { console.log(error.code, error.message); }, {enableHighAccuracy: true, timeout: 15000, maximumAge: 10000}, ); }, [dispatchPlace]); const onRegionChange = ({latitude, longitude}) => { Geocoder.from({ latitude, longitude, }).then(res => { const { formatted_address, place_id, geometry: { location: {lat, lng}, }, } = res.results[0]; dispatchPlace({ type: 'SET_CURRENT_PLACE', description: formatted_address, placeId: place_id, latitude: lat, longitude: lng, }); }); }; useEffect(() => { navigation.setOptions({ headerLeft: () => ( <MenuButtonLeft onPress={() => navigation.navigate('Menu')} testID="modal-menu"> <FeatherIcon name="menu" size={25} color="#000" /> </MenuButtonLeft> ), }); }, [navigation]); return ( <Container> <StatusBar barStyle="dark-content" /> {location && ( <MapView testID="map" style={mapContainer} provider={PROVIDER_GOOGLE} initialRegion={{ latitude: location.latitude, longitude: location.longitude, latitudeDelta: 0.0922, longitudeDelta: 0.0421, }} onRegionChangeComplete={onRegionChange} showsUserLocation={true} customMapStyle={customStyleMap} paddingAdjustmentBehavior="automatic" showsMyLocationButton={true} showsBuildings={true} maxZoomLevel={17.5} loadingEnabled={true} loadingIndicatorColor="#fcb103" loadingBackgroundColor="#242f3e" /> )} <FixedMarker testID="fixed-marker"> <Image style={markerStyle} source={marker} /> </FixedMarker> {/* Logic to when to show BookingInformation or DepartureInformation */} {showBooking ? ( <BookingInformation /> ) : ( <DepartureInformation toggleShowBookingViews={toggleShowBookingViews} /> )}{/* See that we pass toggleShowBookingViews as prop */} </Container> );};export default UserScreen;As you see, we imported BookingInformation component and useShowState custom hook to UserScreen. The custom hook will create a local state that will handle when we show/hide BookingInformation and DepartureInformation.
We also passed toggleShowBookingViews function as prop to DepartureInformation. The reason is to toggle the Book Now button and update the showBooking state.
Now let's move to DepartureInformation and handle the new prop we just passed.
// taxiApp/src/components/DepartureInformation.js...export default function DepartureInformation({toggleShowBookingViews}) {... return ( <Container platform={Platform.OS}> ... <BookNow> <BookNowButton onPress={toggleShowBookingViews} testID="book-now-button"> <ButtonText>Book now</ButtonText> </BookNowButton> </BookNow> </Container> );}DepartureInformation.propTypes = { toggleShowBookingViews: PropTypes.func,};We receive the passed prop toggleShowBookingViews and then replace the console.log() function with the new prop function in the BookNowButton component.
So, if everything is fine when you press the Book Now button, you should see BookingInformation component UI, as shown in the gif below.

Add a Booking Information Input
We need to add an input where the user can type the Destination Place. The idea is to have a Modal where we display a TextInput. Before that, let's add a Pressable component that will open the Modal.
// taxiApp/src/components/BookingInformation.jsimport React from 'react';import styled from 'styled-components/native';import FeatherIcon from 'react-native-vector-icons/Feather';import {formatPlaceName} from '../utils';import {usePlace} from '../context/PlacesManager';// Import custom hook for show/hide elements.import {useShowState} from '../hooks';const Container = styled.View` flex: 1.5; background-color: #fff; padding-vertical: 20px; padding-horizontal: 20px;`;export const Location = styled.View` flex-direction: row; align-items: center;`;const LocationPlaceholder = styled.Text` color: #717171; font-size: 14px; margin-left: 5px; font-weight: 600;`;const Text = styled.Text` color: #000; font-size: 16px; font-weight: 600; margin-left: 5px;`;// New Pressable componentconst LocationPressable = styled.Pressable` flex-direction: row; align-items: center; margin-bottom: 10px;`;// New styled componentconst AddDestinationText = styled.Text` color: #000; font-size: 20px; font-weight: 600; margin-left: 5px;`;// New styled componentconst TextRight = styled(Text)` margin-left: auto;`;export default function BookingInformation() { // Add destinationPlace from PlacesManager const { place: {currentPlace, destinationPlace}, } = usePlace(); // Create a local state for toggle a Modal const [isModalVisible, togglePlaceModal] = useShowState(); return ( <Container> <Location> <FeatherIcon name="map-pin" size={15} color="gray" /> <Text testID="current-place-description"> {formatPlaceName(currentPlace.description)} </Text> </Location> <FeatherIcon name="more-vertical" size={15} color="gray" marginTop={-10} /> <Location> <FeatherIcon name="more-vertical" size={15} color="gray" /> <LocationPlaceholder testID="destination-label"> Destination address </LocationPlaceholder> </Location> {/* Add new components for toggle a Modal */} <LocationPressable onPress={togglePlaceModal}> <FeatherIcon name="circle" size={15} color="gray" /> <AddDestinationText testID="destination-place-description"> {formatPlaceName(destinationPlace.description) || 'Add destination'} </AddDestinationText> <TextRight> <FeatherIcon name="search" size={15} color="#000" /> </TextRight> </LocationPressable> </Container> );}We import the custom hook for handle show/hide Modal. Add a couple of new Styled Components, including Pressable from React Native. Also, add destinationPlace from PlacesManager Context Provider.
Destination Address Modal
Alright, we need to create a new component called SearchAddressModal, inside that Modal we will have a TextInput for search the user destination place. SearchAddressModal will be called from the BookingInformation component.
React Native Modal
We'll use a new package called react-native-modal for our Modal component, let's install it:
npm i react-native-modal --save-exactCreate a new file inside taxiApp/src/components/SearchAddressModal.js:
// taxiApp/src/components/SearchAddressModal.jsimport React from 'react';import {StatusBar, TextInput} from 'react-native';import styled from 'styled-components/native';import Modal from 'react-native-modal';import FeatherIcon from 'react-native-vector-icons/Feather';const Container = styled.SafeAreaView` flex: 1;`;const BackButton = styled.TouchableOpacity` margin-top: 10px;`;const ModalChildrenView = styled.View` flex-direction: row; align-items: center;`;const SearchContainer = styled.View` flex-direction: row; align-items: center;`;const ClearDestinationButton = styled.TouchableOpacity` margin-left: auto;`;const Input = styled(TextInput)` color: #000000; font-size: 20px; font-weight: 600; height: 50px; width: 90%; padding: 10px;`;export default function SearchAddressModal({isModalVisible, toggleModal}) { return ( <Modal isVisible={isModalVisible} backdropColor="white" backdropOpacity={1} animationIn="slideInUp" testID="search-address-modal"> <StatusBar barStyle="dark-content" /> <Container> <BackButton testID="back-button" onPress={toggleModal}> <FeatherIcon name="arrow-left" size={20} color="gray" /> </BackButton> <ModalChildrenView> <SearchContainer> <FeatherIcon name="map-pin" size={20} color="gray" /> <Input placeholder="Add destination" placeholderTextColor="#000000" /> <ClearDestinationButton testID="clear-button" onPress={() => {}}> <FeatherIcon name="x-circle" color="grey" size={20} /> </ClearDestinationButton> </SearchContainer> </ModalChildrenView> </Container> </Modal> );}As you see now, we have a new component that uses Modal from react-native-modal. For now, this component doesn't have a local state; instead, we receive a couple of props from the BookingInformation component to check the Modal's state and close the Modal.
We added a TextInput that for now doesn't work because it doesn't have a state. The local state for the Input component will come as prop from BookingInformation.
Open the Modal from Booking Information
Move into BookingInformation and import the new component, also pass the props the new Modal component need to be visible.
// taxiApp/src/components/BookingInformation.jsimport SearchAddressModal from './SearchAddressModal';...export default function BookingInformation() {... const [isModalVisible, togglePlaceModal] = useShowState(); return ( <> <Container> ... </Container> {/* Import the new Modal component */} <SearchAddressModal isModalVisible={isModalVisible} toggleModal={togglePlaceModal} /> </> );}As you can see we imported the new Modal component we created and we are rendering outside our <Container></Container> component, that's why we use <></> before and after Container component.
We also pass the two props <SearchAddressModal /> component is expecting in order to show/hide.
<SearchAddressModal isModalVisible={isModalVisible} toggleModal={togglePlaceModal} />If everything is fine, when you press the "Add destination" component, you should see that the Modal is visible. Inside the Modal, you can close it by pressing the back arrow button.
Add local state for Modal Input
Let's add a local state that will make the Input component work, as I mentioned above. This local state will come from BookingInformation and passed to the Modal component.
// taxiApp/src/components/BookingInformation.jsimport React, {useState} from 'react';...export default function BookingInformation() { const { place: {currentPlace, destinationPlace}, } = usePlace(); const [isModalVisible, togglePlaceModal] = useShowState(); // Input Modal state const [newAddress, setNewAddress] = useState(null); return ( <> <Container> ... </Container> <SearchAddressModal isModalVisible={isModalVisible} toggleModal={togglePlaceModal} + newAddress={newAddress} + setNewAddress={setNewAddress} /> </> );}Now, we have to move into SearchAddressModal component and receive the two props and use them for the Input component.
// taxiApp/src/components/SearchAddressModal.js...export default function SearchAddressModal({ isModalVisible, toggleModal,+ newAddress,+ setNewAddress,}) { return ( <Modal isVisible={isModalVisible} backdropColor="white" backdropOpacity={1} animationIn="slideInUp" testID="search-address-modal"> <StatusBar barStyle="dark-content" /> <Container> <BackButton testID="back-button" onPress={toggleModal}> <FeatherIcon name="arrow-left" size={20} color="gray" /> </BackButton> <ModalChildrenView> <SearchContainer> <FeatherIcon name="map-pin" size={20} color="gray" /> <Input placeholder="Add destination" placeholderTextColor="#000000" + value={newAddress} + onChangeText={text => setNewAddress(text)} /> <ClearDestinationButton testID="clear-button" + onPress={() => setNewAddress('')}> <FeatherIcon name="x-circle" color="grey" size={20} /> </ClearDestinationButton> </ClearDestinationButton> </SearchContainer> </ModalChildrenView> </Container> </Modal> );}After that, we should be able to type inside the Input component. Also, we should be able to clear what we type when we press the "x-circle" button.
Google Places API
We will use Places API from Google to search for our destination place when we type using the Input component on the Modal screen.
There's a good package for React Native called react-native-google-places-autocomplete that you can use, I tested it, and it works fine. It already comes with an Input component.
But, for this project to have more control, I decided to do it step by step.
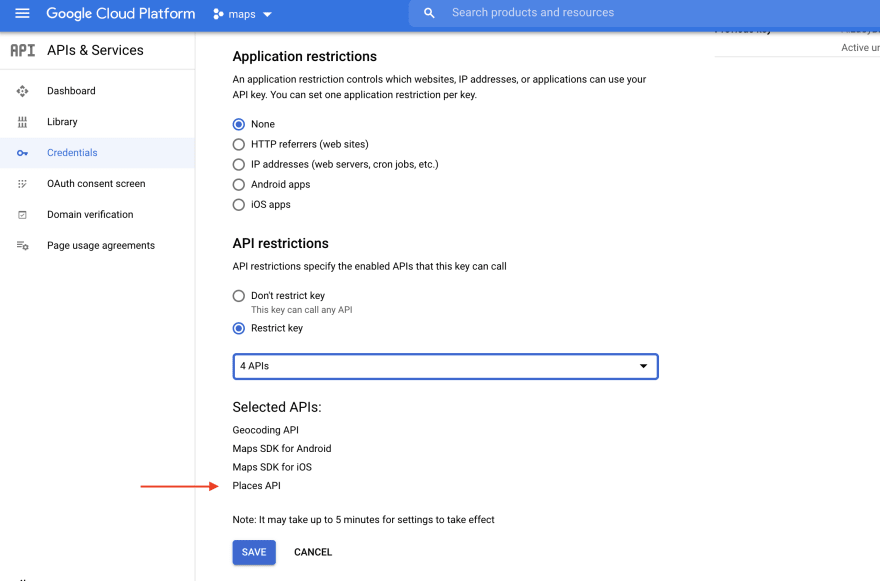
We'll need to enable Places API in our Google Console Cloud project, the same steps we followed for enabling Geocoding API and Maps SDK for Android and iOS.
The process is quite simple, we need to fetch from and endpoint passing the Google Maps API Key and the destination. We'll create a new function utility for that inside our src/utils/index.js file:
import {GOOGLE_MAPS_API_KEY} from './constants';...// This function receive two argumentsexport const APIPlaceAutocomplete = (destination, currentPlace) => { const URL = `https://maps.googleapis.com/maps/api/place/autocomplete/json?key=${GOOGLE_MAPS_API_KEY}&input=${destination}&location=${currentPlace.latitude},${currentPlace.longitude}&radius=2000`; if (destination.length > 0) { return fetch(URL) .then(resp => resp.json()) .catch(error => error); } else { return 'No destination Address provided'; }};So, we are fetching from https://maps.googleapis.com/maps/api/place/autocomplete/json passing a couple of parameters:
- key
- input
- location
- radius
We have to call this function from the SearchAddressModal component passing the parameters it needs to make the successful call to the endpoint.
Fetch Places API using Lodash Debounce
If we call the Google Places API while we type using the Input component from the Modal, we will make the call every time we type any single word, which is useless and unsuitable for optimization.
That's why we're going to use Debounce from the Lodash library. Install Lodash:
npm i --save-exact lodashOpen SearchAddressModal component:
+ import React, {useState, useEffect, useCallback} from 'react';...import {debounce} from 'lodash';import {APIPlaceAutocomplete} from '../utils';...export default function SearchAddressModal({ isModalVisible, toggleModal, newAddress, setNewAddress,+ currentPlace,}) {+ const [predictions, setPredictions] = useState([]);+ useEffect(() => { if (newAddress) { debounceSearch(newAddress); } else { setPredictions([]); } }, [newAddress, debounceSearch]);+ const debounceSearch = useCallback( debounce(address => { APIPlaceAutocomplete(address, currentPlace) .then(results => { setPredictions(results.predictions); }) .catch(e => console.warn(e)); }, 1000), [], ); return ( <Modal ... </Modal> );}We first import useState, useEffect and useCallback from React. We also import debounce from lodash and the recent created function utility APIPlaceAutocomplete.
We also receive a new prop, currentPlace. This prop we could inject into the Modal component using the custom hook from PlacesManager, but I decided to receive it from BookingInformation.
Using useState, we create a local state called predictions, which is an empty array, here we will display the list of predictions from Google Places API.
useEffect(() => { if (newAddress) { debounceSearch(newAddress); } else { setPredictions([]); } }, [newAddress, debounceSearch]);If we have a newAddress, we call the function debounceSearch with the newAddress. Otherwise, we call setPredictions with an empty array.
const debounceSearch = useCallback( debounce(address => { APIPlaceAutocomplete(address, currentPlace) .then(results => { setPredictions(results.predictions); }) .catch(e => console.warn(e)); }, 1000), [], );We use useCallback with debounce, which means that every 1 second, we will call the APIPlaceAutocomplete function, passing the two parameters the function needs.
So, let's pass currentPlace from BookingInformation as prop to SearchAddressModal component.
...export default function BookingInformation() {... return ( <> ... <SearchAddressModal isModalVisible={isModalVisible} toggleModal={togglePlaceModal} newAddress={newAddress} setNewAddress={setNewAddress} + currentPlace={currentPlace} /> </> );}Render List of Predictions with Flatlist
We need to render the list of predictions that we stored inside the predictions local state. First, let's create a new component inside src/components/Prediction.js:
import React from 'react';import {TouchableOpacity} from 'react-native';import styled from 'styled-components/native';const Text = styled.Text` padding: 5px; font-size: 14px;`;export default function Prediction({description, place_id}) { return ( <TouchableOpacity key={place_id} testID={`prediction-row-${place_id}`} onPress={() => {}}> <Text>{description}</Text> </TouchableOpacity> );}And now let's move into SearchAddressModal and start using it along with Flatlist component from React Native.
...+ import Prediction from './Prediction';...const Predictions = styled.View` margin-bottom: 20px;`;export default function SearchAddressModal({ isModalVisible, toggleModal, newAddress, setNewAddress, currentPlace,}) { const [predictions, setPredictions] = useState([]); useEffect(() => { if (newAddress) { debounceSearch(newAddress); } else { setPredictions([]); } }, [newAddress, debounceSearch]); const debounceSearch = useCallback( debounce(address => { APIPlaceAutocomplete(address, currentPlace) .then(results => { setPredictions(results.predictions); }) .catch(e => console.warn(e)); }, 1000), [currentPlace, setPredictions], );+ const renderPredictions = ({item}) => <Prediction {...item} />; return ( <Modal ... <ModalChildrenView> ... </ModalChildrenView>+ <Predictions> {predictions.length > 0 && ( <FlatList data={predictions} renderItem={renderPredictions} keyExtractor={item => item.place_id} /> )} </Predictions> </Container> </Modal> );}
Stop!
That's it from me for now. I hope you're doing good by now and learning a thing or two. We'll continue working on the Booking Information component in the next post.
Stay tuned!
Original Link: https://dev.to/cecheverri4/react-native-taxi-app-booking-information-24op
Dev To
More About this Source Visit Dev To