
An Interest In:
Web News this Week
- April 26, 2024
- April 25, 2024
- April 24, 2024
- April 23, 2024
- April 22, 2024
- April 21, 2024
- April 20, 2024
Some of Our Sources
- BoingBoing
- Simplebits
- Spoon Graphics
- Abduzeedo
- You The Designer
- Naldz Graphics
- FanExtra - PSD
- Reencoded
- 24 Ways
- Freelance Switch
Help Webnuz
Referal links:
Setup a new mac (for devs [and others])
"Got a new macbook! What should I install now ?"
I'm getting this question every couple of weeks from friends and colleagues, and every time I'm sending them instructions on what and how to install in order to setup their environment to make their experience better.
There are many tools/apps/configurations that you can use to make your life easier and your experience better with your mac.
So I decided to finally write everything down and share it (instead of copy&paste emails/whatsapp/slack/discord messages).
Here is my basic setup and recommendations for others.
Key repeat & delay
Change the key repeat and repeat delay - this is usually the first thing I'm changing:
You can find it under System Preferences -> Keyboard.
And if you like the red arrows - keep on reading
Screenshots to clipboard
By default, screenshots are saved to your desktop. To change this - click +shift+5 and under the "options" menu set the "save to" to "Clipboard".
- To capture an area use
+shift+4 - To capture the entire screen use
+shift+5
Note:
is thecommandkey. You can find it left to yourspacekey.
I'll start with some general tools that just make my life easier:
Rectangle
Rectangle is an open-source tool that gives you the ability to easily move the windows-apps around your desktops using your keyboard (left-half / right-half / top / bottom etc)
https://rectangleapp.com/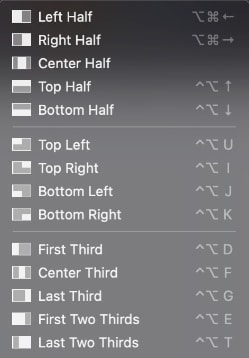
Monosnap
Monosnap is a tool to edit your screenshots. They have both paid and free versions (for personal usage).
Remember the red arrows? This is what you want: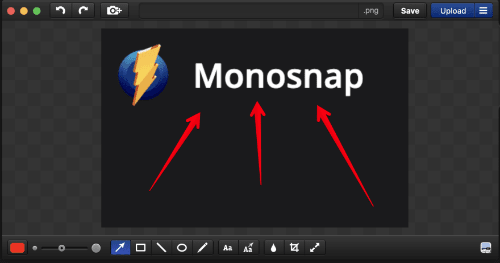
https://monosnap.com/
Homebrew
This is the de-facto package manager for macos (as a developer - most of the packages you need you can install using homebrew).
Open your terminal (cmd + space) and run:
/bin/bash -c "$(curl -fsSL https://raw.githubusercontent.com/Homebrew/install/HEAD/install.sh)"AltTab
Personally, I don't use this tool, but many of my friends like it, so I decided to keep it on my list.
If you moved from Windows to MacOS - AltTab is probably your friend - it brings the power of Windows's "alt-tab" functionality to your Mac.
(Image from AltTab's website)
Install using brew:
brew install alttabiTerm2
iTerm2 is a replacement for the standard macos's terminal (and is so much better).
Now that we have homebrew installed we can use to install iterm2:
brew install iterm2iTerm2 configuration:
There are many settings that you can change in iterm2, here are a few that in my opinion are a must:
- Disable the bell:iTerm2 Preferences -> Profiles -> Terminal -> Notifications -> Silence Bell
- Set iterm to jump over wordson option+left/right arrow and move to begin/end of line with cmd+left/right arrow.iTerm2 Preferences -> Profiles -> Keys:
1. (option + left arrow) - set action to "Send Escape Sequence" - Esc+ b
2. (option + right arrow) - set action to "Send Escape Sequence" - Esc+ f
3. (cmd+ left arrow) - set action to "Send Hex Code" - value is 0x01
4. (cmd + right arrow) - set action to "Send Hex Code" - value is 0x05
Oh My Zsh
oh-my-zsh is a framework for managing zsh configurations. zsh is the default shell on macos these days.
There are hundreds themes and plugins and you can configure almost everything inside.
Lets start by installing oh-my-zsh:
sh -c "$(curl -fsSL https://raw.github.com/ohmyzsh/ohmyzsh/master/tools/install.sh)"We also need fzf for fuzzy search (some plugins need it):
brew install fzfThemes:
There are so many oh-my-zsh themes that you can use. I like intheloop, but you can try others and find the one that you like the most.
To set the relevant theme open your ~/.zshrc file and change the value of ZSH_THEME:
ZSH_THEME="intheloop"Plugins:
zsh-autosuggestions
brew install zsh-autosuggestionsecho "source /usr/local/share/zsh-autosuggestions/zsh-autosuggestions.zsh" >> ~/.zshrczsh-syntax-highlighting
brew install zsh-syntax-highlightingecho "source /usr/local/share/zsh-syntax-highlighting/zsh-syntax-highlighting.zsh" >> ~/.zshrczsh-yarn-autocompletions - not in brew, so we need to install it manually:
- Download the mac zip/targz file from the release age: https://github.com/g-plane/zsh-yarn-autocompletions/releases
- Extract it
- Run the following:
./install.sh $ZSH_CUSTOM/plugins - Once installed - add it to your
pluginssection in the~/.zshrcfile:
plugins=(# some pluginsyarn-autocompletions)This is an important step - to allow running this file you need to set some permissions.
Open Finder, go to ~/.oh-my-zsh/custom/plugins/yarn-autocompletions, hold the shift key, right-click on the yarn-autocompletions file, click open (while holding the shift-key).
By default - oh-my-zsh comes with many other plugins. You just need to enable them. The complete list can be found in your ~/.oh-my-zsh/plugins folder, and you can just edit your ~/.zshrc file and add them as part of the plugins config.
Here is a good list to begin with:
plugins=(# other pluginsawsgitnpmyarnzsh-interactive-cd)The Fuck
The Fuck is a great tool that corrects errors in previous console commands.
Here is an example:
git pushfatal: The current branch master has no upstream branch.To push the current branch and set the remote as upstream, use git push --set-upstream origin master fuckgit push --set-upstream origin master [enter///ctrl+c]Counting objects: 9, done....To install just run:
brew install thefuckDo you think I'm missing something? Let me know in the comments.
Cover photo by Christopher Gower @ unsplashOriginal Link: https://dev.to/dekel/setup-a-new-mac-for-devs-and-others-4d88
Dev To
More About this Source Visit Dev To