
An Interest In:
Web News this Week
- May 1, 2024
- April 30, 2024
- April 29, 2024
- April 28, 2024
- April 27, 2024
- April 26, 2024
- April 25, 2024
Some of Our Sources
- BoingBoing
- Technology Review
- Creative Curio
- FanExtra - PSD
- Noupe
- My Ink Blog
- Reencoded
- CSS Globe
- Design Modo
- Android Headlines
Help Webnuz
Referal links:
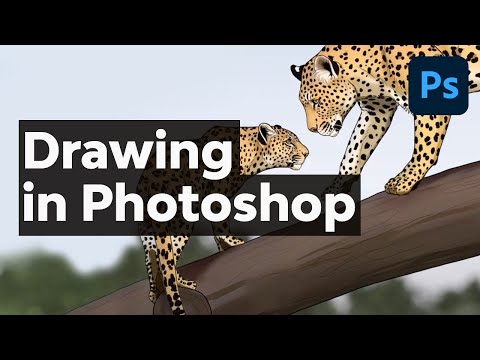
How to Draw in Photoshop


Can you draw in Photoshop? Sure, if you know how! Using Photoshop to draw may sound like a weird idea, but many professional artists use it on a daily basis.
In this tutorial, I'll teach you how to draw in Photoshop. I'll show you all the basic tools and present a step-by-step process of Photoshop drawing—from sketch to color, shading, and special effects. In my opinion, this technique is the best way to draw in Photoshop if you're a beginner, but you can modify it later to create your own personal style. So if you're interested in drawing in Photoshop for beginners, this will be a perfect tutorial for you!
What You're Going to Learn in This Adobe Photoshop Drawing Tutorial
- How to draw using Photoshop
- What is the best way to draw in Photoshop
- What are the drawing tools in Photoshop
- The easy way to shade in Photoshop
- How to draw in Photoshop using Clipping Masks
- How to blend in Photoshop
Follow along with us over on our Envato Tuts+ YouTube channel:
What You'll Need
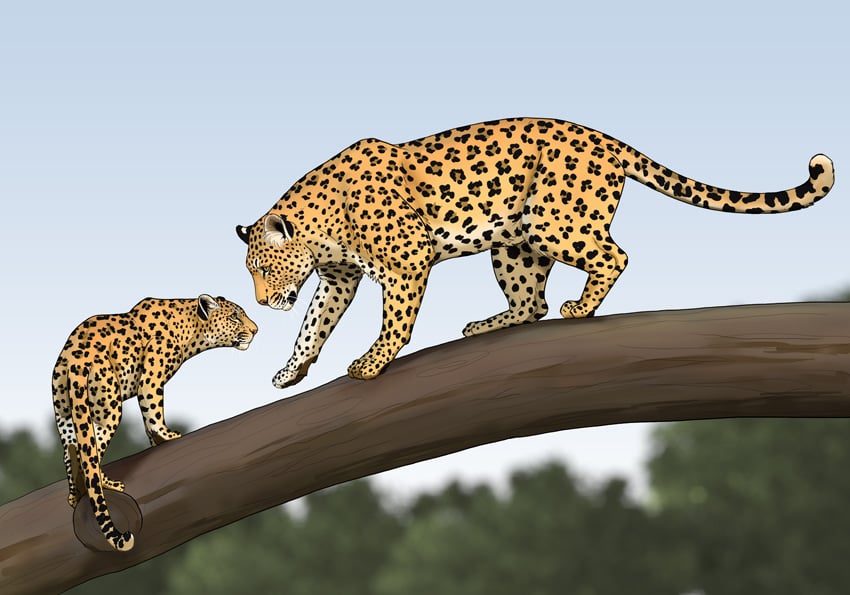
For this tutorial we're going to need a reference photo. Using references is not cheating—it just means you draw something you see instead of something you imagine. You can find good, high-resolution references on Envato Elements. I used this one:
Envato Elements is an awesome resource where you can download many Photoshop actions, add-ons, and brushes, like this artistic and matte painting brush set, perfect for adding texture and realistic traditional drawing textures to your Photoshop art.


1. What Are the Drawing Tools in Photoshop?
In this section, I'm going to explain the basic drawing tools of Photoshop. If you don't consider yourself a total beginner and you're interested in the drawing technique only, feel free to skip to section 2.
Step 1
Open Photoshop and create a New File. First, we have to decide the size of our canvas. You can change it later, but it always comes at a loss of quality, so choose wisely. The bigger the size, the more details you can fit in, but also the harder it is for your computer to manage. Let's use the dimensions 5000 x 3500 for now.


Step 2
The new file has been created, and we're ready to draw! But first, take a look at the Layers panel. There's a single layer here for now—the background filled with white. To keep your lines separated from the background, you need to create a New Layer. Just click the plus icon to do it.


Step 3
Press B to use the Brush Tool. If you draw something on the canvas now, it will be drawn on the layer that is currently selected. Click the eye icon next to the background layer to see that it stays separated from the lines. Because the lines are separated, you can use the Move Tool (V) to drag them, or press Control-T to resize and rotate them.


Step 4
Change the color now and draw something over the first line. You'll notice that they're merged—you can only move them together. But if you create a New Layer and draw on it, then these lines will stay separated. So always pay attention to what layer you're drawing on. If you want to make sure you won't draw on a certain layer by accident, you can lock it.
You can remove these layers by pressing Delete to clean up the canvas.


Step 5
Right-click on the canvas to open the Brushes palette. It includes all the default brushes. You can also open this panel by clicking this icon on the right.


Step 6
Test a couple of brushes now. You'll notice that they're pretty small—it's because the canvas is so big! To change it, you can press Z to use the Zoom Tool and "get closer" to the canvas. Then you can hold the Space key and drag the canvas to move across it. To zoom out, hold the Alt key when using the Zoom Tool, or press Control-0 to reset the view. If you have a hard time remembering the shortcuts, just use the View menu.
You can also temporarily rotate the whole canvas by clicking R. Press Escape to reset the rotation.


Step 7
You can also change the size of the brush. You can do it by dragging the slider in the Brushes panel, but it's easier to simply use the square bracket keys: [ and ]. When drawing, I keep my fingers over them all the time to change the size of the strokes dynamically.


Step 8
We're almost ready to start drawing, but first choose a sketching brush. You can pick any of the default ones, but if you feel none of them fits your sketching style, you can create your own brush. Select the brush that seems to be the closest to your idea of a perfect sketching brush and open the Brush Settings panel—it's right over the Brushes panel.


Step 9
You can now experiment with the settings to see how they affect the strokes of your brush. You don't have to know what these settings do—just change them and see what happens. You can also change the settings in the upper bar.


Step 10
When you're done, click the plus icon to save these settings as a new brush. You can now create your own brush group and drag your new brush to it.


Step 11
Alternatively, you can install brushes made by other artists—you just need to download the brush set, like this pencil brush set from Envato Elements, and drag it into the Brushes panel.


One more thing: remember to Save (Control-S) your artwork every time you do something important.
2. How to Prepare Your Reference for Photoshop Drawing
Step 1
Before we start drawing, open your reference in Photoshop, then go to Image > Image Size. Make it 500 px wide. If you want, you can go to Image > Image Rotation > Flip Canvas Horizontal—I think my reference looks better this way.


Step 2
Go to Filter > Filter Gallery > Artistic > Cutout. Adjust the settings to turn the scene into a set of geometrical shapes. Remove as much detail as possible while keeping the general outline of the elements.


3. How to Draw Line Art in Photoshop
Step 1
Now we can start drawing! Remove all the test layers and create a new one. Keep your reference photo in sight—you can use the PureRef app for this purpose. Start by blocking out the main shapes, focusing on the proportions. Thanks to what we did to the reference a moment ago, it's easier to copy the geometrical shapes without getting lost in the details. Angles are also easier to copy than round shapes. Keep your brush big, and don't zoom in too much. Focus on the big picture for now.
Don't try to make it perfect all at once. Remember that you can use Control-Z to undo a mistake, or use the Eraser Tool (E) to erase it. You can also use the Lasso Tool (L) to select a part of the drawing and move it to another place. Press Control-D to deselect when you do it.
Because my brush gets thicker when I press harder, I can draw the first lines more subtly, and make them darker and thicker when I want to accentuate their final position. The thick lines cover the thin, exploratory lines.


Step 2
When you're done, lower the Opacity of this layer by dragging the slider in the Layers panel. This will allow us to use the sketch as a support for the next stage of drawing, without creating a jungle of lines. Switch your reference to the original photo.


Step 3
Now create a New Layer, make your brush smaller, and continue drawing, this time adding all the details and fixing the proportions if necessary. Don't try to keep it clean—it's still a sketch, just a more detailed one. It's good to analyze the elements in the scene to copy their 3D form, not just the outlines. Understanding what you're drawing will help you with shading later, and it's also a necessary step to be able to draw from imagination in the future.
This doesn't apply to Photoshop drawing only, but to drawing in general—however, since digital art is often considered to be easier than normal drawing, your expectations for your first attempts may be higher. Whenever you feel frustrated, keep reminding yourself that there's nothing wrong with you—it's just harder than it looks. Control-Z may help you remove your mistakes, but there's no shortcut to draw something the right way.
Flipping the image horizontally from time to time will help you see the whole image with fresh eyes and make certain mistakes more noticeable. You can assign a keyboard shortcut to it to make it more convenient.


Step 4
Now, time for the final lines! Hide the first sketch and lower the Opacity of the second one. Then create a New Layer, zoom in, and draw the final, clean drawing. Keep your brush small and your strokes smooth. It's good if these strokes are dark and pretty hard-edged—this will make it easier to create the Clipping Mask later.
Take your time—creating good line art is a skill on its own, and you shouldn't rush it just because you've spent so much time on this drawing already. Make sure to include a variety of lines in your line art—thick and thin, tapered and rounded. Accentuate certain parts strongly, and others subtly. You can hide your sketch from time to time to see how you're doing and what else needs to be accentuated.


Step 5
Create separate line art for the branch, or any other objects you have in your scene that overlap the previous elements.


Step 6
Hide the sketch layer and name the line art layers so that you can instantly recognize them.


4. How to Color a Drawing in Photoshop
Step 1
Take the Magic Wand Tool (W) and click the area outside of the line art. If it doesn't select the whole element, change the Tolerance. Then go to Select > Inverse to select the inside of the outline.


Step 2
Create a New Layer under this layer, and use the Paint Bucket Tool (G) to fill it with any color. Deselect with Control-D. Give this layer a name, something including "mask".


Step 3
Do the same with the other object or objects in your scene.


Step 4
Let's add the colors now. Select the background layer and click the circle icon on the bottom. Select Gradient and create a bluish-white gradient to create the effect of a cloudy sky.


Step 5
Select the first mask and create a New Layer. Hold the Alt key and click the line between these two layers. This will create a Clipping Mask—now you can draw all over this new layer without risking going outside of the lines.


Step 6
Use this method to fill the objects with a single color.


Step 7
A single, uniform color is pretty boring, so let's add another, similar color using a hard brush.


Step 8
Now we need to blend these two colors. Find the Brush Tool in the toolbar, and then hold its icon to reveal a menu. Select the Mixer Brush Tool. Adjust the settings to create a blender brush that works just the way you expect it to—a soft round brush can be a good base for the default blender, but textured brushes create nice effects too.
When you find the perfect settings, save them as a new brush, just like before.


Step 9
Use this method to add as many colors as you need, but for now focus only on the big areas of color.


Step 10
Now add another layer and color the details. Coloring the details separately can be useful in case you want to change anything important later. However, the blender brush may not work if you want to blend things from two different layers.


Step 11
Let's add one more layer for the spots. This pattern, although very time-consuming, will make the leopards look more detailed even without intricate shading.


5. How to Shade in Photoshop
Step 1
Let's shade our drawing now! Create a New Layer on top of the previously clipped layers, clip it, and fill it with white. Then click the Normal button to reveal the list of Blend Modes. Select Multiply. When you paint on a layer in Multiply mode, the colors become transparent—instead of covering the colors beneath, they darken them, as a colored glass would. That's why it's perfect for drawing shadows!


Step 2
Draw the shadows on the lower part of the body using a hard brush. Use greenish yellow rather than black—this will make the shadows look more natural, as if filled with light reflected from the environment. You can keep the shadows sharp or blend them, depending on the style you're going for.


Step 3
For a more realistic effect, use a few levels of darkness—make the biggest area of shadows quite bright, and then find the areas that need more shadow and darken them. The darker the shadow, the smaller the area it should cover. You don't have to copy the shading in the reference directly—sometimes it's better to use simpler, more predictable shading in your drawing.


Step 4
Add one more white Multiply layer. This time, paint some sky-colored shadows on the top and left side of the body—this will make them look more three-dimensional.


Step 5
Do a similar thing with the branch.


6. How to Finish a Photoshop Drawing
Step 1
Let's finish the background now. Adjust the gradient if necessary to make it fit the colors you've chosen later. Then create a New Layer and go to Filter > Render > Tree. You can pick any tree you want, but I think Shrub will work best here.


Step 2
Use the Move Tool (V) to place the tree in the bottom-left corner. Then hold the Alt key and drag to create more trees in this area.


Step 3
Hold the Shift key to select all the tree layers, and then press Control-E to merge them. Lower the Opacity to simulate some atmospheric perspective.


Step 4
Now merge the trees with the sky, and go to Filter > Blur > Lens Blur. Adjust the settings to create the effect you like, and then press OK.


Step 5
Now it's time to stop looking at the reference and focus entirely on your work. Take a good look at it—is there anything you'd like to change? Because every effect has been applied to a separate layer, you won't have any problem adjusting them.
You can duplicate the layer by pressing Control-J to make the effect stronger, and lower its Opacity to make it subtler. You can create a New Layer on top and paint on it to add more details. You can blend the shadows some more, or add new ones. Feel free to spend as much time as you need at this stage to make your image as good as it can possibly be!


Step 6
When you're done, select the whole drawing by pressing Control-A, and then go to Edit > Copy Merged and paste the copy into a New File. Go to Image > Image Size and give your drawing a more sensible size—something around 1000 px wide. Now your file is ready to be saved as a PNG and shared on social media!


Good Job!
Now you know how to draw using Photoshop! You know how to draw the first sketch, how to create the line art, how to add the colors, how to shade, and how to finish the artwork. Now, using Photoshop to draw doesn't sound like a crazy idea anymore!


Photoshop Painting Brushes
Creating custom brushes in Photoshop is possible, but it takes some time and skill. Instead, you can use brushes created by other artists! Here are a couple of propositions from Envato Elements.
Artistic & Matte Painting Photoshop Brush Set (ABR)
If you need a basic, universal brush set, try this one—it contains 22 brushes designed to simulate various traditional tools. It may look simple, but the truth is you don't need anything else to create wonderful artwork!
Pencil Brushes Photoshop (ABR)


Whether you need a pencil just for the first stage of drawing, or you want to create an artwork that looks as if it was drawn with real pencils, this brush set is a great choice. It contains 31 brushes, and some of them will save you a lot of time during shading!
Shader Brushes for Photoshop (ABR, EPS, PNG)


This professional brush set will allow you to achieve a unique style of shading. It's perfect for minimalistic illustrations, but these textured brushes will be great for photorealistic artworks as well!
Stipple Brush Set for Photoshop and Illustrator (ABR, AI, EPS)


Stipple shading is a method of shading using a series of tiny dots grouped together. If you like this style, thanks to this brush set you won't have to draw all these dots by hand—these brushes come in different sizes and densities to create a realistic and natural effect.
Photoshop Ink Brushes (ABR)


Ink drawings look really cool, but ink is not very forgiving. However, if you use digital ink, you get the same effect without all the pressure! This brush set contains 12 ink washes brushes, 12 sketching ink brushes, and ink stain brushes—combine them all for a fantastic end result!
If you liked this Adobe Photoshop drawing tutorial, you may also like our other tutorials:

 DrawingHow to Draw a Rose
 ProcreateHow to Install and Use Procreate Brushes
 Portrait100+ Best Portrait Tutorials (Illustration, Photo Manipulation, & More)
 ProcreateHow to Create a Stylish Neon Portrait in Procreate
 AnimalsHow to Draw a Tiger
Original Link: https://design.tutsplus.com/tutorials/how-to-draw-in-photoshop--cms-36853
TutsPlus - Design
More About this Source Visit TutsPlus - Design