
Some of Our Sources
- Engadget
- Web Designer Wall
- Just Creative
- Smashing Apps
- Naldz Graphics
- Reencoded
- Stylized Web
- CSS Tricks
- Android Headlines
- Willems Lab
Help Webnuz
Referal links:
Company Themed Resume Builder using react and redux
This guide will help you in building a company themed resume builder using reactjs. You will fill in your details and then select the company you wish to apply for. This web application will generate your resume based on the company you have to apply for.
STEP 1 - Setting up redux store
First of all, we need to create a store which will contain the state tree of the application. I created the store in index.js file. To bring any changes to state in redux, we need to dispatch action and write its reducer function.
const store = createStore(rootReducer);Then we will wrap the App component inside Provider component. It makes the redux store available to all the nested components.
<Provider store={store}> <App /></Provider>Now, we use a connect function inside all other components. It lets that component re-read the values of state whenever the state updates.
const mapStateToProps = (state) => { return{ state }};const TwitterContainer = connect(mapStateToProps, null)(Twitter);export default TwitterContainer;Connect() takes two arguments. Both are optional. I have used only the first one: mapStateToProps. It is called every time the store state is changed. It receives the entire store state and returns an object of data which is required by that component.
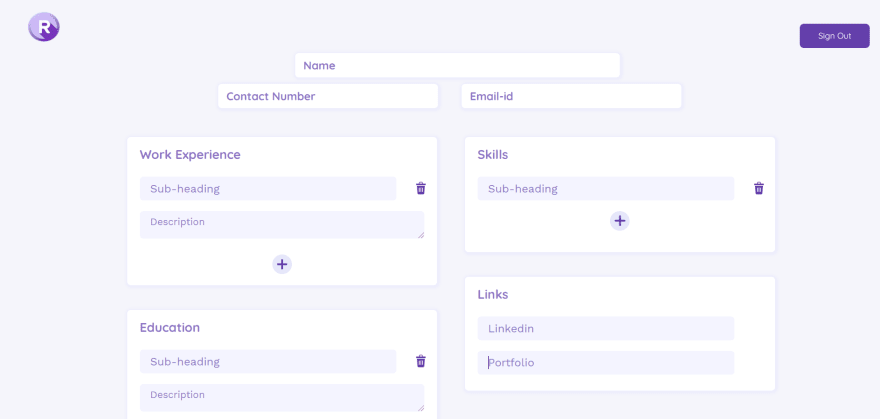
STEP 2 - Getting the details from user
Input fields are created to get user input. This includes name, contact number, email-id, work experience, education, projects, skills, links for linkedin and portfolio. The state have these as properties and will be empty initially. For work-ex, education, projects and skills, array is used. Each element of these array will have:
1) id
2) subheading
3) description
work_experience: [{ id: 1, subheading: '', desc: '' }]On entering input in these fields, an action will be dispatched.
const addName = (value) => { props.dispatch({ type: "ADD_NAME", text: value }); }The reducer check for the type of action and make changes in state. For taking input for fields like work-ex, education, projects and skills, id is also needed.
The code below is shown for subheading of work-ex
const addWorkSubheading = (i,value) =>{ props.dispatch({ type: 'ADD_WORK_SUBHEADING', id: i, text: value }); }Similarly, actions are dispatched for other subheadings and descriptions.
To change the state according to the input from user, firstly action.id is compared to the id of all elements of work-ex array and the subsection to be changed is assigned to a variable and its index is assigned to another variable.
Now, if the length of array is one , then using spread operator state is spread and then inside work-ex array, first element is spread and value is assigned.
If the length is 2, then state is spread and the index of the subsection is checked using switch. If index is 0, then changes are made in the first element and second element is returned as it is and vice versa.
If the length is more than 2, then state is spread and work-ex array is sliced from 0 till subsectionIndex and returned as it is, the required subsection is spread and changes are made and then again work-ex is sliced from (subsectionIndex + 1) till the end and returned as it is.
case 'ADD_WORK_SUBHEADING': const subsection = state.work_experience.filter(w=>{ return w.id === action.id })[0]; const subsectionIndex = state.work_experience.findIndex(w=>{ return w.id === action.id }); if (state.work_experience.length <= 1){ return{ ...state, work_experience: [ { ...state.work_experience[0], subheading: action.text } ] }; } else if (state.work_experience.length === 2) { switch (subsectionIndex) { case 0: return { ...state, work_experience: [ { ...state.work_experience[0], subheading: action.text }, state.work_experience[1] ] }; case 1: return { ...state, work_experience: [ state.work_experience[0], { ...state.work_experience[1], subheading: action.text } ] }; } } else { return { ...state, work_experience: [ ...state.work_experience.slice(0, subsectionIndex), { ...subsection, subheading: action.text }, ...state.work_experience.slice(subsectionIndex+1, state.work_experience.length) ] }; }Similarly, state is changed for other subheadings and descriptions.
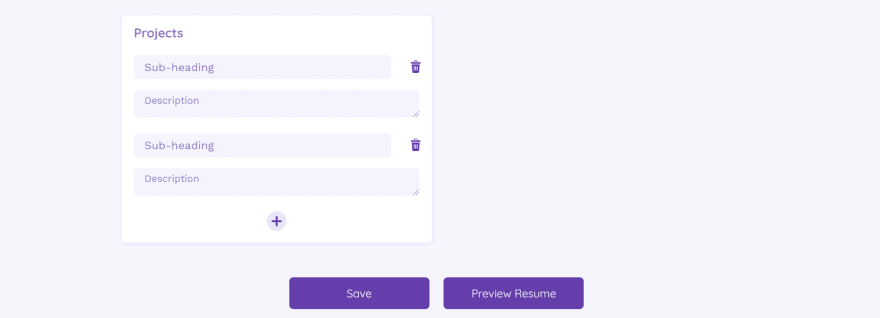
Now to add subsection, there is a plus button. When this button is clicked, an action is dispatched. And in reducer, firstly state is spread. Then work-ex is spread and one more element is added to the array with id as length of array +1.
case 'ADD_WORK_SUBSECTION': return { ...state, work_experience: [ ...state.work_experience, { id: state.work_experience.length+1, subheading: '', desc: '' } ] };STEP 3 - Preview Resume
On filling the details, you can preview the resume for different companies.

On clicking these buttons, you will get your themed resume.
The data entered by the user will be displayed with custom styling based on the company one selects from this page.
STEP 4 - Sign in with Github
For building sign-in feature, I have used react-firebase auth.
The follwing steps are to be followed when building authentication using react-firebase:
Step 1
Create a project in firebase and enable the signup method you want to use for your project.
Step 2
Install react firebase.
npm i @react-firebase/auth
Step 3
Get your firebase config using this:
https://console.firebase.google.com/project/PROJECT_NAME/settings/general/
Replace PROJECT_NAME with your project name in firebase.
Paste this in a file named as config.js and export config.
Step 4
Import firebase in project.
import firebase from "firebase/app";import "firebase/auth";import { FirebaseAuthProvider, FirebaseAuthConsumer} from "@react-firebase/auth";import { config } from "./config";Step 5
Wrap your app code inside FirebaseAuthProvider and FirebaseAuthConsumer:
<FirebaseAuthProvider firebase={firebase} {...config}><div> <FirebaseAuthConsumer> {({ isSignedIn, user, providerId}) => { if(isSignedIn === true){ return( <div> <Router> <Switch> <Route exact path="/" render={() => <MainApp uid={user.uid}/>} /></div>);}else{ return( <div className="signin-div"> <button className="signin" onClick={() => { const githubAuthProvider = new firebase.auth.GithubAuthProvider(); firebase.auth().signInWithPopup(githubAuthProvider); }}> Sign In with Github </button> </div> ); } }} </FirebaseAuthConsumer> </div> </FirebaseAuthProvider>FirebaseAuthConsumer returns isSignedIn as true if the user has signed in and as false if there is no user signed in.
Using this condition, either MainApp and all other components are rendered or a page is rendered with sign up button.
STEP 5 - Storing user's data in Firebase Cloud Firestore
The following steps are to be followed for creating and storing data in Cloud Firestore
Step 1
Go to your project and navigate to Cloud Firestore. Select starting mode as Test mode. Select location and click on done.
Step 2
Install Cloud Firestore SDK
npm install [email protected] --save
Step 3
Create a file database.js in your project and import firestore
import firebase from "firebase/app";import "firebase/firestore";Step 4
Initialise Cloud Firestore and db and export db.
firebase.initializeApp({ apiKey: '### FIREBASE API KEY ###', authDomain: '### FIREBASE AUTH DOMAIN ###', projectId: '### CLOUD FIRESTORE PROJECT ID ###'});const db = firebase.firestore();export default db;Import db in files where either you have to save data or fetch data.
Step 5
Now to save data in firestore, a save button is used. This button is available on the user details page.
On clicking this button, following code will run.
const saveData = () => { db.collection("users").doc(props.uid).set({ name: props.state.name, contact: props.state.contact, email: props.state.email, work_experience: props.state.work_experience, education: props.state.education, projects: props.state.projects, skills: props.state.skills, linkedin: props.state.linkedin, portfolio: props.state.portfolio }) .then(() => { console.log("Document successfully written!"); }) .catch((error) => { console.error("Error writing document: ", error); }); }On running this code, a collection "users" will be created in database. While authentication, we get uid inside user. In the database, different documents will be created for different uid. The data from state will be saved to database using .set().
STEP 6 - Retrieving user's data from Firebase Cloud Firestore
Data retrieval from Cloud Firestore will happen when the Home page will mount.
const fetchUsers = async () => { await db.collection("users").doc(props.uid).get().then((doc) => { if (doc.exists) { console.log("Document data:", doc.data().portfolio); props.dispatch({ type: "ADD_DATA", text: doc.data() }) } else { console.log("No such document!"); } }).catch((error) => { console.log("Error getting document:", error); }); }; useEffect( () => { fetchUsers() }, [] );Using useEffect with an empty array, we'll not be watching any variables. So, it will only update state only on first render like componentDidMount().
Inside fetchUsers, .get() is called with "users" as collection and "uid" as document. It will retrieve data for that uid. An action is then dispatched and in reducer function the following changes will occur in state.
case 'ADD_DATA': return{ ...state, name: action.text.name, contact: action.text.contact, email: action.text.email, work_experience: action.text.work_experience, education: action.text.education, projects: action.text.projects, skills: action.text.skills, linkedin: action.text.linkedin, portfolio: action.text.portfolio, firebaseprocessing: false };STEP 7 - Sharing resume's link
On choosing any company for which you wish to have your resume created, you'll get to a page where you'll see your resume and share button. On clicking this button, you'll get a link. You should copy this link and paste it wherever you wish to.

To get this link, firstly we should have the hostname, protocol and port.
const hostname = window.location.hostname;const protocol = window.location.protocol;const port = window.location.port;Now to display this link, a div will be created which will contain this link and will be visible only when share button is clicked and then it will disappear when clicked anywhere other than the div. For this, I used ClickAwayListener. You can read more about it on https://www.npmjs.com/package/react-click-away-listener.
{(props.state.link === true)? <ClickAwayListener onClickAway={e=>hideLink()}> <section className="link-part3" > {(port === 0 || port === '')? <p>Copy this link {protocol}//{hostname}/{props.uid}/amazon</p>: <p>Copy this link {protocol}//{hostname}:{port}/{props.uid}/amazon</p> } </section> </ClickAwayListener>: <Fragment /> }In this section of code, first we'll check if props.state.link is true or not. This is used to display link. Then, it is checked if port number is 0 or empty string or any other value.
If it is 0 or empty string, then this is the default case (80 for http and 443 for https). In default case, we don't need to mention port number in the link.
If it is not 0 or empty string, then we need to mention the port number in the link.
The link will also have uid which will be used to retrieve data when this link is entered.
STEP 8 - Viewing resume using the link
For indicating that the link is entered externally, a parameter external is passed to the props when routing this link.
<Route path="/:id/youtube" render={() => <Youtube external={true} />}/>Inside the Youtube component, while using useEffect, we check if props.extrenal is true or not. This checks whether the link is entered externally or not.
If props.external is true, then fetchUsers is called with id. We use this id from the link entered. For this, useParams() is used.
If props.external is false, it is internal link and fetchUsers is called with props.uid.
This is used to get the document corresponding to the user id whose resume is being viewed.
const fetchUsers = async (i) => { await db.collection("users").doc(i).get().then((doc) => { if (doc.exists) { console.log("Document data:", doc.data().portfolio); props.dispatch({ type: "ADD_DATA", text: doc.data() }); } else { console.log("No such document!"); } }).catch((error) => { console.log("Error getting document:", error); }); }; useEffect( () => { (props.external)? fetchUsers(id): fetchUsers(props.uid) }, [] );Now, user's data is retrieved from Cloud Firestore and the state is changed according to that. And the data from store is used to display data on resume when any of the link is entered.
Source Code: https://github.com/shambhavijs/themed-resume
Live Demo: https://bit.ly/2SiZUZ4
Original Link: https://dev.to/shambhavijs/company-themed-resume-builder-using-react-and-redux-5153
Dev To
More About this Source Visit Dev To