
Some of Our Sources
- Pearsonified
- The Logo Smith
- Smashing Apps
- Vandelay Design
- Crazy Leaf Design
- Line 25
- Web Resource Source
- Android Dissected
- Hashedout
- TechPowerUp
Help Webnuz
Referal links:
Integrating MapBox with Next.js the Cheaper Alternative to Google Maps
Lately, Ive been working on creating an online platform for eco hotels and resorts, and found myself needing to render a map with some clickable marker pins (which we are going to reproduce in this tutorial). After scouring the internet with possible solutions, two immediate options sprung up Google Maps and MapBox. While most of us are familiar with Google Maps because of the overwhelming presence it has in all our lives, integrating it in an application, I found, is less than ideal. Building a bootstrapped project, I wanted to keep the costs at a minimum and Google Maps pricing structure would mean that the costs would begin to add up.
Enter MapBox!
With a competitive pricing structure (the first 50,000 requests on web are free) and an easy-to-use and well documented API, MapBox is a good alternative to Google Maps. It is also built on top of OpenStreetMap, which is an open source mapping project. Win, win!
What are we building?
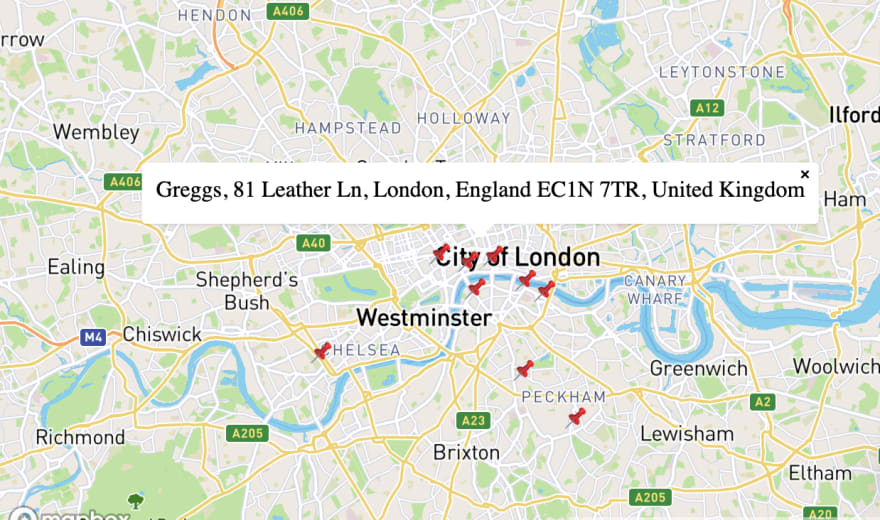
Were going to be querying MapBoxs search api to get some locations of an infamous coffee shop called Greggs, focusing our search on the Greater London region. Then, we are going to render these places in our MapBox <Map> component with a bunch of clickable markers. On click, these markers will display some dismissible popups.
The finished product will look something like,
Let's Code!
Make a MapBox account to get your access token
The first thing you will need to do is to make a MapBox account so that you can get an access token. We will use this token to make requests to the various MapBox APIs.
Once you have your access token, it is time to set up your very own Next.js project and integrate all the juicy functionality that MapBox provides.
Setup a new Next.js project (Skip this if you already have a project of your own)
Setting up a Next.js project is straightforward, you can either follow the instructions laid out in the official documentation or run the following command to set up a new Next.js project (Make sure you have Node.js installed).
npx create-next-app mapbox-projectThen, cd into the mapbox-project directory and run the development server by running npm run dev or yarn dev . Et Voila! Your Next.js project is up and running!
Setup A MapBox Map
Next up, its time to render a MapBox map in our project. We do this by adding a MapBox library written by the team at Uber called react-map-gl. This contains a suite of React components for MapBox. Add this library to your project by running:
yarn add react-mapbox-glWith this, were going to create a Map component which will live in components/Map.js.
Create your Map.js file and add the following code to it:
import { useState } from "react";import ReactMapGL from "react-map-gl";export default function Map() { const [viewport, setViewport] = useState({ width: "100%", height: "100%", // The latitude and longitude of the center of London latitude: 51.5074, longitude: -0.1278, zoom: 10});return <ReactMapGL mapStyle="mapbox://styles/mapbox/streets-v11" mapboxApiAccessToken={process.env.MAPBOX_KEY} {...viewport} onViewportChange={(nextViewport) => setViewport(nextViewport)} ></ReactMapGL>}This is not going to work just yet. One of the biggest features of Next.js is the server side rendering it offers. MapBox, however, requires the global window object in order to work correctly. If you are server side rendering your app, you will need to dynamically import it into your page. This means that instead of importing it like a regular component,
import Map from '../components/Map'We will have to import it dynamically. We will do this by using Next.js dynamic imports.
In your pages/index.js file (or wherever youre rendering your Map component) add the following code.
const Map = dynamic(() => import("../components/Map"), { loading: () => "Loading...", ssr: false});This means that our MapBox component will now selectively be rendered client side. Perfect!
The only thing we need to do now is to add MapBoxs CSS files to our project. The easiest way to do this is to modify your existing _app.js or by adding a custom _document.js file. Then add a link to the CSS to the <Head> in your render function. You can get the latest version of the CSS files in their API documentation.
<head><link href='https://api.mapbox.com/mapbox-gl-js/v1.12.0/mapbox-gl.css' rel='stylesheet' /></head>Perfect. Your Map should now be up and running! Lets take this a step further and try rendering some clickable pins on our map.
Use MapBoxs search API to fetch a list of landmarks
MapBox has a really handy geocoding API which you can be used to fetch a list of locations, with their latitudes and longitudes. Were going to be fetching a list of Greggs (a take-away fast food and coffee shop) in London and render them as pins on our Map.
First, lets query our list by adding a simple fetch call to the Mapbox geocoding API. We want to search within the geographic bounds of London and want to cap our search at 10 results (London is huge and Londoners love their Greggs vegan sausage rolls. We dont want to overwhelm ourselves with all the possibilities!). MapBoxs Geocoding Place Search API takes the following parameters, with some additional query strings.
/geocoding/v5/mapbox.places/{search_text}.jsonWe will be using the limit query parameter to cap our results at 10, and the bbox parameter to specify the latitudinal and longitudinal bounds of London.
With all this in mind, our search url will look something like this:
https://api.mapbox.com/geocoding/v5/mapbox.places/greggs.json?access_token=${process.env.MAPBOX_KEY}&bbox=-0.227654%2C51.464102%2C0.060737%2C51.553421&limit=10We can use this url, to make a simple fetch call in our page. Our modified page will now look something like,
const Map = dynamic(() => import("../components/Map"), { loading: () => "Loading...", ssr: false});const url = `https://api.mapbox.com/geocoding/v5/mapbox.places/greggs.json?access_token=${process.env.MAPBOX_KEY}&bbox=-0.227654%2C51.464102%2C0.060737%2C51.553421&limit=10`;export default function IndexPage() { const [locations, setLocations] = useState([]); useEffect(() => { const fetchLocations = async () => { await fetch(url).then((response) => response.text()).then((res) => JSON.parse(res)) .then((json) => { setLocations(json.features); }).catch((err) => console.log({ err })); }; fetchLocations(); }, []); return (<Container> <Map /> </Container>);}We now have a list of 10 Greggs locations!
Using our search results to render pins on our map
Now that we have a list of places, we can render these on a Map. react-map-gl comes with a handy <Marker> component that makes our task pretty straight forward. First we need to pass these locations to our <Map> component.
return (<Container> <Map locations={locations} /> </Container>);Now, within out Map component, we need to render a pin for each of these locations by passing their latitude and longitude to the <Marker> component.
Our final Map component will look something like,
import { useState } from "react";import ReactMapGL, { Marker } from "react-map-gl";export default function Map({ locations }) { const [viewport, setViewport] = useState({ width: "100%", height: "100%", // The latitude and longitude of the center of London latitude: 51.5074, longitude: -0.1278, zoom: 10 });return <ReactMapGL mapStyle="mapbox://styles/mapbox/streets-v11" mapboxApiAccessToken={process.env.MAPBOX_KEY} {...viewport} onViewportChange={(nextViewport) => setViewport(nextViewport)} > {locations.map((location) => ( <div key={location.id}> <Marker latitude={location.center[1]} longitude={location.center[0]} offsetLeft={-20} offsetTop={-10}> <span role="img" aria-label="push-pin"></span> </Marker> </div> ))}</ReactMapGL>}Making the pins clickable
Were almost there! The last thing we want to do to make these maps fully functioning and interactive, is to add a popup with the name of the place. Again, Mapbox comes with a handy Popup component that makes this easy to do. We will simply add an onClick handler to our pins which will capture the details of the selected location, then we will pass the latitude and the longitude of the selected location to our <Popup> component. Itll all be clear in a second!
Within the Map component, add a useState hook to capture the selected location.
export default function Map({ locations }) { // UseState hook const [selectedLocation, setSelectedLocation] = useState({}) const [viewport, setViewport] = useState({ width: "100%", height: "100%", // The latitude and longitude of the center of London latitude: 51.5074, longitude: -0.1278, zoom: 10 });......We will also modify the render block to add an onClick handler and the <Popup> component that we just mentioned.
......return <ReactMapGL mapStyle="mapbox://styles/mapbox/streets-v11" mapboxApiAccessToken={process.env.MAPBOX_KEY} {...viewport} onViewportChange={(nextViewport) => setViewport(nextViewport)} > {locations.map((location) => ( <div key={location.id}> <Marker latitude={location.center[1]} longitude={location.center[0]} offsetLeft={-20} offsetTop={-10}> <a onClick={() => { setSelectedLocation(location); }}> <span role="img" aria-label="push-pin"></span> </a> </Marker> {selectLocation.id === location.id ? ( <Popup onClose={() => setSelectedLocation({})} closeOnClick={true} latitude={location.center[1]} longitude={location.center[0]}> {location.place_name} </Popup>) : (false)} </div> ))}</ReactMapGL>}The <Popup> component takes an onClose handler which sets the selectedLocation to {}.
And that is all! Weve managed to render a map, rendered some pins on our map and managed to make them clickable with popups! Heres our final result:
Original Link: https://dev.to/niharikak101/integrating-mapbox-with-next-js-the-cheaper-alternative-to-google-maps-g39
Dev To
More About this Source Visit Dev To