
An Interest In:
Web News this Week
- April 26, 2024
- April 25, 2024
- April 24, 2024
- April 23, 2024
- April 22, 2024
- April 21, 2024
- April 20, 2024
Some of Our Sources
- Slashdot
- Technology Review
- You The Designer
- Creative Curio
- Noupe
- CSS Globe
- Wal You
- Daily Now
- Dev To
- Hashedout
Help Webnuz
Referal links:
HarperDB and WebSockets
HarperDB and WebSockets
WebSocket is a computer communications protocol, providing full-duplex communication channels over a single TCP connection. Wikipedia
TCP stands for transmission control protocol. It is a reliable protocol; thus, it assures that the data being transmitted will be sent in its entirety (a.k.a. lossless). There are many different higher-level protocols based on TCP, each serving the general purpose of transmitting data from one point to another. HTTP, the main communication protocol of the internet, is an example of a high-level protocol many developers are familiar with. WebSocket operates similar to HTTP, but has its own variety of differences.
One of WebSocket's main principles is the full-duplex communication channels. These channels allow for simultaneous, bi-directional data transfer between the two peers. This means that at any time the systems at either end of a WebSocket connection can receive or send data.
HTTP differs in this principle because generally only the client can make requests to the server. The server completes the request, sends the response back to the client, and then waits to receive another request.
I use "generally" here since new versions of HTTP have enabled things like server push.
Consider a chat application scenario:
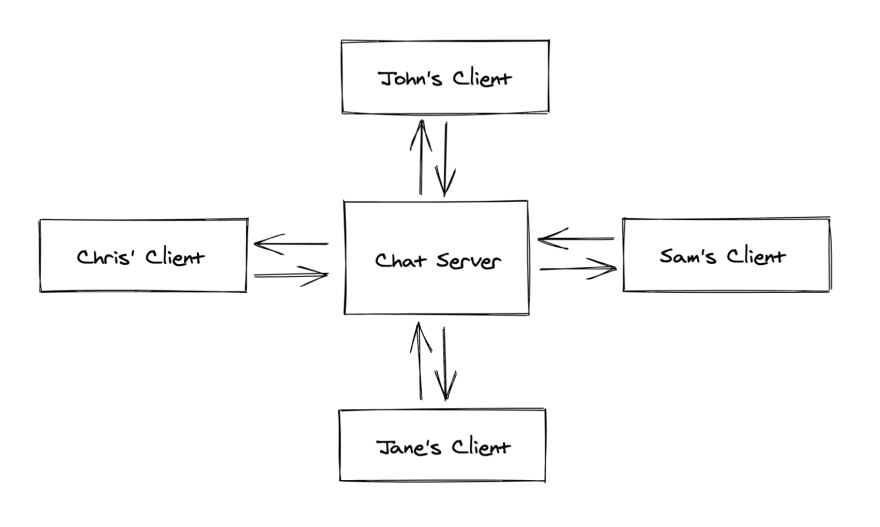
All four clients need to be kept in sync. When John sends a message, Chris, Sam, and Jane, should all receive it as quickly as possible. If this app is using HTTP, the send operation is simple, use a POST request to the server with the message. But the receive operation is a bit harder. Client's need to simultaneously be polling the server for new messages. Depending on the polling interval and the number of connected clients, the server could be looking at an alarming number of requests to handle.
With WebSockets, the flow is simplified significantly. All clients establish a connection with the server and begin subscribe to a certain channel. Any client (or the server) can publish a message to the specified channel at any time. When it does so, the server will then process the publish event, and depending on the implementation, will broadcast the new message to all client connections on the channel. This pattern is often dubbed as the pub/sub model. And is used by a plethora of applications, including HarperDB clustering!
Internally, HarperDB clusters replicate data between instances using the bi-directional pub/sub model. Clients can subscribe to the same WebSocket channels HarperDB uses and access all of the updates of a given table. Using this mechanism, developers can build applications with close-to realtime data updates. To make this application development even easier, HarperDB has published a new module, harperdb-websocket-client.
Follow along with the demo below to see it in action.
Demo
The source code for this demo can be found at Ethan-Arrowood/harperdb-websocket-tutorial
This demo will walk you through the creation of a Node.js project powered by WebSockets and HarperDB. The application will be a data entry CLI with an additional display script.
Prerequisites and Set Up
Set your current working directory to a new folder:
mkdir hdb-websocket-democd hdb-websocket-demoCreate a docker-compose.yml file with these contents:
version: '2'services: harperdb: image: harperdb/hdb:latest environment: - INIT_HDB_USERNAME=HDB_ADMIN - INIT_HDB_PASSWORD=password - INIT_CLUSTER_USER=cluster_user - INIT_CLUSTER_PASSWORD=password - INIT_ENABLE_CLUSTERING=true - INIT_NODE_NAME=docker_node - INIT_CLUSTER_PORT=12345 ports: - 9925:9925 - 31283:31283 - 12345:12345 volumes: - ./hdb_data/:/opt/harperdb/hdb/Initialize a new npm project and install two dependencies:
npm i -ynpm i undici harperdb-websocket-clientCreate three project files:
touch init.js data-entry.js data-display.jsAnd finally launch HarperDB using Docker
docker-compose upinit.js
The init script contains some necessary set up operations so the CLI application has a schema and table to query against.
Start off by importing undici, initializing a new undici client, and creating two methods requestFactory and readStream.
undici is a new Node.js http 1.1 client. It is blazing fast and has a really extensible API.
const undici = require('undici')const client = new undici.Client('http://localhost:9925') // make sure to use the http port for the HarperDB instance/** * This function takes a JSON operation and returns an undici * client request with the given operation stringified in the * `body` property. */const requestFactory = op => client.request({ path: '/', method: 'POST', headers: [ 'content-type', 'application/json', 'authorization', 'Basic SERCX0FETUlOOnBhc3N3b3Jk' // this token was generated based off of the credential settings in docker-compose.yml ], body: JSON.stringify(op)})/** * This is a helper function for processing the request responses. * Undici response `body` are returned as streams. */const readStream = async stream => { let res = '' for await (let chunk of stream) { res += chunk } return res}Next, create four database operations using the requestFactory method
const dropSchema = () => requestFactory({ 'operation': 'drop_schema', 'schema': 'dev'})const createSchema = () => requestFactory({ 'operation': 'create_schema', 'schema': 'dev'})const createTable = () => requestFactory({ 'operation': 'create_table', 'schema': 'dev', 'table': 'animals', 'hash_attribute': 'id'})const describeTable = () => requestFactory({ 'operation': 'describe_table', 'schema': 'dev', 'table': 'animals'})Finally, define an immediately invoked function expression (iife) using async/await.
;(async () => { await dropSchema() await createSchema() await createTable() // destructure the body property from the request response let { body } = await describeTable() // process the body stream let result = await readSTream(body) // sometimes the table creation fails so retry if (result.includes('Invalid table')) { await createTable() // re-destructure and process ;({ body } = await describeTable()) result = await readStream(body) } // Check the intended output in the next code block console.log(JSON.parse(result)) // close the undici client client.close()})()Now, with the HarperDB Docker container running, run this script with node init.js. The output should look something like this (but with different times and id):
{ __createdtime__: 1606254462088, __updatedtime__: 1606254462088, hash_attribute: 'id', id: 'dc42484f-0586-44c7-9e80-9d2f36b6a4ed', name: 'animals', residence: null, schema: 'dev', attributes: [ { attribute: 'id' }, { attribute: '__updatedtime__' }, { attribute: '__createdtime__' } ], record_count: 0}data-entry.js
Finally, some WebSocket action!
Start off by importing readline and HarperDBWebSocketClient, as well as initializing both:
readline is a native Node.js library.
const HarperDBWebSocketClient = require('harperdb-websocket-client')const readline = require('readline')// The credentials used here are specific to the docker-compose file defined earlierconst hdbClient = new HarperDBWebSocketClient({    hostname: 'localhost',    socketClusterOptions: {        rejectUnauthorized: false,        autoReconnect: false,        ackTimeout: 10000,        secure: true    },    port: 12345,    username: 'cluster_user',    password: 'password',    implicitInit: true})const rl = readline.createInterface({    input: process.stdin,    output: process.stdout,    // All of the \x1b things are color codes. When this runs in your terminal it should be multicolored!    prompt: '\x1b[34mEnter new animal record, in the format <type>,<name>,<size>
Example:\x1b[89m \x1b[36mdog,harper,medium\x1b[89m
\x1b[91m>\x1b[39m '})Next, using the rl interface, create the basic CLI
// kick off the clirl.prompt()rl.on('line', line => {    // for this demo we are skipping any kind of input validation.    // trim the input, split it up into an array, and then trim each entry.    // desctructure into three variables    const [ type, name, size ] = line.trim().split(',').map(v => v.trim())    // Some useful debug info    console.log(`\x1b[33mInserting new animal record: ${JSON.stringify({ type, name, size })}\x1b[89m`)    //  insert the new record using the websocket client    hdbClient.insert('dev:animals', [        { type, name, size }    ])    // prompt the user again for subsequent data entry    rl.prompt()}).on('close', () => {    // print out a nice message when the user ends the CLI session    console.log('
\x1b[92mThank you for using HarperDB Animal Data Entry CLI\x1b[39m') process.exit(0) // exit safely})The core to this demo is quite short, hdbClient.insert('dev:animals', [{ type, name, size }]) is all you need to insert records over WebSockets! The client also supports .update and .delete. At this time, the WebSocket client cannot manage things like users, tables, or schemas.
Try running the new script with node data-entry.js. The following image shows what is output in my terminal interface.

Great! The CLI is working, but we can't actually see the new records... onto data-display.js.
data-display.js
Start again by importing and initializing HarperDBWebSocketClient.
const HarperDBWebSocketClient = require('harperdb-websocket-client')const hdbClient = new HarperDBWebSocketClient({ hostname: 'localhost', socketClusterOptions: { rejectUnauthorized: false, autoReconnect: false, ackTimeout: 10000, secure: true }, port: 12345, username: 'cluster_user', password: 'password', implicitInit: true})Next, subscribe to the table the data-entry script is inserting records into.
hdbClient.subscribe('dev:animals', data => { const record = data.transaction.records[0] console.log(`New record ${record.id} inserted`)})And just like that, now data-display will log every time a new record is added to the table!
With the Docker container and the data-entry script running, open up another terminal and run node data-display.js.
Go back to the data-entry terminal and enter a new record. You should see a new ID in the data-display terminal.
The following screenshot shows the same output from data-entry as before, but also with the data-display output on the right.

Great work! Now enter as many records as you like and see how the WebSocket connections almost instantaneously output the new records. And for a special trick, try opening two more terminals. Run both scripts again so that you have two terminal instances for each script. Enter a record on the first data-entry terminal and see it output in both data-display process. Enter another record in the second data-entry terminal and see it also output in both data-display processes! WebSockets are pretty awesome.
I hope you enjoyed this article. My name is Ethan Arrowood and I'm a full time software engineer for Microsoft. I'm also an open source contributor to Fastify and Node.js. Come say hi on Twitter (@ArrowoodTech) and GitHub (@Ethan-Arrowood).
Original Link: https://dev.to/ethanarrowood/harperdb-and-websockets-3p6k
Dev To
More About this Source Visit Dev To