
An Interest In:
Web News this Week
- April 3, 2024
- April 2, 2024
- April 1, 2024
- March 31, 2024
- March 30, 2024
- March 29, 2024
- March 28, 2024
Some of Our Sources
- The Logo Smith
- Creative Curio
- Crazy Leaf Design
- My Ink Blog
- Web Design Ledger
- Reencoded
- Spyre Studios
- Freelance Switch
- Daily Now
- TechPowerUp
Help Webnuz
Referal links:
November 19, 2020 06:46 pm GMT
Step 2: Add another form to your
Original Link: https://dev.to/deboragaleano/how-to-create-a-netlify-contact-form-in-react-5bma
How to add a Netlify Contact Form in React
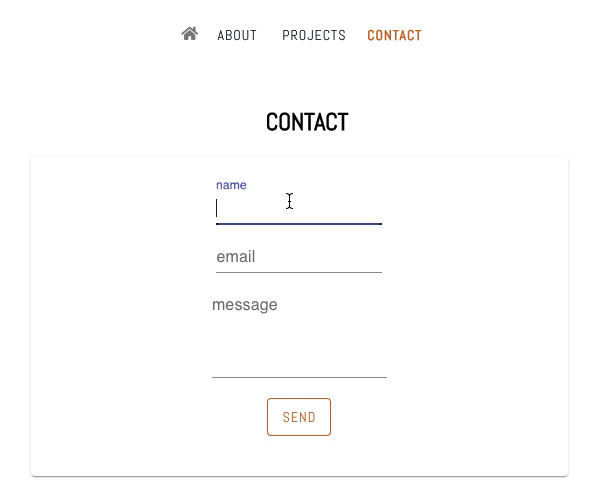
I recently created a contact form for my portfolio website using Netlify and it took me some time to set it up. I wrote this post to help other poor souls out there trying to do the same.
Here's how it looks:
Note: I used these two extremely helpful articles to guide me through: this one and this.
Step 1: Add the form with Netlify attributes
- Create a simple contact form (I used Material-UI here)
- IMPORTANT: Add Netlify built-in features to process form submissions. Look at
name,methodanddata-netlifyattributes inside theformelement - Also, Netlify recommends adding a hidden input inside the form. The important attribute here is
value, which should be the same as the forms name: contact.
<Container maxWidth='sm'> <h2>CONTACT</h2> <Card> <form name="contact" method="POST" data-netlify="true" > <input type="hidden" name="form-name" value="contact" /> <TextField id="standard-basic" label="name" name="name" /> <TextField id="standard-basic" label="email" name="email" /> <TextField multiline id="standard-basic" label="message" name="message" /> <Button type="submit">Send</Button> </form> </Card> </Container> Enter fullscreen mode Exit fullscreen mode
Step 2: Add another form to your index.html file
- Netlify recommends adding the following block of code to your
index.htmlfile, right after the opening<body>tag in order to allow Netlify to process the form. - The
actionattribute here would be used for redirecting. More on this on the next step.
<!-- A little help for the Netlify post-processing bots --><form name="contact" netlify netlify-honeypot="bot-field" action='/' hidden> <input type="text" name="name" /> <input type="email" name="email" /> <textarea name="message"></textarea></form> Enter fullscreen mode Exit fullscreen mode
Step 3: Add a success message and avoid redirecting
- What's the goal here? To help people stay on your website.
- Add the following code, including
useEffectanduseStateas well as the message under the<h2>tag - IMPORTANT: Make sure that the
actionattribute inside theformelement takes the user to the right path. In my case it's"/contact/?success=true"contact here is my route and the name of my component.
Note: most of this code was taken from one of the articles I mentioned in the introduction.
//Final code export default function Contact() { const [success, setSuccess] = useState(false); useEffect(() => { if ( window.location.search.includes('success=true') ) { setSuccess(true); } }, []); return ( <Container maxWidth="sm"> <h2>CONTACT</h2> {success && ( <p style={{ color: "green" }}>Thanks for your message! </p> )} <Card> <form name="contact" method="POST" action="/contact/?success=true" data-netlify="true" > <input type="hidden" name="form-name" value="contact" /> <TextField id="standard-basic" label="name" name="name" /> <br /> <TextField id="standard-basic" label="email" name="email" /> <br /> <TextField multiline id="standard-multiline-static" label="message" name="message" /> <br /> <div> <Button type="submit">Send</Button> </div> </form> </Card> </Container> );} Enter fullscreen mode Exit fullscreen mode
Step 4: Finally, check your form submissions
- Assuming that you've already deployed your site, check your form submissions on your Netlify project dashboard
- It should look something like this:

That's it. Hopefully it worked as expected. If not, just let me know and we'll find a way
Original Link: https://dev.to/deboragaleano/how-to-create-a-netlify-contact-form-in-react-5bma
Share this article:
Tweet

View Full Article
Dev To
More About this Source Visit Dev To