
An Interest In:
Web News this Week
- April 26, 2024
- April 25, 2024
- April 24, 2024
- April 23, 2024
- April 22, 2024
- April 21, 2024
- April 20, 2024
Some of Our Sources
- Slashdot
- BoingBoing
- Engadget
- Mashable
- Technology Review
- Smashing Magazine
- Smashing Apps
- Creative Curio
- Crazy Leaf Design
- Wal You
Help Webnuz
Referal links:
Containerize your web application & deploy it on Kubernetes
Introduction
If you are new to the concept of containers and the Docker & Kubernetes platform, chances are you will find plenty of theoretical resources online but there is a huge gap when it comes to practical tutorials.
This blog post is aimed to fill that gap. In this i will show you how you can containerize an application and get it running in Kubernetes.

What well do
We will be creating a simple flask app for this tutorial & then i'll show how you can first create a docker image of your application using Dockerfile and later deploy it on Kubernetes (available in docker desktop's built in Kubernetes environment)
I am also assuming you are at least comfortable with some of the basic commands & terminologies of docker and kubernetes
Here's how we will proceed
- We will create our application
- Containerize our app by creating an image using Dockerfile
- Finally deploying everything on kubernetes
Creating an application
A containerized development environment is easy to manage and share with other developers as it can be easily deployed without any change to their standard environment.
First let's create a simple web app using flask & name it "app.py"
# make sure you have flask installed in your environmentfrom flask import Flask app = Flask(__name__)@app.route('/',methods = ['GET']) def func(): return 'Hello World'if __name__ == "__main__": app.run(host='0.0.0.0')In this we have created one GET method
To test this, simply run python app.py in your console & type http://localhost:5000 (port 5000 is the default port for the development server) in your browser and you'll see the output as the following

Create a Dockerfile
Now that your app is working fine, the first step in containerizing the application is to create a Dockerfile.
But wait, what is a Dockerfile? 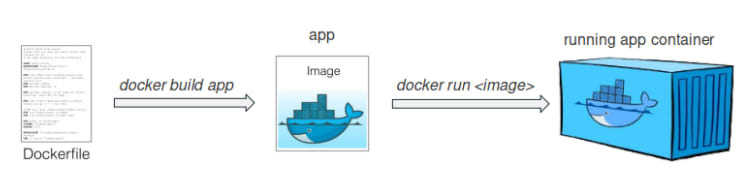
Dockerfile is a set of instructions Docker will use to build the image. To create one, Open any text editor of your choice & write down the following code in it.
Also make sure to name this file exactly as Dockerfile without any extension
FROM python:3.7RUN mkdir /codeWORKDIR /codeADD . /codeRUN pip install -r requirements.txtEXPOSE 5000CMD ["python","/code/app.py"]In this Docker will :
- Get the official Python Base Image for version 3.7 from Docker Hub.
- In the image, create a directory named code & set it as the working directory.
- Copy the local directorys contents to that new folder into the image.
- Run the pip installer to pull the requirements into the image.
- Inform Docker the container listens on port 5000(default port).
- Configure the starting command to use when the container starts.
For the 4th point you need to create a requirements.txt file which will contain all the required libraries your application will need to run. In this case we will only need flask.
Create an image
To create an image using this Dockerfile run the following command in your local directory where your application is located
docker build -f Dockerfile -t hello-python:latest .You will see something like this going on in your terminal -
Now to check if the image is created properly run :
docker image ls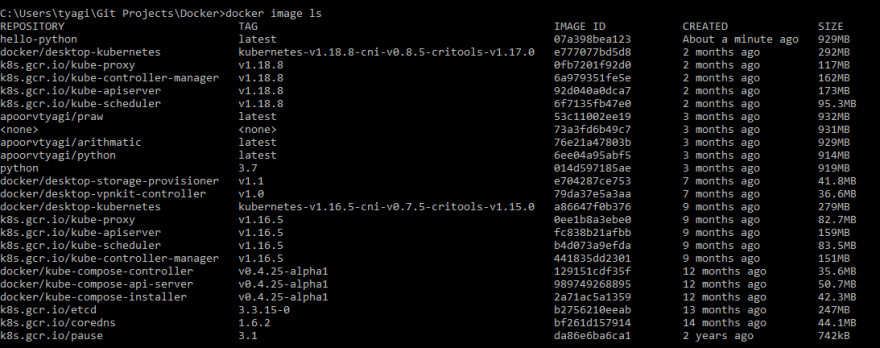
In this you can see on the very top that our image is created successfully by the name of hello-python. To verify this you can also try running the image using the following command
docker run -dp 5000:5000 hello-python
Now go to http://localhost:5000 & you can see the output like this
YAY!!! Our docker image is running perfectly.
Deploying on Kubernetes
We are finally ready to get the application running in Kubernetes. We just need to create a service and a deployment in our k8s.

Before we move forward make sure you have kubectl installed in your machine
If everything is configured then it's time to move on & create a yaml file with the following contents in it :
apiVersion: v1kind: Servicemetadata: name: hello-world-pythonspec: selector: app: hello-world-python ports: - protocol: "TCP" port: 6000 targetPort: 5000 type: LoadBalancer---apiVersion: apps/v1kind: Deploymentmetadata: name: hello-world-pythonspec: selector: matchLabels: app: hello-world-python replicas: 4 template: metadata: labels: app: hello-world-python spec: containers: - name: hello-world-python image: hello-python imagePullPolicy: Never ports: - containerPort: 5000What Yaml file does is it tells kubernetes about what we want run.
For example with this yaml file above, It is telling Kubernetes the following:
- You want a load-balanced service exposing port 6000
- You want four instances of the hello-python container running
In this Kubernetes YAML file, we have two objects, separated by the ---:
one is the service & other one is the deployment
While Kubernetes YAML can appear long and complicated at first, it almost always follows the same pattern:
The apiVersion, which indicates the Kubernetes API that parses this object
The kind indicating what sort of object this is
Some metadata applying things like names to your objects
The spec specifying all the parameters and configurations of your object.
Use kubectl to send the YAML file to Kubernetes by running the following command:
kubectl apply -f deployment.yamlAfter this you will see all your pods running when you type
kubectl get pods

Similarly you can check your deployments & services by running :
kubectl get deployments
and
kubectl get services
Now navigate to http://localhost:6000 and you should be able to see the "Hello World" message
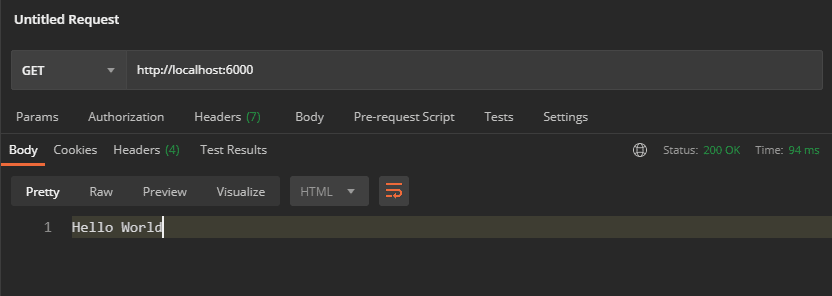
Thats it! The application is now running in Kubernetes!
Conclusion
At this point, we have successfully deployed our application to a Kubernetes environment. We havent done much with Kubernetes yet, but now that you have a basic understanding of k8s, you can begin adding other components to your app and taking advantage of all the features and power of Kubernetes.
In addition to deploying to Kubernetes, we have also described our application as a Kubernetes YAML file. This simple text file contains everything we need to create our application in a running state.
We didn't talked about the theoretical concepts in detail so in case if you get stuck somewhere or didn't understand any particular piece, reply in the comments or @ me on Twitter any time.
If you like what you read here and want to show support, consider buying me some coffee

Original Link: https://dev.to/apoorvtyagi/containerize-your-web-application-deploy-it-on-kubernetes-3k5o
Dev To
More About this Source Visit Dev To