
An Interest In:
Web News this Week
- April 29, 2024
- April 28, 2024
- April 27, 2024
- April 26, 2024
- April 25, 2024
- April 24, 2024
- April 23, 2024
Some of Our Sources
- BoingBoing
- TutsPlus - Code
- Spoon Graphics
- Abduzeedo
- TutsPlus - Design
- Naldz Graphics
- Web Design Ledger
- CSS Globe
- Specky Boy
- Dev To
Help Webnuz
Referal links:
How to Create an Architecture Sketch Effect in Adobe Photoshop

In this tutorial you will learn how to create an amazing architecture sketch effect. I will explain everything in so much detail that everyone can create it, even those who have just opened Photoshop for the first time.
The effect shown above is the one I will show you how to create in this tutorial. If you would like to create the even more advanced sketch with watercolor effects shown below, using just a single click and in only a few minutes, then check out my TechnicalArt 2 Photoshop Action.

Follow along with us over on our Envato Tuts+ YouTube channel:
What You'll Need
To recreate the design above, you will need the following resources:
1. Let's Get Started
First, open the photo that you want to work with. To open your photo, go to File > Open, choose your photo, and click Open. Now, before we get started, just check a couple of things:
- Your photo should be in RGB Color mode, 8 Bits/Channel. To check this, go to Image > Mode.
- For best results, your photo size should be 2000–4000 px wide/high. To check this, go to Image > Image Size.
- Your photo should be the Background layer. If it is not, go to Layer > New > Background from Layer.

2. How to Create the Background
Step 1
In this section, we are going to create the background. Go to Layer > New Fill Layer > Solid Color to create a new solid color fill layer, name it Background color, and choose the color #f0f0f0 as shown below:

Step 2
Now Right-click on this layer, choose Blending Options, check Gradient Overlay, and use the settings below:

3. How to Create the Main Sketch
Step 1
In this section we are going to create the main sketch. Select the Background layer and press Control-J on your keyboard to duplicate this layer. Then, drag this layer to the top of the Layers panel.

Step 2
Now press Control-Shift-U on your keyboard to desaturate this layer. Then, go to Image > Adjustments > Levels and enter the settings below:

Step 3
Name this layer Temp and press Control-J on your keyboard to duplicate this layer.

Step 4
Now press Control-I on your keyboard to invert this layer and change the Blending Mode of this layer to Color Dodge. Then, go to Filter > Other > Minimum, and set the Radius to 2 px and Preserve to Squareness as shown below:

Step 5
Control-click on the Temp layer to get both layers selected at the same time. Then, press Control-E on your keyboard to merge these two layers into one layer.

Step 6
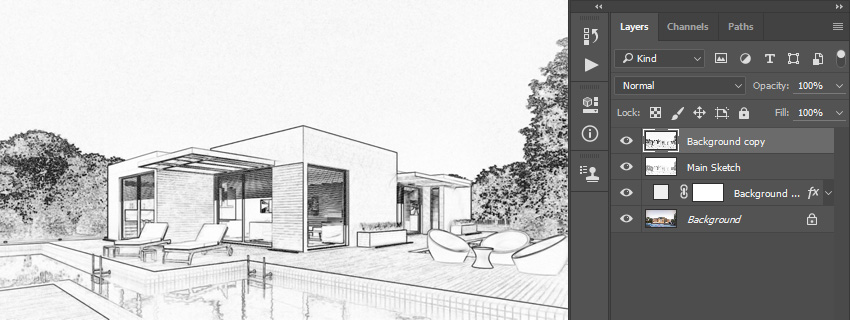
Change the Blending Mode of this layer to Multiply and name it Main Sketch.

4. How to Create the Perspective Sketch
Step 1
In this section, we are going to create the perspective sketch. Select the Background layer and press Control-J on your keyboard to duplicate it. Then, drag this layer to the top of the Layers panel.

Step 2
Now go to Filter > Stylize > Find Edges and then press Control-Shift-U on your keyboard to desaturate this layer.
Step 3
Go to Filter > Blur > Motion Blur, and set the Angle to 90° and Distance to 1200 px as shown below:

Step 4
Now go to Filter > Sharpen > Smart Sharpen and enter the settings below:

Step 5
Go to Filter > Filter Gallery > Sketch > Photocopy, and set the Detail to 2 and Darkness to 5.

Step 6
Change the Blending Mode of this layer to Multiply and change the Opacity to 40%. Then, name this layer Perspective_Sketch_1.

Step 7
Now go to Layer > Layer Mask > Hide All to add a layer mask that hides the whole layer.

Step 8
Set the foreground color to #ffffff, choose the Brush Tool (B), pick a soft brush, and brush where you want to reveal the vertical perspective lines.

Step 9
Now select the Background layer and press Control-J on your keyboard to duplicate this layer. Then, drag this layer just below the Perspective_Sketch_1 layer in the Layers panel.

Step 10
Go to Filter > Stylize > Find Edges and then press Control-Shift-U on your keyboard to desaturate this layer.

Step 11
Go to Filter > Blur > Motion Blur, and set the Angle to 0° and Distance to 1200 px as shown below:

Step 12
Now go to Filter > Sharpen > Smart Sharpen and enter the settings below:

Step 13
Go to Filter > Filter Gallery > Sketch > Photocopy, and set the Detail to 2 and Darkness to 5.

Step 14
Change the Blending Mode of this layer to Multiply and change the Opacity to 55%. Then, name this layer Perspective_Sketch_2.

Step 15
Now go to Layer > Layer Mask > Hide All to add a layer mask that hides the whole layer.

Step 16
Set the foreground color to #ffffff, choose the Brush Tool (B), pick a soft brush, and brush where you want to reveal the horizontal perspective lines.

5. How to Create the Text
Step 1
In this section, we are going to create the text. Choose the Horizontal Type Tool (T) and set the font to Hijrnotes, font size to 80 px, alignment to Left, and color to #000000. Then, click anywhere inside the canvas and go to Type > Paste Lorem Ipsum to paste some random text. Feel free to use your own text and font settings.

Step 2
Double-click on this layer thumbnail to make the text editable and delete some of the text. Then, choose the Move Tool (V) and click and drag anywhere inside the canvas to position the text as shown below:

Step 3
Now name this layer Text_1. Then, press Control-J on your keyboard to duplicate this layer.

Step 4
Double-click on this layer thumbnail to make the text editable, press Control-A to select all text, and go to Type > Paste Lorem Ipsum to paste random text. Then, delete some of the text, choose the Move Tool (V), and click and drag anywhere inside the canvas to position the text as shown below:

Step 5
Name this layer Text_2 and drag it just below the Text_1 layer in the Layers panel. Then, press Control-J on your keyboard to duplicate this layer.
Step 6
Now Double-click on this layer thumbnail to make the text editable, press Control-A to select all text, and go to Type > Paste Lorem Ipsum to paste random text. Then, delete some of the text, choose the Move Tool (V), and click and drag anywhere inside the canvas to position the text as shown below:

Step 7
Press Control-T on your keyboard to transform this layer and set the Rotate to 15°.

Step 8
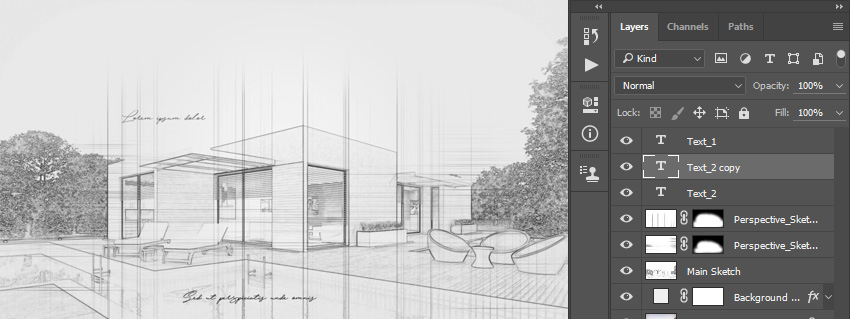
Now name this layer Text_3 and drag it just below the Text_2 layer in the Layers panel.

6. How to Make the Final Adjustments
Step 1
In this section, we are going to make final adjustments to the design. Press D on your keyboard to reset the swatches and select the Text_1 layer. Then, go to Layer > New Adjustment Layer > Gradient Map to create a new gradient map adjustment layer and name it Overall Contrast.

Step 2
Now change the Blending Mode of this layer to Soft Light and set the Opacity to 35%.

Step 3
Go to Layer > New Adjustment Layer > Levels to create a new levels adjustment layer and name it Overall Brightness.

Step 4
Now Double-click on this layer thumbnail and, in the Properties panel, use the settings below:

Step 5
Press Control-Alt-Shift-E on your keyboard to make a screenshot. Then, go to Filter > Other > High Pass and set the Radius to 2 px as shown below:

Step 6
Change the Blending Mode of this layer to Hard Light and name it Overall Sharpening.

You Made It!
Congratulations, you have succeeded! Here is our final result:

If you would like to create the even more advanced sketch with watercolor effects shown below, using just a single click and in
only a few minutes, then check out my TechnicalArt 2 Photoshop Action.
The
action works so you simply brush over your photo with a color and just
play the action. The action will do everything for you,
giving you fully
layered and customizable results. There are also over 60 high-quality watercolor brushes included with the
action that you can use to build the designs even further. The action
will also create four textures (watercolor, canvas, paper, and halftone)
and 25 preset color looks that you can choose from.
The action comes with a detailed video tutorial that demonstrates how to use the action and customize the results to get the most out of the effect.
You can also get this item in a bundle and save 50%—check out my Artistic 4in1 Photoshop Actions Bundle.
Original Link: https://design.tutsplus.com/tutorials/architecture-sketch-photoshop-effect-action--cms-30614
TutsPlus - Design
More About this Source Visit TutsPlus - Design