
An Interest In:
Web News this Week
- April 26, 2024
- April 25, 2024
- April 24, 2024
- April 23, 2024
- April 22, 2024
- April 21, 2024
- April 20, 2024
Some of Our Sources
- Engadget
- Simplebits
- Six Revisions
- Abduzeedo
- You The Designer
- Web Designer Depot
- FanExtra - PSD
- Crazy Leaf Design
- My Ink Blog
- Spyre Studios
Help Webnuz
Referal links:
An introduction to promises
Introduction
Promises are one of the most important yet confusing and difficult to understand part of JavaScript, that most freshers, as well as experienced developers, struggle to understand.
So in this multi-part series, we'll explore all about promises, async/await, various promise methods and how to use promises for building real-world applications.
So let's get started with this first part in the series.
Promises
Promises are added in ES6 as a native implementation.
Promise represents an asynchronous operation to be completed in the future.
Previously, Before ES6, there was no way to wait for something to perform some operation.
For example, when we make an API call, there was no way to wait until we get the result back before ES6 came.
For that, We have used external libraries like Jquery or Ajax which had their own implementation of promises but there was no browser implemented promise thing.
But Now using Promises in ES6, we can make an API call ourselves and wait until it's done to perform some operation.
How to create a Promise
To create a promise we need to use the Promise constructor function like this:
const promise = new Promise(function(resolve, reject) {});The Promise constructor takes a function as an argument and that function internally receives resolve and reject as parameters.
The resolve and reject parameters are actually functions that we can call depending on the outcome of the asynchronous operation.
Promise goes through three states.
- Pending
- Fulfilled
- Rejected
When we create a promise, its in a pending state, and when we call the resolve function, it goes in a fulfilled state and if we call reject it will go in the rejected state.
To simulate the long-running or asynchronous operation, we will use the setTimeout function.
const promise = new Promise(function(resolve, reject) { setTimeout(function() { const sum = 4 + 5; resolve(sum); }, 2000);});Here, we've created a Promise which will resolve to the sum of 4 and 5 after 2000ms(2 seconds) timeout is over.
To get the result of the successful promise execution, we need to register a callback using .then like this:
const promise = new Promise(function(resolve, reject) { setTimeout(function() { const sum = 4 + 5; resolve(sum); }, 2000);});promise.then(function(result) { console.log(result); // 9});If the operation is not successful, then we call reject function like this:
const promise = new Promise(function(resolve, reject) { setTimeout(function() { const sum = 4 + 5 + 'a'; if(isNaN(sum)) { reject('Error while calculating sum.'); } else { resolve(sum); } }, 2000);});promise.then(function(result) { console.log(result);});Here, If the sum is not a number then we're calling the reject method with the error message otherwise we're calling the resolve method.
If you execute the above code, you will see the following output:
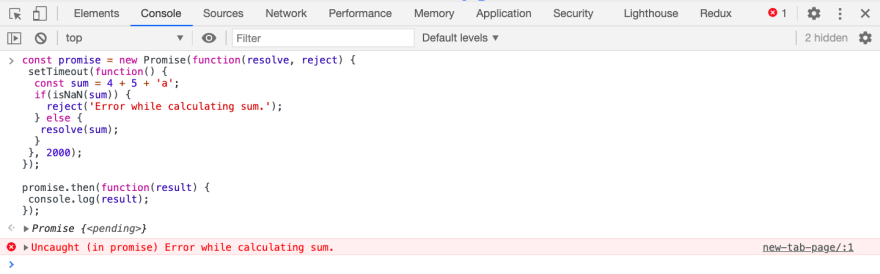
As you can see, we're getting an uncaught error message along with the message we've specified because calling reject function, throws an error but we have not added any error handler for catching that error.
To catch the error, we need to register another callback using .catch like this:
promise.then(function(result) { console.log(result);}).catch(function(error) { console.log(error);});You will see the following output:
As you can see, we have added the .catch handler, so we're not getting any uncaught error but we're just logging the error to the console.
This also avoids stopping your application abruptly.
So it's always recommended to add
.catchhandler to every promise so your application will not stop from running because of the error.
Promise chaining
We can add multiple .then handlers to a single promise like this:
promise.then(function(result) { console.log('first .then handler'); return result;}).then(function(result) { console.log('second .then handler'); console.log(result);}).catch(function(error) { console.log(error);});When we have multiple .then handlers added, the return value of the previous .then handler is automatically passed to the next .then handler.

As you can see, adding 4 + 5 resolves a promise and we get that sum in the first .then handler. There we're printing a log statement and returning that sum to the next .then handler.
And inside the next .then handler, we're adding a log statement and then we're printing the result we got from the previous .then handler.
This way of adding multiple .then handlers is known as promise chaining.
Delaying a promise execution
Many times we don't want to create promise immediately. We want to create a promise after some operation is completed.
To achieve this, we can wrap the promise in a function and return that promise from that function like this:
function createPromise() { return new Promise(function(resolve, reject) { setTimeout(function() { const sum = 4 + 5; if(isNaN(sum)) { reject('Error while calculating sum.'); } else { resolve(sum); } }, 2000); });}This way, we can use the function parameters inside the promise, making the function truly dynamic.
function createPromise(a, b) { return new Promise(function(resolve, reject) { setTimeout(function() { const sum = a + b; if(isNaN(sum)) { reject('Error while calculating sum.'); } else { resolve(sum); } }, 2000); });}createPromise(1,8) .then(function(output) { console.log(output); // 9});// ORcreatePromise(10,24) .then(function(output) { console.log(output); // 34});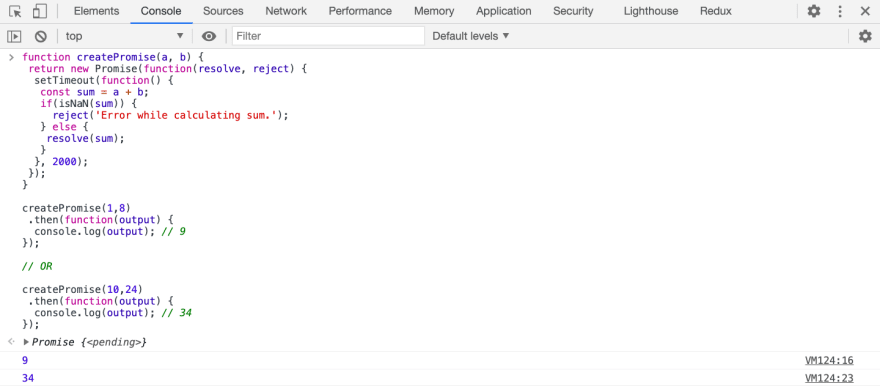
Note: When we create a promise, it will be either resolved or rejected but not both at the same time. So we cannot add two
resolveorrejectfunction calls in the same promise.
Also, we can pass only a single value to resolve or reject function.
If you want to pass multiple values to resolve function, pass it as an object like this:
const promise = new Promise(function(resolve, reject) { setTimeout(function() { const sum = 4 + 5; resolve({ a: 4, b: 5, sum }); }, 2000);});promise.then(function(result) { console.log(result);}).catch(function(error) { console.log(error);});
Using arrow functions
In all the above code examples, we've used normal ES5 function syntax while creating promises. But it's a common practice to use arrow function syntax instead of ES5 function syntax like this:
const promise = new Promise((resolve, reject) => { setTimeout(() => { const sum = 4 + 5 + 'a'; if(isNaN(sum)) { reject('Error while calculating sum.'); } else { resolve(sum); } }, 2000);});promise.then((result) => { console.log(result);});You can either use ES5 or ES6 function syntax depending on your preference and need.
Avoid Callback Hell
Promises also help to avoid the callback hell problem.
This is the frequently asked Interview question about promises.
To understand it in details with various live code samples, check out my previous article here
Conclusion
Promises are the most powerful and useful feature added in ES6 which helps to avoid callback hell problem and perform asynchronous operation easily.
In the next part, we'll explore what is async/await and how to use it. So stay tuned for that.
Don't forget to subscribe to get my weekly newsletter with amazing tips, tricks and articles directly in your inbox here.
Original Link: https://dev.to/myogeshchavan97/an-introduction-to-promises-part-1-21fp
Dev To
More About this Source Visit Dev To