
An Interest In:
Web News this Week
- April 17, 2024
- April 16, 2024
- April 15, 2024
- April 14, 2024
- April 13, 2024
- April 12, 2024
- April 11, 2024
Some of Our Sources
- Techcrunch
- Web Designer Wall
- Smashing Apps
- You The Designer
- Web Designer Depot
- Naldz Graphics
- Noupe
- 24 Ways
- Specky Boy
- Freelance Switch
Help Webnuz
Referal links:
Delegates in Swift
The delegate pattern is a very useful design solution in Swift - its handiness comes from the fact that it can pass responsibility around within your code. One class or struct can call a delegate method, and some other object takes care of doing the work, so it seems that its happening behind the scenes.
Delegation can seem hairy and overly complicated at the outset, but if you break it down to its essentials, the pattern is pretty straightforward, and after employing it a few times, it will seem second nature.
At the heart of the delegate pattern are protocols. A protocol itself is not a piece of code that does work; instead it acts as a blueprint that defines a set of requirements. These requirements can be functions, properties, and more that must be defined in the conforming object, so it can successfully obey the protocol.
A protocol is defined with the protocol keyword and a name.
protocol MyProtocol { // the protocol requirements are defined inside var requiredString: String { get set } func requiredFunction() }Notice that the body of the function is not filled out, all that is defined is the name and any inputs. The string requirement here is declared with { get set } because, as a variable, it is gettable and settable.
An object adopts the protocol by adding a colon after its name, then listing the protocol it wishes to adopt, and conforming to its requirements within.
struct MyStruct: MyProtocol { // this object must then conform to protocol requirements var requiredString = This is the conforming string func requiredFunction() { print(Here we have conformed to the function requirement with an implementation of the function) }}This is all important to understand, because delegation relies on the implementation of a protocol. Together, a protocol and a delegate are what makes the delegate pattern happen. Lets take a look at an example from my journaling app, Space Log.
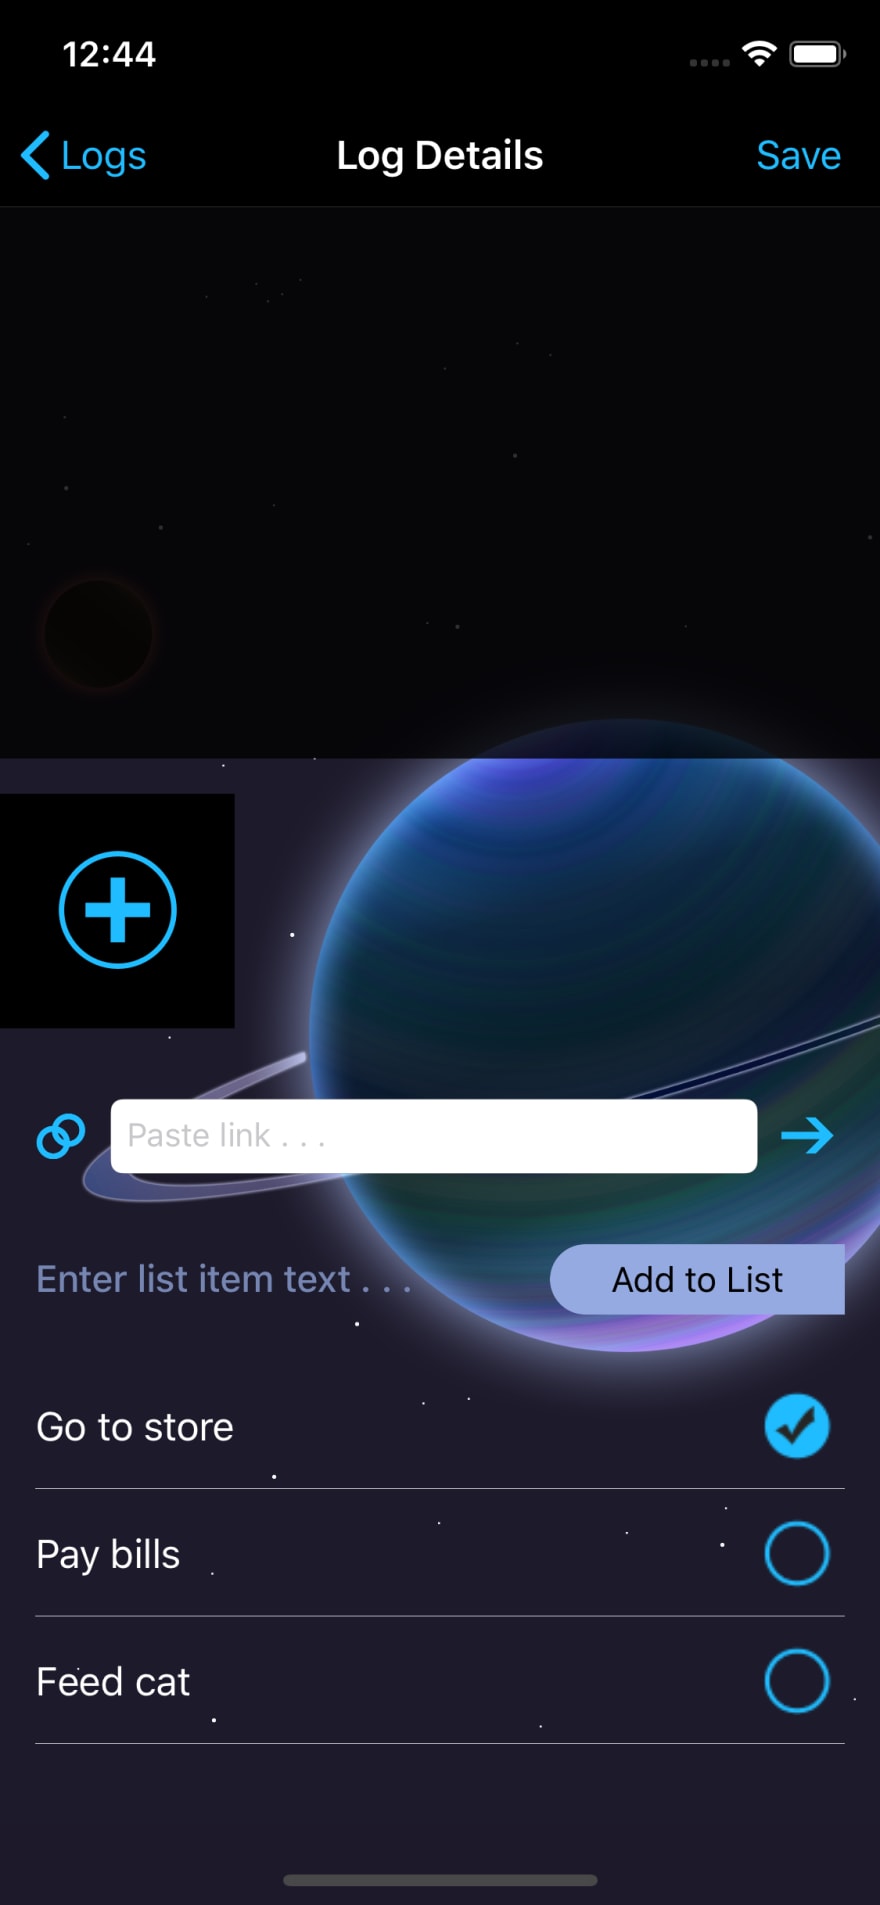
One of the features of Space Log is that it allows users to create to-do lists, and check off individual items. Here, delegation is used in the UITableViewCell file to detect when a cells button has been tapped, then calls the delegates method, which passes along info on the cell and its checked state to the detail view, where it then updates the appropriate checklist items completion value.
Delegation allows this information to be communicated easily across the different objects involved. Lets start with where the delegate protocol is declared.
protocol CellCheckDelegate: class { func didChangeSelectedState(sender: CheckListTableViewCell, isChecked: Bool) }Here the protocol requires a function, which has a cell and bool input. The protocol is class-bound, using the class keyword, which means the delegate, when declared, must be weak. Delegates should be declared as weak, so they are not held strongly in memory, in order to prevent a strong reference cycle.
Now well see that declaration in action. The delegate is defined inside the CheckListTableViewCell file. It is weak, variable, and optional.
weak var cellDelegate: CellCheckDelegate?Below, inside the IBAction that handles taps on the cell button, is a call to the delegates function. Self, which is the cell, is passed in as the sender and a variable isChecked that is set based on the current checked or unchecked state is passed in as well. Note the use of self, as the delegate is declared within CheckListTableViewCell, and the question mark, since the delegate is an optional.
self.cellDelegate?.didChangeSelectedState(sender: self, isChecked: isChecked)This call then tells the detail controller, which conforms to the protocol, to take action. Lets look at where this code is set forth.
First, within func tableView(_ tableView: UITableView, cellForRowAt indexPath: IndexPath) the cells delegate is set, after the cell has been declared, and before the cell is returned.
cell.cellDelegate = selfThis creates the bridge, so to speak, between CheckListTableViewCell and the cell that is created in the tableView, by referring to the delegate within CheckListTableViewCell (this 'holding onto each other' is why the delegate being declared as weak is important, since elements of code 'holding on' to each other is what can create a strong reference cycle if the weak keyword is not used).
In an extension, the detail controller then adopts the CellCheckDelegate, and conforms to it by filling out implementation for the didChangeSelectedState function.
extension DetailViewController: CellCheckDelegate { func didChangeSelectedState(sender: CheckListTableViewCell, isChecked: Bool) { let path = self.tableView.indexPath(for: sender) if let selected = path { checkList[selected.row].isComplete = isChecked } }}This function is what ends up being performed when the delegate function is called from the IBAction within CheckListTableViewCell. It uses the sender (cell) path to find which checkList item needs to be modified, then assigns the completion value to the checkList items isComplete value.
You can see this code in action in the repo here!
Employing the delegate pattern allows this process to be carried out in relatively few lines of code, and does so in a lightweight manner. I hope this has helped you understand delegates a bit better - if it has, give it a like!
Original Link: https://dev.to/kduncanwelke/delegates-in-swift-2kfa
Dev To
More About this Source Visit Dev To