
An Interest In:
Web News this Week
- April 3, 2024
- April 2, 2024
- April 1, 2024
- March 31, 2024
- March 30, 2024
- March 29, 2024
- March 28, 2024
Some of Our Sources
- Mashable
- Techcrunch
- Team Treehouse
- Abduzeedo
- You The Designer
- Reencoded
- Freelance Switch
- Design Modo
- Willems Lab
- Dev To
Help Webnuz
Referal links:
How to set up a Smashing dashboard on your Raspberry Pi
As an OS we are going to use DietPi because it automates most of the setups. There is a 64Bit version available but at the time of writing this, I can't install Chromium on it.
To install DietPi you can follow their Guide. For flashing I used RPi Imager.
Now you should be here:
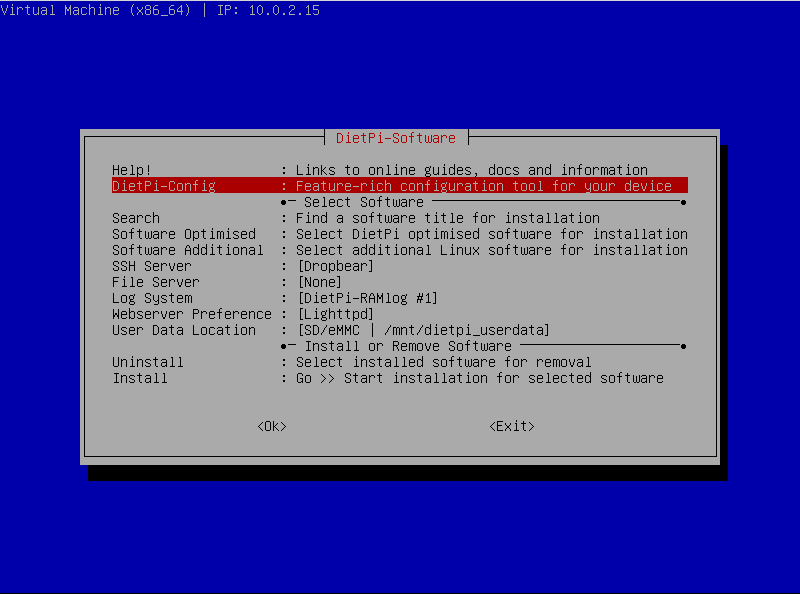
First Run
Enter Software Optimised, select Chromium (using the arrows and spacebar), and then press Enter.
After that go to DietPi-Config -> Display Options -> Display Resolution and select the current screen resolution.
After that go back until you see AutoStart Options, select Chromium with Enter, you can leave the URL as it is and make sure the user is set to root. Go all the way back by selecting Exit.
Then go to Software Additional and select Build-Essentials, Git, Node.JS, and your editor of choice. Exit by pressing Enter. (Pressing Esc will clear your Settings)
And finally, select Install and reboot at the end.
Setting up Chromium
In some cases, the window size of Chromium might be smaller than the resolution. Looking like this:

To fix this we have to edit these variables in the file at /boot/dietpi.txt and set them to your appropriate resolution:
SOFTWARE_CHROMIUM_RES_X=1280SOFTWARE_CHROMIUM_RES_Y=720After that, we have to modify the chromium autostart script to fix some glaring issues. It can be found here /var/lib/dietpi/dietpi-software/installed/chromium-autostart.sh
CHROMIUM_OPTS="--kiosk --test-type --window-size=$RES_X,$RES_Y --start-fullscreen --start-maximized --window-position=0,0"To this variable add these options:
--no-default-browser-checkDisables the default browser check. Useful for UI/browser tests where we want to avoid having the default browser info-bar displayed.--disable-component-updateDisable the popup for updating chromium or saying it can't update chromium.--no-first-runSkip First Run tasks, whether or not it's actually the First Run.
More info on command line switches here
Right before:
xinit $FP_CHROMIUM $CHROMIUM_OPTSadd these commands:
sed -i 's/"exited_cleanly":false/"exited_cleanly":true/' ~/.config/chromium/'Local State'sed -i 's/"exited_cleanly":false/"exited_cleanly":true/; s/"exit_type":"[^"]\+"/"exit_type":"Normal"/' ~/.config/chromium/Default/PreferencesThese set in the local chromium settings the exited_cleanly value, it tells chromium it always exited as it should. This being a RaspberryPi, Chromium might close directly and we don't want to see the "Restore Previous Session" pop-up.
In the end, you should have a file that looks like this
#!/bin/bash# Autostart run script for Kiosk mode, based on @AYapejian https://github.com/MichaIng/DietPi/issues/1737#issue-318697621# - Please see /root/.chromium-browser.init (and /etc/chromium.d/custom_flags) for additional egl/gl init options# Command line switches https://peter.sh/experiments/chromium-command-line-switches/# --test-type gets rid of some of the chromium warnings that you may or may not care about in kiosk on a LAN# --pull-to-refresh=1# --ash-host-window-bounds="400,300"# Resolution to use for kiosk mode should ideally match current system resolutionRES_X=$(sed -n '/^[[:blank:]]*SOFTWARE_CHROMIUM_RES_X=/{s/^[^=]*=//p;q}' /boot/dietpi.txt)RES_Y=$(sed -n '/^[[:blank:]]*SOFTWARE_CHROMIUM_RES_Y=/{s/^[^=]*=//p;q}' /boot/dietpi.txt)CHROMIUM_OPTS="--kiosk --test-type --no-default-browser-check --no-first-run --disable-component-update --window-size=$RES_X,$RES_Y --start-fullscreen --start-maximized --window-position=0,0"# If you want tablet mode, uncomment the next line.#CHROMIUM_OPTS+=' --force-tablet-mode --tablet-ui'# Add URL for the first run:URL=$(sed -n '/^[[:blank:]]*SOFTWARE_CHROMIUM_AUTOSTART_URL=/{s/^[^=]*=//p;q}' /boot/dietpi.txt)CHROMIUM_OPTS+=" --homepage $URL"# Find absolute file path location of Chromium binary.FP_CHROMIUM=$(command -v chromium)if [[ ! $FP_CHROMIUM ]]; then # Assume RPi FP_CHROMIUM="$(command -v chromium-browser)"fised -i 's/"exited_cleanly":false/"exited_cleanly":true/' ~/.config/chromium/'Local State'sed -i 's/"exited_cleanly":false/"exited_cleanly":true/; s/"exit_type":"[^"]\+"/"exit_type":"Normal"/' ~/.config/chromium/Default/Preferencesxinit $FP_CHROMIUM $CHROMIUM_OPTSSetting up Smashing
Smashing is a Sinatra based framework that lets you build beautiful dashboards. (from their docs)
Log in as the user dietpi(it's the default user) and run these steps:
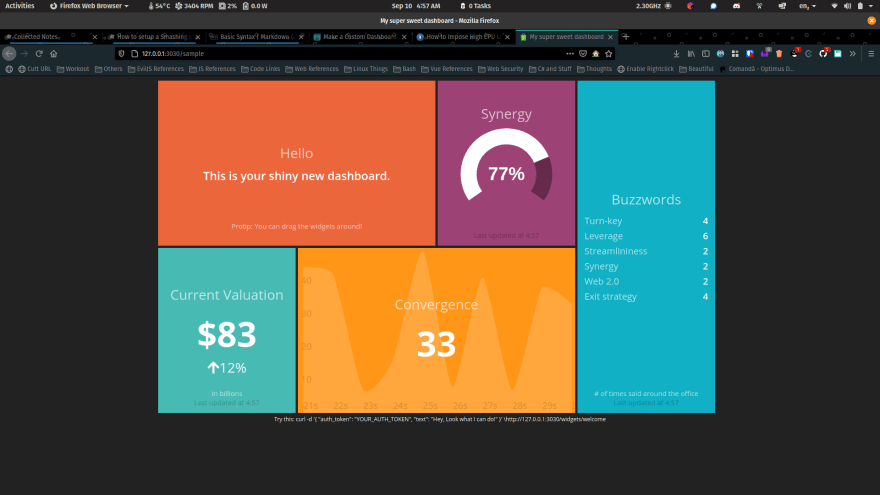
# Install rubysudo apt install ruby-dev# Install gemssudo gem install smashing bundler# Generate sample projectsmashing new sample_dashboardcd sample_dashboard# Install dependenciesbundle install# Runsmashing startNow you should be able to connect to it on localhost, or using the LAN address of the Raspberry Pi on port 3030 and it should look something like this:
Now that we know it works we need to set up the service that autostarts the dashboard and tell chromium to load our link on boot.
Create a file called smashing.service in path /etc/systemd/system containing:
[Unit]Description=Start Smashing DashboardBefore=graphical.targetAfter=network.target remote-fs.target[Service]Type=execRestart=alwaysRestartSec=60TimeoutSec=5minKillMode=control-groupGuessMainPID=noUser=dietpiGroup=dietpiWorkingDirectory=/home/dietpi/sample_dashboardExecStart=/usr/local/bin/smashing start#ExecStop=/usr/local/bin/smashing stopPrivateTmp=truePrivateDevices=trueProtectSystem=fullMountFlags=privateNoNewPrivileges=true[Install]WantedBy=multi-user.targetMake sure to change the WorkingDirectory to the path where your dashboard is at.
More info about the service options here
After that do:
# Reload the Daemon to see our changessudo systemctl daemon-reload# Start smashing on bootsudo systemctl enable smashingAnd to modify the link that Chromium loads we can either modify from the TUI using the app dietpi-config or modify the variable SOFTWARE_CHROMIUM_AUTOSTART_URL in /boot/dietpi.txt and set it to http://localhost:3030
Now reboot and it should automagically load the dashboard full-screen on boot having this as a final result:

More info on Smashing here
If you want to have more control over the performance of the smashing service you can use dietpi-services.
DietPi has a lot of tooling that makes your life with a RaspberryPi much much better and I recommend looking more into it.
Original Link: https://dev.to/sweethuman/how-to-set-up-a-smashing-dashboard-on-your-raspberry-pi-2h70
Dev To
More About this Source Visit Dev To