
An Interest In:
Web News this Week
- May 1, 2024
- April 30, 2024
- April 29, 2024
- April 28, 2024
- April 27, 2024
- April 26, 2024
- April 25, 2024
Some of Our Sources
- Simplebits
- Just Creative
- Pearsonified
- You The Designer
- Naldz Graphics
- My Ink Blog
- Reencoded
- CSS Globe
- Android Headlines
- TechPowerUp
Help Webnuz
Referal links:
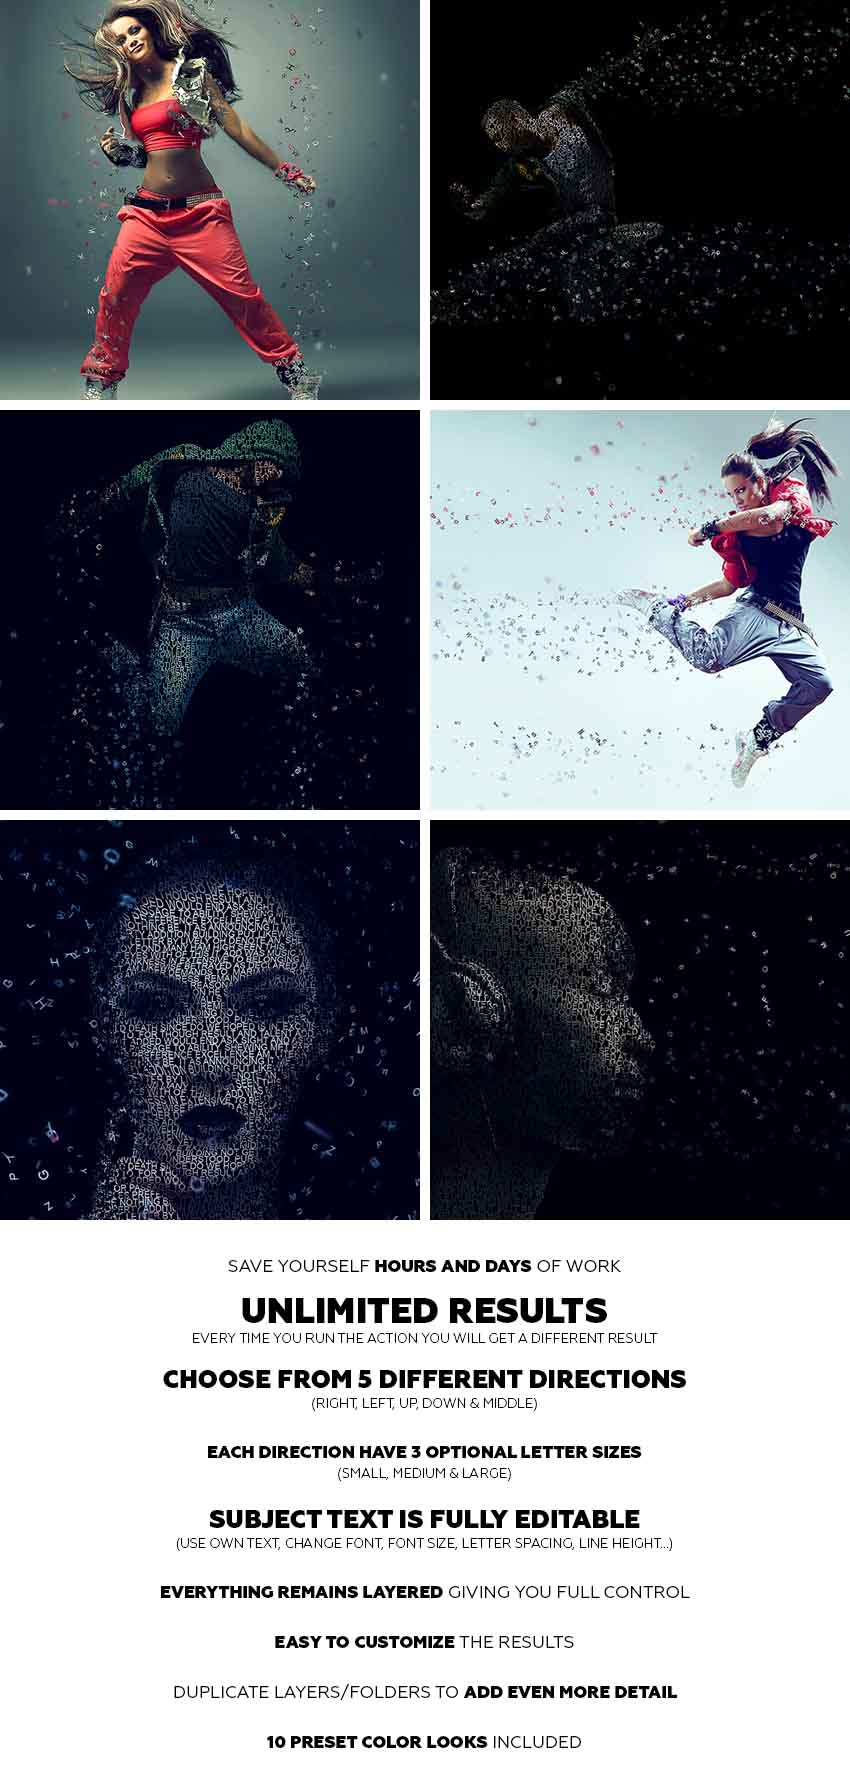
How to Create a Typography Dispersion Action in Adobe Photoshop

In this tutorial, you will learn how to create an amazing typography dispersion effect. First, we are going to create and define a few patterns and brushes. Then, we are going to create a typography effect from our subject, and then disperse the letters in the direction we choose. After that, we are going to make some final adjustments.
I will try to explain everything in so much detail that everyone can
create it, even those who have just opened Photoshop for the first time.
The effect shown above is the one I will show you how
to create here in this tutorial. If you would like to create the effects
shown below, using just a single click and in just a few minutes, then check out my Typography 4 Photoshop Action.
What You'll Need
To recreate the design above, you will need the following photo:
- The stock image is no longer available, but you can get a similar one over on PhotoDune.
1. How to Get Started
Step 1
First, open the photo that you want to work with. To open your photo, go to File > Open, choose your photo, and click Open. Now, before we get started, just check a couple of things:
- Your photo should be in RGB Color mode, 8 Bits/Channel. To check this, go to Image > Mode.
- For best results, your photo size should be1500–4000 px wide/high. To check this, go to Image > Image Size.
- Your photo should be theBackground layer. If it is not, go to Layer > New > Background from Layer.

Step 2
We are going to create a typography dispersion effect in the downward direction, so we need to expand the canvas on the bottom so we have more space for the effect, and also a little bit on the left and right sides. Go to Image > Canvas Size and use the settings below:

Step 3
Now we need to make this expanded canvas area seamless. Choose the Magic Wand Tool (W) and click once over the white area to select the whole white area we have just added. Go to Edit > Fill and select the settings below. After that, press Control-D on your keyboard to remove the selection.

2. How to Create Patterns and Brushes
Step 1
In this section, we are going to create the patterns and brushes we'll need. Go to File > New to create a new file, name it Typography Pattern 1, and use the settings below:

Step 2
Now choose the Horizontal Type Tool (T), click anywhere inside the canvas, and type a single letter. You can use any font, font style, and font size. I have chosen Arial font, Regular font style, and31.47 px size. After you type a letter, hit Enter on your keyboard and use the same method to add several letters. Here is what I got:

Step 3
Now click on the Background layer eye icon next to its thumbnail to hide it. Go to Edit > Define Pattern to define a pattern and name it Typography_Pattern_1. Keep this file open.

Step 4
Repeat the first two steps in this section, but in Step 1 name the new file Typography Pattern 2, and in Step 2 use different letters with the same font, font style and font size you used for the previous pattern. Here is what I got:

Step 5
Now click on the Background layer eye icon next to its thumbnail to hide it. Go to Edit > Define Pattern to define a pattern and name it Typography_Pattern_2. Keep this file open as well.

Step 6
Repeat the first two steps in this section, but in Step 1 name the new file Typography Pattern 3,
and in Step 2 use different letters with the same font, font style and
font size you used for the previous two patterns. Here is what I got:

Step 7
Now click on the Background layer eye icon next to its thumbnail to hide it. Go to Edit > Define Pattern to define a pattern and name it Typography_Pattern_3. Keep this file open as well.

Step 8
We are going to create brushes now. Select the Typography Pattern 1 document, go to Edit > Define Brush Preset, and name it Temp as we will remove this brush in the next few steps.

Step 9
Press B on your keyboard, right-click anywhere inside the canvas, select the Temp brush, and hit Enter. Then go to Window > Brush and inside the Brush window use the settings below:

Step 10
Now we are going to define this brush with new settings as a new brush. Go to Edit > Define Brush Preset and name it Typography_Brush_1. Press B on your keyboard, right-click anywhere inside the canvas, and Alt-click on the Temp brush to remove it.

Step 11
Repeat all the steps from Step 8 to Step 10 to create two more brushes from the two other documents Typography Pattern 2 and Typography Pattern 3. Of course, name those two new brushes according to their serial number. Then close all documents except your photo document.

3. How to Create the Base
Step 1
Now we need to create the base that determines which part of our photo will be turned into typography. So the base will actually be our subject. Go to Layer > New > Layer to create a new layer and name it Base.

Step 2
While the Base layer is selected, fill your subject with a color. You can do it in various ways. For example, you can create a selection of your subject using the Pen Tool (P), Magic Wand Tool (W), Lasso Tool (L) or some other tool, and then just fill the selection with a color. Or you can choose the Brush Tool (B) and brush over your photo using a hard or soft brush.

4. How to Create Typography From a Subject
Step 1
In this section we are going to create a typography effect from a subject that we have defined with the Base layer. Control-click on the Base layer thumbnail to make a selection of that layer, select the Background layer, and go to Layer > New > Layer Via Copy. Then hide the Base layer by clicking on the eye icon next to its thumbnail.

Step 2
Now go to File > New to create a new file, name it Text, and use the settings below. You can use different values for width/height, but make sure that the document is at least as big as your photo document.

Step 3
Choose the Horizontal Type Tool (T) and type the text so it covers the whole document. You should use the same font and font style that you used for creating patterns and brushes. Also, the font size should be the same or very close.
Feel free to make changes to your text, like increasing or decreasing leading, tracking and more. If the content of the text does not matter to you, you can use a text generator to speed up the process.

Step 4
Now choose the Move Tool (V), click and hold inside the canvas, and drag the text layer from the Text document to your photo document and position it so it covers the whole subject. Double-click on this layer name and rename itText.

Step 5
Control-click on the Layer 1 thumbnail to make a selection of that layer, and then go to Layer > Layer Mask > Reveal Selection.

Step 6
Now selectLayer 1 and drag it above the Text layer. Then go to Layer > Create Clipping Mask. Double-click on this layer name and rename itText Color.

Step 7
Now we are going to create a solid color background. Select the Background layer and go to Layer > New Fill Layer > Solid Color to create a new solid color fill layer, name it Background Color, and use the settings below:

Step 8
Select the Background layer and go to Layer > New > Layer Via Copy to duplicate that layer. Then drag this layer just below the Base layer, go to Filter > Blur > Gaussian Blur, and use the settings below:

Step 9
Now go to File > Save As to save your document as a new file. You can name it however you want, and you can save it anywhere you want, but keep in mind that you will need to select that file later to apply a filter. Then right-click on the Background copy layer and choose Delete Layer.

Step 10
We need to correct the edges of the subject slightly. Select the layer mask of the Text layer, go to Select > Select and Mask, and use the settings below:

Step 11
Right-click on the Text layer name and choose Convert to Smart Object. Then go to Filter > Displace, use the settings below, and choose OK. After that you will get another window, and there you can choose the file you have previously saved and click Open.

Step 12
Now we are just going to group some layers. Select the Background Color layer, Shift-click on the Text Color layer, go to Layer > New > Group from Layers to create a new group from these layers, and name it Subject Typography.

5. How to Create Dispersed Letters
Step 1
In this section, we are going to create letters that we are going to disperse later. First we need to create another base layer that determines which areas will be dispersed. Select the Base layer, go to Layer > New > Layer to create a new layer, and name it Base 2.

Step 2
Control-click on the Base layer thumbnail to make a selection of that layer and go to Layer > Layer Mask > Reveal Selection.

Step 3
Now select theBase 2 layer thumbnail, choose the Brush Tool (B), pick a soft or hard brush, and start brushing over the areas you want to disperse.

Step 4
Select the layer mask of theBase 2 layer, right-click on it, and choose Apply Layer Mask.

Step 5
Control-click on the Base 2 layer thumbnail to make a selection of that layer. Choose the Lasso Tool (L), right-click anywhere inside the canvas, choose Make Work Path, and use the settings below:

Step 6
Now click on the eye icon of the Base 2 layer next to its thumbnail to hide it. Select the Subject Typography group and go to Layer > New > Layer to create a new layer. Leave the default name Layer 1 because we will delete this layer in the next few steps.

Step 7
Choose the Pen Tool (P), right-click anywhere inside the canvas, choose Fill Work Path, and use the settings below:

Step 8
Now Control-click on the Layer 1 thumbnail to make a selection of that layer, select the Background layer, and go to Layer > New > Layer Via Copy to create a new layer via copy, and name it L_1 (abbreviation ofLetter_1). Then right-click on Layer 1 and choose Delete Layer.

Step 9
Now repeat all the steps from Step 6 to Step 8 as many times you want, depending on how many letters layers you want to create, using Typography_Pattern_1. I have repeated it nine more times, so I have ten letters layers in total.

Step 10
Now we are going to create more letters layers but with other patterns, so we have different letters. Repeat all the steps from Step 6 to Step 8, but in Step 7 use the settings below instead of the settings you used the previous time.

Step 11
Now repeat Step 10 as many times you want, depending on
how many letters layers you want to create, using Typography_Pattern_2. I have repeated it nine more
times, so I have 20 letters layers in total.

Step 12
Now we are going to create more letters layers with our last pattern,
so we have different letters. Repeat all the steps from Step 6 to Step 8, but in Step 7 use the settings below instead of the settings you used the previous time.

Step 13
Now repeat Step 12 as many times as you want, depending on
how many letters layers you want to create, using Typography_Pattern_3. I have repeated it nine more
times, so I have 30 letters layers in total.

Step 14
Now select the first letters layer, go to Filter > Displace, use the settings below, and choose OK. After that you will get another window, and there you can choose the file you have previously saved and click Open.

Step 15
Select the next letters layer and press Control-F to apply the previous filter with the same settings. Use the same method to apply this filter to all other letters layers.

Step 16
We are going to group all the letters layers now. Select your top letters layer and Shift-click on the last letters layer to select all letters layers, go to Layer > New > Group from Layers to create a new group from selected layers and name it Letters. Then drag the group just above theSubject Typography group.

6. How to Disperse Letters
Step 1
In this section, we are going to disperse the letters we have just created. So all you have to do now is to choose the Move Tool (V), select the letters layer that you want to move, and move it in the direction of your choice. I want to create a dispersion in the downward direction, so here is what I got:

Step 2
Now we are going to transform some letters to create depth. Select the letters layer that you want to transform, choose the Lasso Tool (L), right-click anywhere inside the canvas, and use the settings below:

Step 3
I have transformed a few more letters layers. Feel free to transform as many layers as you want, and also to use different values for width/height. Here is what I got:

Step 4
Now to give more depth and focus to the effect, we are going to blur some letters. Select the letters layer that you want to blur, go to Filter > Blur > Gaussian Blur, and use the settings below:

Step 5
I have blurred a few more letters layers. Feel free to transform as
many layers as you want, and also to use different values for Gaussian blur. Here is what I got:

Step 6
Now make some final changes to the dispersed letters, so you can move, transform and blur letters layers as you like. Also feel free to move or transform the whole Letters group and also change the layer order in the Layers panel. Here is what I got:

7. How to Create a Missing Letters Effect
Step 1
In this section, we are going to create a missing letters effect. Select the Text layer and go to Layer > Layer Mask > Reveal All to add a blank layer mask to this layer.

Step 2
Select the layer mask of the Text layer and press D on your keyboard to reset the swatches. Choose the Brush Tool (B), right-click anywhere inside the canvas, pick some of the typography brushes we have created at the beginning of the tutorial, and hit Enter. Then start brushing over the areas where you wish to create a missing letters effect. You can also use a soft brush for the edges. Here is what I got:

8. How to Make Adjustments
Step 1
In this section, we are going to make some final adjustments to the effect. Firstly we are going to add a nice color look. So select the Letters group and go to Layer > New Adjustment Layer > Curves to create a new curves adjustment layer just below the Base layer, and name it Color Look.

Step 2
Now double-click on the Color Look layer thumbnail and use the settings below:

Step 3
Now we are going to add a subtle filter. Go to Layer > New Adjustment Layer > Photo Filterto create a new photo filter adjustment layer and name it Photo Tint.

Step 4
Double-click on the Photo Tint layer thumbnail and use the settings below:

Step 5
Now we are going to add a subtle contrast. Press D on your keyboard to reset the swatches, go to Layer > New Adjustment Layer > Gradient Map to create a new gradient map adjustment layer and name it Overall Contrast.

Step 6
Change the blending mode of the Overall Contrast layer to Soft Light and drop the Opacity to 8%.

Step 7
Finally we are going to add sharpening to the whole effect. Press Control-Alt-Shift-E on your keyboard to make a snapshot, and then go to Filter > Other > High Pass and use the settings below:

Step 8
Double-click on the Layer 1 name and rename itOverall Sharpening. Change its blending mode to Hard Light and drop the Opacity to 82%.

You Made it!
Congratulations, you have succeeded! Here is our final result:

If you would like to create the effect shown below, using just a single click and in just a few minutes, then check out
my Typography 4 Photoshop Action.
The action works so that you just brush over the areas that you want to disperse in letters, play the
action, and the action will do everything for you, giving you fully
layered and customizable results.
You can choose from five different dispersion directions:
- Right
- Left
- Up
- Down
- Middle
And each direction comes in three optional letter sizes:
- Small
- Medium
- Large
The action is made so that every time you run the action,
you will get a unique result even if you use the same brushed
area. The letters will always be differently arranged and deployed. The subject typography is a fully editable text layer. You can use your own text, change the font, font style, letter spacing, line height, etc. The action will also create 10 preset
color looks for you.
It
comes with a detailed video tutorial that demonstrates how to use and customize the look of your action to get the most out of the effect.
Original Link: https://design.tutsplus.com/tutorials/how-to-create-a-typography-dispersion-action-in-adobe-photoshop--cms-27598
TutsPlus - Design
More About this Source Visit TutsPlus - Design