
An Interest In:
Web News this Week
- April 30, 2024
- April 29, 2024
- April 28, 2024
- April 27, 2024
- April 26, 2024
- April 25, 2024
- April 24, 2024
Some of Our Sources
- Technology Review
- Simplebits
- Six Revisions
- Inspiredology
- Reencoded
- Spyre Studios
- Android Dissected
- Android Headlines
- Willems Lab
- Daily Now
Help Webnuz
Referal links:
How to Draw a Dragon Step by Step
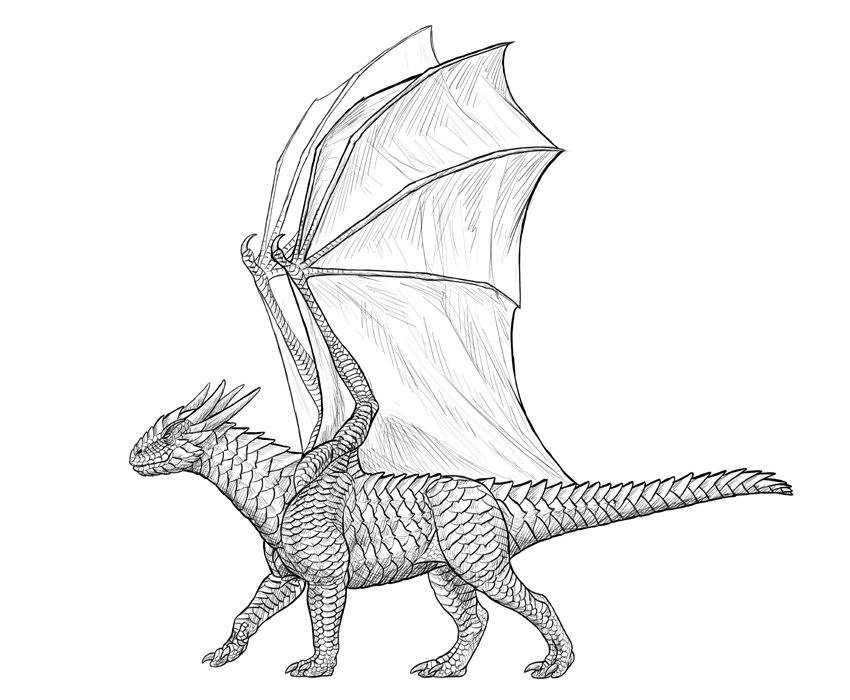
Fantastic creatures may not be real, but it doesn't mean they can't be drawn in a realistic way. If you want to learn how to draw a dragon, in this tutorial I will lead you step by step. You can also use the tutorial to create a base for your own dragon, with the details of your own choosing. Muscles, wings, claws, scales—this tutorial has it all!
Prefer to learn via video? Check out our tutorial over on Envato Tuts+ YouTube Channel to find out how to draw an Ice Dragon from Game of Thrones.
1. How to Draw the Pose of a Dragon
Step 1
It's nearly impossible to draw something from imagination step by step without a base. Try to quickly sketch your idea without any details—just the pose and general proportions.

Step 2
We're going to build upon this sketch now. Draw a big oval in the chest area. Dragons have huge chests, because they need powerful breast muscles for their wings.
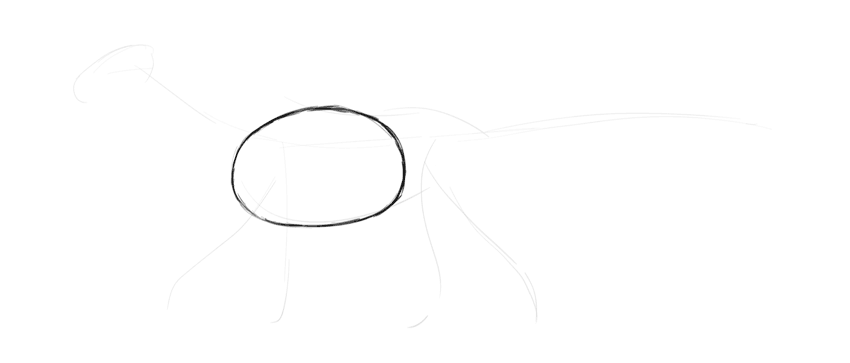
Step 3
Attach the shoulder blade to the front of the chest.

Step 4
Define the back of the body.

Step 5
We need to make sure we know where the ground level is. Draw a line towards it.

Step 6
Draw the legs now, paying attention to all the joints.


Step 7
The default pose of the legs is easy, but also boring. Let's create the other pair of legs to make it more dynamic. Imagine every part of the leg is like the hand of a clock, with the joint at the center. Draw the path on which it would go.

Step 8
Draw the other pair of legs using these paths.

Step 9
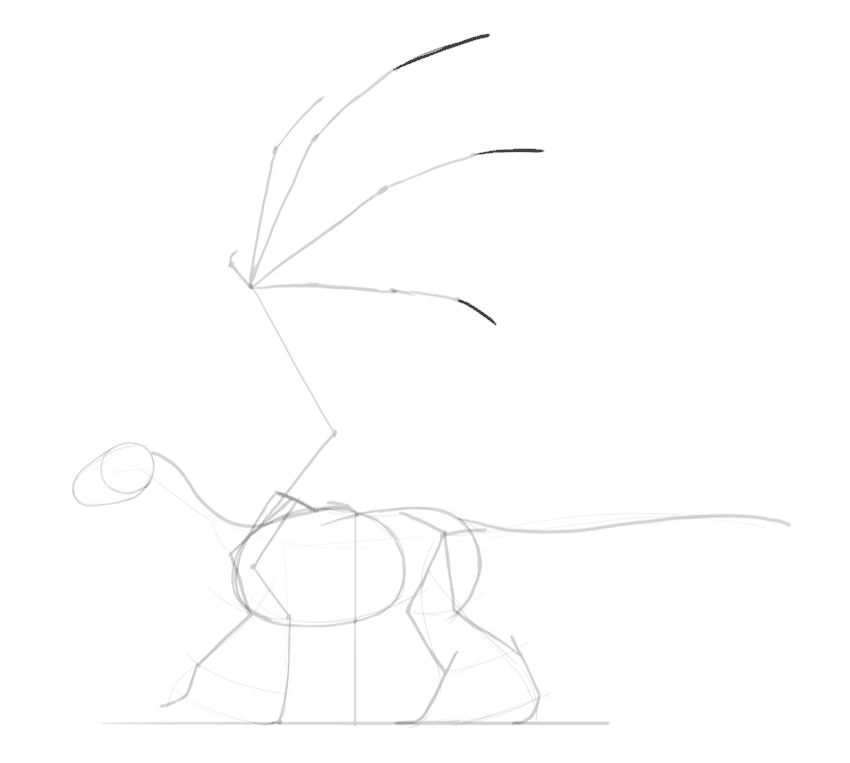
Add a circle at the end of the neck. This will be the whole width of the head, not just the brain case.

Step 10
Add the shape of the muzzle.

Step 11
Add the rest of the spine: the neck and the tail.

Step 12
Time for the wings. This will be a rather unnatural pose for the wings, but all the other poses require perspective, and I want to keep it easy. If you want, you can try to pose the wings in some other way.
Let's place these new shoulder blades on the back, as with birds. Then add the arm and the forearm.

Step 13
Add all the parts of the fingers, one by one. The second one should be the longest.


Step 14
Because of our simple perspective, the other wing is hidden. However, a dragon with one wing would look weird, so feel free to add a part of the other one.

2. How to Draw a Dragon's Body
Step 1
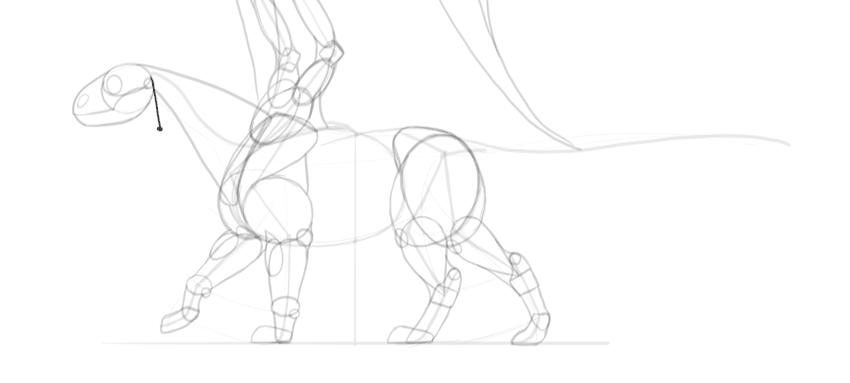
The pose is ready, so now let's add some body to this bare skeleton. Draw a circle around the arm—this will be the triceps and biceps all in one.

Step 2
Cover the shoulder with one long mass.

Step 3
Connect it to the arm with a line. This whole area will make the shoulder mass.

Step 4
Add the shoulder muscles to the other leg.

Step 5
Add a big oval for the thigh.

Step 6
Connect the thigh to the hips.

Step 7
Add the other leg as well. This one will be in the front.

Step 8
The wrists and ankles have a special bony shape, so it's important to make this area distinguishable.


Step 9
Add the paws. Front or back, they should have roughly the same shape.

Step 10
Add the other part of the paws: the "palms" and "feet".

Step 11
There's one more muscle mass needed to make the legs complete:


Step 12
Finally, some minor details...

Step 13
... and the final outline of the limbs.

3. How to Draw Dragon Wings
Step 1
Wings need muscles, too—they're arms, after all. Start with a huge shoulder muscle right at the base.

Step 2
Then some biceps...

Step 3
... and some mass on the forearm.

Step 4
Let's add some shape to the elbow and the wrist as well.

Step 5
You can now outline the muscles in a fancy way.

Step 6
Add the muscles to the other wing as well.

Step 7
Don't forget about the wing-finger—it gives the wing some of its arm functionality back.


Step 8
Add the joints to the wing-fingers.

Step 9
Outline the fingers.


Step 10
Finally, add the membrane.


4. How to Draw Other Dragon Parts
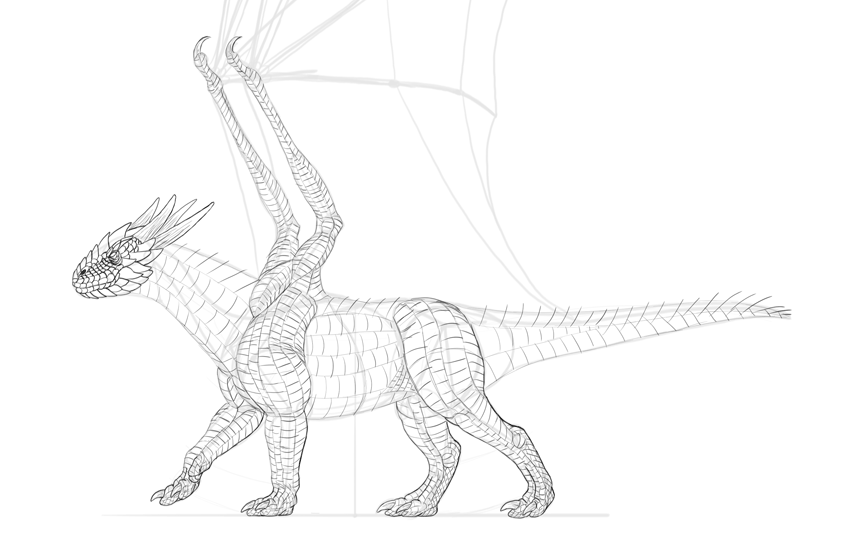
Step 1
Time for more details of the head. The best way to start the head is to create a simplified skull for a base. First, the brain case...

... the eye socket...

... the upper jaw...

... the jaw joint...

... the cheek bone...

... and the lower jaw. Simple, isn't it?

Step 2
The chest is slightly rotated towards us, so draw the muscles connecting the arms and the "hole" for the neck.

Step 3
Draw the neck muscles attached to the back of the skull.

Step 4
To create a realistic dragon neck, don't forget to place the larynx behind the skull.
This will let you create this neat triangle with a space for the throat, the windpipe, and the flame tube.

Step 5
Attach a powerful chest muscle to the wings.

Step 6
Finish the shape of the main body.


Step 7
If the dragon is related to dinosaurs, it will look nice with . Add this shape to the base of the tail to make it more solid.

Step 8
Finally, finish the tail.


5. How to Draw Dragon Feet
Step 1
There are a couple more details we need to add before the body is fully shaped: the toes and claws. First, draw the tip of the middle toe. Leave some space for the claw, and flatten the pad as it's pressed to the ground.

Step 2
Draw the curved claw.

Step 3
Draw the other toe, shorter this time.


Step 4
Many animals have a "thumb" called a dew claw on their front legs. This is helpful for holding the prey while eating, and, in the case of dragons, for catching prey in flight.

Step 5
Outline the full length of the toes. Create a hump right between the tips—this will suggest the joints beneath.


Step 6
Add the big pads under the paws.

Step 7
Don't forget about adding details to the wing-fingers as well!

6. How to Draw Dragon Scales and Other Details
The base of the body is done, so you can now finish it any way you want! I will show you my way, but feel free to create your own details. If you're drawing traditionally, you can put a new sheet of paper over the sketch to draw the clean final lines, or use a darker tool to make the sketch less visible.
Step 1
Draw the eye and the nose. The smaller the eye, the bigger the dragon will seem.

Step 2
Draw the wrinkles under the eye.

Step 3
It's hard to make any facial expression when you have hard scales on your face, but the scales themselves may create a false expression. If you want to make your dragon look angry or badass, put some bigger scales along its brow.
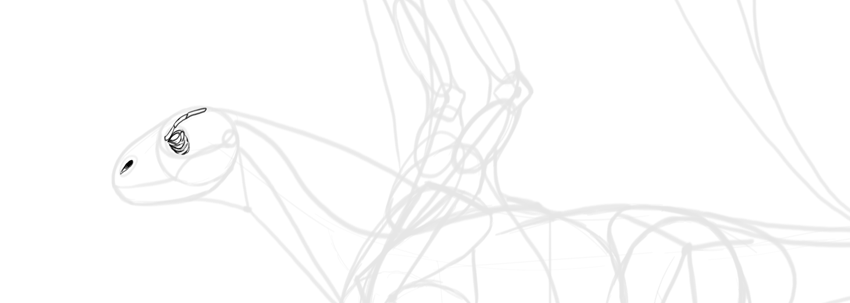

Step 4
Create an outline of the head out of big scales.

Step 5
Give the lips smaller scales to make them more elastic.

Step 6
What's a dragon without horns? Make sure you attach them to the upper part of the skull, not to the lower jaw by accident (I have nothing against horns on the lower jaw, but it's harder to make them functional).

Step 7
Draw rows of smaller scales in the other areas.
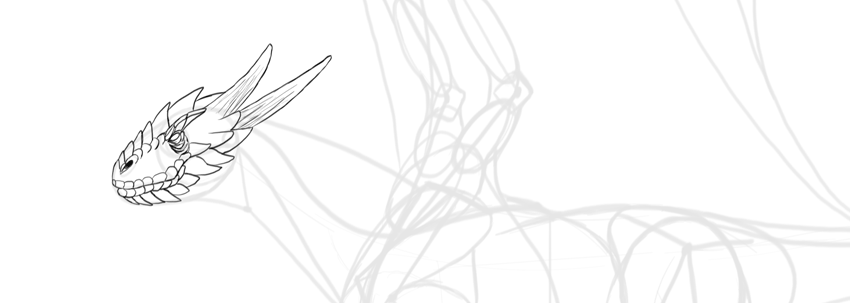


Step 8
Outline the feet.

Step 9
Time for the body scales! Draw rows all over the body, adjusting their shape to the 3D form beneath. Imagine that you're trying to cover the body with parallel rows of tape.

Step 10
Cross the rows now, creating a pattern of roof tiles—each line of one row should be placed between two lines of its side rows.
Step 11
You can cross some of the bigger parts with lines to make these scales more detailed later.

Step 12
Connect the lines in rows with curves to create an outline of the scales.

Step 13
Outline the scales in a detailed way.

Step 14
The wings don't need too many scales, so just sketch a few of them at the base. Outline the fingers as well.

Step 15
Outline the membrane.

Step 16
Finish the drawing by thickening the outer outline and adding some details.

Step 17
If you want to turn this piece of line art into a finished artwork without coloring, you can add simple, sketchy shading. This will add some volume to the dragon's body.

Good Job!
You have drawn a beautiful dragon! Do you want some other simple, step-by-step drawing tutorials? Check out one of these:
 DrawingHow to Draw a Super Cute Kitten Step by Step
 AnimalsHow to Draw a Roaring Lion Step by Step
 DrawingHow to Draw a T-Rex Dinosaur
Original Link: https://design.tutsplus.com/tutorials/how-to-draw-a-dragon-step-by-step--cms-28758
TutsPlus - Design
More About this Source Visit TutsPlus - Design