
An Interest In:
Web News this Week
- April 26, 2024
- April 25, 2024
- April 24, 2024
- April 23, 2024
- April 22, 2024
- April 21, 2024
- April 20, 2024
Some of Our Sources
- Slashdot
- Smashing Apps
- Abduzeedo
- You The Designer
- Web Designer Depot
- FanExtra - PSD
- 24 Ways
- Freelance Switch
- Web Resource Source
- The Verge
Help Webnuz
Referal links:
How to Create a YouTube Banner in Adobe Photoshop
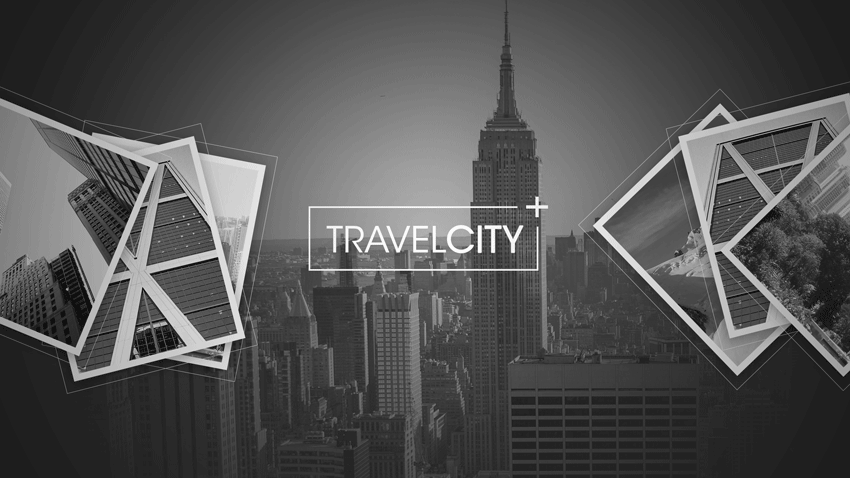
In this tutorial, we're going to create a simple banner for a YouTube channel using stock images and basic tools in Adobe Photoshop.
Need more inspiration? Check out the amazing YouTube Banners available on GraphicRiver or our recommended banner selection in this article:
Tutorial Assets
The following assets were used during the production of this tutorial:
How to Create the Banner
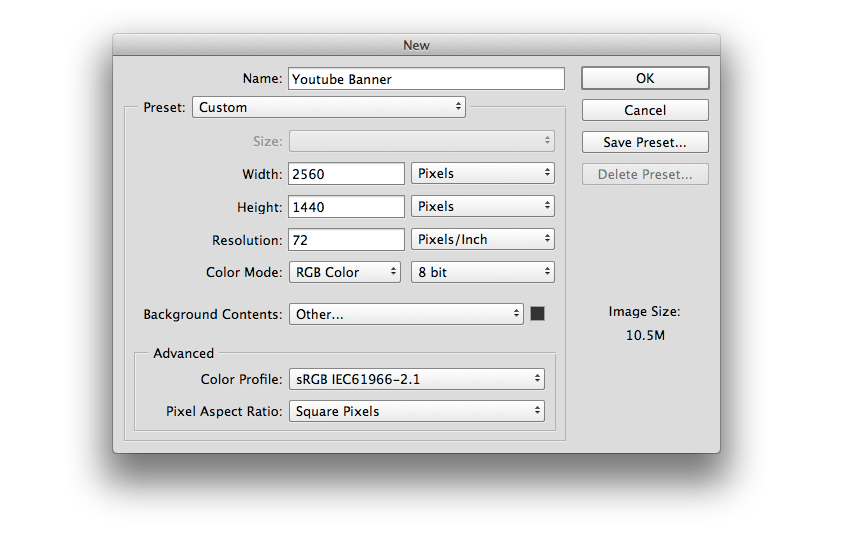
Step 1
Start by creating a 2560 x 1440 px document in Photoshop with the following configuration. Set the Background Fill Color to #333333.
Step 2
Add the background and adjust its size. Then Rasterize the layer (right click > Rasterize layer) and subsequently desaturate the image (Shift-Command-U).

Step 3
Now add a Layer Mask from the Layers panel and apply a Radial Gradient with the Gradient Tool (G) using the front black color. Then set the layer Opacity to 80%.

Step 4
Let’s create the boxes to place the stock images. Draw a rectangle with the Rectangle Tool (U) and set the Stroke thickness to 20 px; any fill color will do.

Step 5
Apply a Drop Shadow to the rectangle using the Blending options, using the following values:

Step 6
Import the first stock image and place it over the rectangle. Rasterize the image (Layer > Rasterize > Layer) and then desaturate the layer (Shift-command-U).

Step 7
Now create a Clipping Mask with the rectangle below (right click > Create Clipping Mask) to enter in the box.

Step 8
Draw another rectangle around the frame with a 1 px Stroke thickness (#FFFFFF) and no fill color. Then Group the rectangle, the image and the frame (Command-G).

Step 9
Make six copies of the portrait (Command-J) and place the rest of the stock images in each of the portraits. Then Rotate and place them as shown in the image below.
Be sure to frame the images well in the box and to desaturate them.

Step 10
Create a text title called “TRAVELCITY” with the Horizontal Type Tool (T) and apply Bold to the word "CITY".

Step 11
Take the Pen Tool (P) and draw a 5 px thick frame around the text title, leaving the upper right corner open. Then draw a cross with a Stroke thickness of 10 px.

Step 12
Now we are going to create a vignette. To do so, create a Gradient layer from the Layers panel using the black color as front, and apply the following settings.

Congratulations! You're Finished!
And that’s it! We have created a banner for your YouTube Channel, simply and quickly. I hope you find it useful and use what you learnt here for your future banners. I hope to see your results!

Want more YouTube banners? Check out the following articles:
 Adobe Photoshop41 Creative YouTube Banner Templates
 Placeit24 Best Gaming YouTube Banners Made With a YouTube Banner Maker
 Banner AdsHow to Make a Banner for a YouTube Channel (With a Banner Maker)
Original Link: https://design.tutsplus.com/tutorials/how-to-create-a-youtube-banner-in-adobe-photoshop--cms-28513
TutsPlus - Design
More About this Source Visit TutsPlus - Design