
An Interest In:
Web News this Week
- April 2, 2024
- April 1, 2024
- March 31, 2024
- March 30, 2024
- March 29, 2024
- March 28, 2024
- March 27, 2024
Some of Our Sources
- Slashdot
- Engadget
- Simplebits
- Creative Curio
- Fuel Your Creativity
- Stylized Web
- Specky Boy
- Daily Now
- Dev To
- Hashedout
Help Webnuz
Referal links:
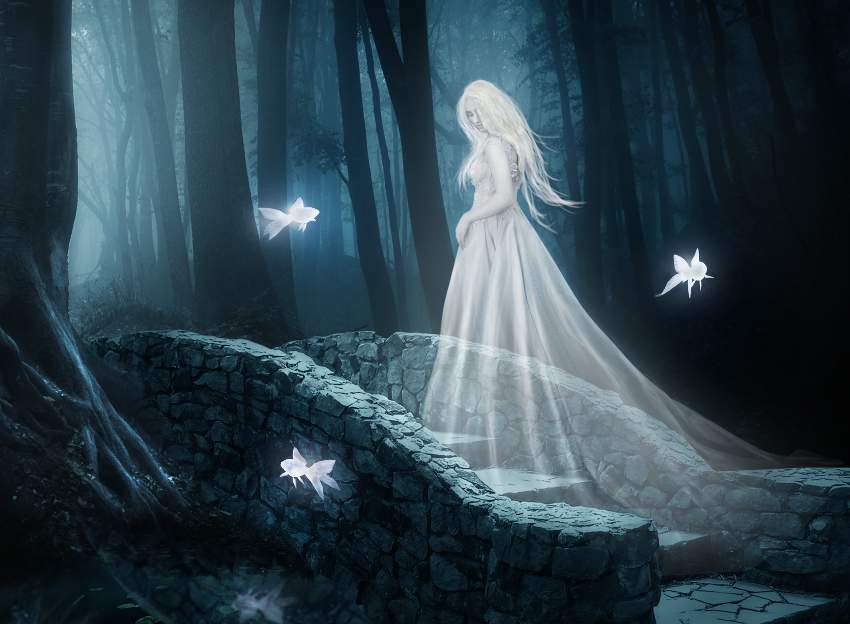
How to Create a Haunting Fantasy Digital Art Photo Manipulation in Adobe Photoshop

In this tutorial, I'll show you how to create a fantasy digital art piece featuring a ghost woman looking at ghostly flying fish.
First, we'll build the base scene with images of a forest, pond, and bridge. After that, we'll add the model and retouch her, invert her hair's color, and paint more hair. Later we'll import the fish and add a ghostly effect to them. We'll paint glowing light and sparkling dots and use several adjustment layers to complete the final effect.
Tutorial Assets
The following assets were used during the production of this tutorial:
1. How to Import the Forest
Step 1
Create a new 2000 x 1516 px document in Photoshop with the given settings:

Step 2
Open the forest image and drag it into the white canvas using the Move Tool (V). Use the Free Transform Tool (Control-T) to resize it to fit the canvas.

Step 3
Go to Layer > New Adjustment Layer > Hue Saturation and set it as Clipping Mask. Change the Hue values a bit to -8:

Step 4
Create a Curves adjustment layer and reduce the lightness. On this layer mask, activate the Brush Tool (B) and select a soft round one with black color. Use this brush to remove the dark effect on the left side as we're aiming to add a light source there.


Step 5
Make a new layer, change the mode to Overlay 100%, and fill with 50% gray.

Activate the Dodge and Burn Tool (O) with Midtones Range, Exposure about 20% to darken some details on the right of the trees and brighten their left side to fit the light source. You can see how I did it with Normal and the result with Overlay mode.


2. How to Add the Pond and Bridge
Step 1
Place the pond image in the bottom left of the canvas and use Control-T to resize it to be much smaller.

Add a mask to this layer and use a soft black brush to remove the hard edges and sky in this, leaving only the pond visible.

Step 2
Create a Curves adjustment layer to darken the pond.

Step 3
Make a Levels adjustment layer to darken both sides of the pond more. On the layer mask, paint on the middle to reveal some light there.

Step 4
Add a Hue/Saturation adjustment layer and decrease the Saturation values to -83:

Step 5
Create a Color Balance adjustment layer to make the color of the pond match the forest.

Step 6
Now let's make a reflection on the surface of the pond for the tree above it. On the forest layer, use the Polygonal Lasso Tool (L) to select the lower part of this tree and hit Control-C to copy this selection. Make a new layer on top of the other layers and hit Control-V to paste the selection onto this new layer. Convert this layer to a Smart Object and flip it vertically (Edit > Transform > Flip Vertical), and then move this part below the tree.


Step 7
Add a mask to this layer to remove the hard edges of the tree and blend it with the water. Go to Filter > Blur > Gaussian Blur and set the Radius to 2 px to soften this reflection.

Step 8
Create a Hue/Saturation adjustment layer and a Curves adjustment layer with the same settings as for the forest. On the Curves layer mask, use a soft black brush with Opacity of about 20% to paint on some details of the root to keep some lightness there.


Step 9
Cut out the bridge and place it at the bottom of the canvas. Flip it horizontally to make it fit the direction of the light source. Add a mask to this layer to remove the front of the bridge.

Step 10
Make a reflection for the bridge as we did with the tree's reflection (duplicate, flip vertically, mask, and apply a Gaussian Blur of 2 px).

Step 11
Select the bridge and its reflection layers and hit Control-G to make a group for them. Change this group's mode to Normal 100% and add a Curves adjustment layer to darken the bridge. On this layer mask, use a soft black brush to erase the middle parts to reveal some lightness as we're aiming to add a ghost with glowing light there.

Step 12
Use a Brightness/Contrast adjustment layer to darken the lower section of the bridge more. Paint on the rest so it won't be affected by this adjustment layer.

Step 13
Create a Hue/Saturation adjustment layer and reduce the Saturation to -93:

Step 14
Make a Color Balance adjustment layer and change the Midtones and Highlights settings:


3. How to Retouch the Model
Step 1
Isolate the model and place her in the middle of the bridge. Go to Filter > Liquify and use the Forward Warp Tool (W) to enlarge the bottom of the dress, following the direction of the bridge.


Step 2
Add a mask to the model's layer and use a hard black brush to remove the part of the dress outside the steps. After that, select a soft black brush with Opacity of about 30-40% to reduce the visibility of the bottom of the dress, to make it appear semi-transparent.


Step 3
Create a Hue/Saturation adjustment layer and decrease the Saturation values to -56:

Step 4
Make a Color Balance adjustment layer to change the model's color:

Step 5
To change the color of the model's hair from black to white (we're making a ghost!), use the Polygonal Lasso Tool to select only the hair, and then go to Layer > New Adjustment Layer > Invert.

Step 6
Use a Curves adjustment layer to darken the model. On the layer mask, paint on the bright details, especially the wrinkles, to reveal the lightness there.


Step 7
Use another Curves adjustment layer to increase some haze and reduce the dark contrast on the upper part of the model's body, face, and hair. On the layer mask, paint on the lower part of the model's dress to keep its contrast and lightness.

Step 8
Select only the hair part and use a Hue/Saturation adjustment layer to change its tone a bit.

Step 9
Make a new layer and use a soft small brush with the color #c4c7ca to strengthen the wrinkles on her dress, making these details more visible.

Step 10
Create two new layers and use a small brush with the color #b8bdc2 and #c3c9ce to paint more hair for the model.

4. How to Make the Ghost Fish
Step 1
Open the image of the fish and download the angles you want (I've chosen the ones shown in the screenshot below) or use your own. Set them around the model, including one that fits the direction of the model's gaze. Convert all of these layers to Smart Object.

Duplicate the one beside the bridge and flip him vertically. Move him into the water's area and lower the Opacity of this layer to 50% to make the reflection fade into the water.

Step 2
Apply a Gaussian Blur of 2 px to this reflection layer to soften it.

Step 3
Double-click each of the fish layers, and apply an Inner Shadow and Outer Glow. Set the color of the shadow to #e8f1f7 and the color of the glow to #c4c7ca.


Step 4
Add a mask to each of these layers and use a soft black brush with Opacity of about 30% to reduce their visibility.

Step 5
Create a group for the fish layers and add a Black and White adjustment layer, using the default values:

Step 6
Use an Invert adjustment layer to make them darker. Don't worry as we'll fix it later.

Step 7
Use a Color Balance adjustment layer to change the fish's color a bit:

Step 8
Create a Curves adjustment layer to bring the light effect back to the fish. Use a soft black brush with a lowered opacity (about 20%) to reduce the light on the details you feel are too bright.

5. How to Paint the Glowing Light and Dots
Step 1
Make a new layer on top of the other layers, and use a soft brush with the color #c9d1d7 and Opacity about 15% to paint some glow for the fish.

Add another layer, and use the same brush to strengthen the light/glow around the fish. Change this layer mode to Overlay 100%.

Step 2
Create a new layer, change the mode to Overlay 100%, and fill with 50% gray. Use the Dodge and Burn Tool to refine the light and shadow on the tree, model, tree reflection, and details for the dress.


Step 3
On a new layer, use a soft brush with the color #c9d6da to paint a glow around the ghost. Change this layer mode to Hard Light 100% and use a layer mask to reduce the light around it, making it appear more subtle.

Use the same brush with an Opacity of about 50% to paint a glow around the contour of the model to increase the ghostly effect. Alter this layer mode to Linear Dodge 100%.

Step 4
In this step, we'll make sparkling dots. Make a new
layer on top of the other layers, and change the brush's color to #c4c7ca.
Press F5 to change the settings of this brush:


Use this brush to add tiny, sparkling dots around the model, bridge, and fish. Press [ and
] to easily change the brush's size while painting.

Step 5
Hit Control-G to make a group for this layer and change this group's mode to Color Dodge 100%. Now the effect looks much better!

Step 6
Apply the Outer Glow effect for the dots layer. Set the color of the glow to #c4c7ca.


6. How to Make the Final Adjustments
Step 1
Create a Gradient Map adjustment layer on top of the other layers and pick the colors #e10019 and #00601b. Lower the Opacity of this layer to 20%.

Step 2
Make a Color Balance adjustment layer and change the Midtones and Highlights settings:


Step 3
Create another Color Balance adjustment layer to alter the model's color a bit. Paint on the rest so it won't be affected by this adjustment layer.

Step 4
Use a Curves adjustment layer to increase the light and contrast of the whole scene. On the layer mask, use a soft black brush to erase the effect on the bridge so it won't become too bright.


Step 5
Use a soft brush with the color #7cb3b2 to change the color of the bright details on the root a bit to fit the rest of the scene. Alter this layer mode to Color 10%.

Congratulations, You're Done!
I hope that you've enjoyed the process of creating this fantasy digital art photo manipulation and learned something new for
your own projects. Feel free to share your results or leave comments in
the box below. Enjoy Photoshopping!
Enjoy more of our tutorials below:

How to Add Lights to a Tree With a Photoshop Action

How to Create a Fantasy Jellyfish Photo Manipulation With Adobe Photoshop

Original Link: https://design.tutsplus.com/tutorials/how-to-create-a-haunting-fantasy-digital-art-photo-manipulation-in-adobe-photoshop--cms-32139
TutsPlus - Design
More About this Source Visit TutsPlus - Design