
An Interest In:
Web News this Week
- April 25, 2024
- April 24, 2024
- April 23, 2024
- April 22, 2024
- April 21, 2024
- April 20, 2024
- April 19, 2024
Some of Our Sources
- Slashdot
- BoingBoing
- Simplebits
- Just Creative
- Pearsonified
- Vandelay Design
- Noupe
- Specky Boy
- Android Dissected
- Hashedout
Help Webnuz
Referal links:
A Beginners Guide to Photo Manipulations in Adobe Photoshop
Photo manipulations, photo art, and photo composites are all ways artists use photography to make something new and creative. Some can create elaborate landscapes using a few simple pictures, while others make detailed characters with the right stocks.
But how do you get started with this fascinating medium if you're just a beginner?
Today, we're going to tackle some helpful photo manipulation tips for the average Photoshop beginner. I'll show you which tools you'll definitely need to know, as well as the core concepts of stitching photos together for a new result.

Before we get started, keep in mind that every creative process is a journey. Far too many expect to read an article or tutorial and automatically walk away with an "aha" moment.
But only through the process of thorough experimentation, practice, and trial and error will these tips stick.
So test them out in your free time and let me know how you do!
How to Turn Your Ideas Into Photo Manipulations
All art starts with a basic idea. Perhaps a phantom light bulb goes off in your head, and that's when you decide that it's time to make something creative.
So how do you go from just an idea to a finished photo manipulation?
The process of starting a photo art project will vary from artist to artist. And depending on your experience level, you may even skip a few steps. But here are a few key points to consider.
Break Ideas Down With Words
First, start with an idea assessment.
Art is like a school project. In order to translate an idea effectively, you have to do thorough research into the symbols, colors, and realistic environments needed to achieve a believable result.
You can do this easily by writing down a bunch of words on paper, on your phone, or even on a napkin to describe how you want your art to look.

For instance, if you want to create a magical Cinderella manipulation, maybe you'll write:
- Cinderella pumpkin carriage
- colorful red forest
- moody, but pretty
- magical pumpkins
- a centered composition
Just these words alone give me enough mental visuals to find the pictures I need for this project. Notice how I didn't just write about the visuals I needed, but also the words for the general "feel/mood," as well as the colors and composition.

I start out every project with this basic step. It allows me to know which elements I want in my final piece and which to avoid so I don't waste any time on unimportant details.
And in case you were wondering, here is my final Cinderella pumpkin carriage manipulation below:

Thumbnail Drawings
Next, consider a thumbnail drawing.
Eek! I know, I said the "d" word. But no, you don't have to be a master at drawing to do this. Thumbnail drawings can be as simple as a few quickly drawn lines or shapes, so people of any creative level can make them.
A photo manipulation is, essentially, a photo puzzle. So the point of a thumbnail drawing is to give you a better understanding of the general layout of your composition. Once you nail it down, you can begin looking for pictures that will help achieve your idea.

Thumbnail drawings also give you room to experiment with multiple ideas before landing on "the one."
You may ask yourself:
Do I want the subject in the middle? Or to the far right? Test out both options with quick sketches to see which works best. It's an effective way to save time and energy so you don't commit to an idea you won't like.
In order to create my recent Fireflies Photo Manipulation, I created a thumbnail drawing as simple as the one below.

All I drew were two basic jar shapes, a couple of scribbles for flies,
and some quickly drawn grass to give me enough solid visuals to create
the final effect.
And before we move on, my dear beginners...
Make thumbnails with very basic compositions first! Focus on layouts that you already understand, like a simple, straightforward or centered portrait. Don't play with perspective or complicated angles just yet.
You might get discouraged by attempting a project that is out of your skill level. So be realistic with what you can take on!
How to Select Photos for Photo Manipulations
Now that you have a concrete idea, it's time to look for pictures!
I can confidently say that I've spent thousands of hours looking for stock photos. And I realize that that probably doesn't sound very fun.
But there are many reasons why you'll need to spend considerable time looking for the right stocks.
Not all stock photography is created equal. They will inevitably vary in quality and size, as well as theme and composition.
Where to Find Stock Photos
Avoid issues with copyright infringement outright by using free photos, premium ones you've already bought, or photos you've taken yourself.
Envato Elements and many premium sites are great resources to find high-quality images for one monthly fee.

But if you don't have the funds for a premium account, here are a
few places you can find amazing free stock photos online.
 StockHow to Find Good Stock Photography
 Freebies30 Amazing Websites for Free Stock and Design Resources
My current favorites are Unsplash and Pixabay. Pixabay is a great hub
for free stock photography, but the quality of the photos varies. Unsplash,
however, specifically features cool, high-quality free pictures curated by a community of users.
How to Search for Stocks
Many things can happen during a photo manipulation project. A person might remove the stock you like, or in some cases, it might be impossible to find one that fits your theme.
So here are a few tips to find the right photo on these stock sites:
- Keep your idea and word assessment close by.
- Only bookmark the stocks you think will work for that idea.
- Try out several keywords to get more photo results. For example, "girl", "woman", and "child" show up very differently on stock sites.
- Get familiar with how stock photographers label/tag their photos.
- Bookmark a few extra photos that you can interchange easily, if needed.
- Download the photos you definitely like right away.
- And keep an open mind—don't be rigid with your choices!

Taking Your Own Pictures
You also have the option to take your own photos. I highly recommend it!
Last year, I embarked on a personal self-portrait project to help build my confidence. Slowly but surely, my photo art skills improved over time because I could style myself the way I needed for each theme.

Taking your own pictures gives you much more control over the final look. And these days, you can even get away with just using a smartphone with good lighting for a quick photo shoot.
Check out these tutorials to see how I used my own photos for manipulations:
 Photo ManipulationHow to Create a Galaxy-Inspired Self-Portrait Photo Manipulation in Adobe Photoshop
 Photo ManipulationHow to Create a Forest Self-Portrait Photo Manipulation in Adobe Photoshop
A quick note:
Many beginners underestimate the significance of thorough stock research. Though you can get away with some lower quality pictures, settling on poor photos will inevitably translate to your art. To move forward, you'll need significant creative/software knowledge to make up the difference in the long run.
Photo Manipulation Tools You Need to Know
Let's put the pieces of your photo puzzle together with the right tools.
It might sound overwhelming for me to say that most if not all the tools in Adobe Photoshop have the potential of being used in a photo manipulation.
And still, I wholeheartedly believe this.
After spending over ten years learning about the software and its growing number of tools, I finally realized that the more tools you know, the easier any creative process becomes.
Basic Tools
But let's get back to the nitty gritty basics. Photoshop has many tools that are essential for photo manipulators.
Here are my personal favorites.
- Selection Tools
The Brush/Eraser Tool- Layer Masks
Clipping Masks- Layer Blend Modes
- Adjustment Layers
You can go very far with these tools alone. For instance, Layer Masks are essential for removing backgrounds in photos non-destructively. And learning these tools is as simple as typing them into Google or even the Envato Tuts+ search bar to see examples of them in action.

But keep in mind that many of these tools break off into several options.
Adjustment Layers, for instance, can mean Brightness/Contrast, Color Balance, Levels, and many more. And there are various Layer Blend Modes that change the way layers are applied in a composition. Take your time building your repertoire of knowledge; you'll only be happy that you did!
Study the basics with these helpful lessons:
 Adobe PhotoshopPhotoshop in 60 Seconds: How to Use Adjustment Layers
 Digital PaintingHow to Incorporate Selection Tools Into Your Workflow in Adobe Photoshop
 Adobe PhotoshopQuick Tip: Layer Mask vs. the Eraser Tool in Adobe Photoshop
 Adobe PhotoshopPhotoshop in 60 Seconds: Layer Blend Modes
 BrushesFree Video Course: Essential Tips to Master Photoshop Brushes
Advanced Tools
Once you feel comfortable with the basics, you can move on to experimenting with more advanced tools.
Some tools you may be avoiding might deal with photo retouching techniques, 3D, or even animation.
Here are just a few of the best advanced ones below:
- 3D Tools
Timeline Panel- Filter Gallery
Liquify Tool
The Liquify Tool, for instance, can dramatically alter the appearance of a subject's face by warping each detail with incredible, smart tools.
Notice how I used it to warp the overall head shape in my Frankenstein Monster Photo Manipulation below.

As with everything I've mentioned, go at your own pace. Decide that today is the day I'll try a 3D creation, perhaps. Then incorporate it into your photo art to get your practice in for the day.
Here are a few ways our instructors use these tools:
 Photo ManipulationHow to Create a Frankenstein's Monster Photo Manipulation in Adobe Photoshop
 InstagramHow to Create an Animated Watercolor Photo Reveal for Instagram Stories in Photoshop
 Photoshop ActionsHow to Create a Photo to Pencil Drawing Effect in Photoshop
 Text EffectsHow to Create an Abstract Pastel 3D Text Effect in Adobe Photoshop
How to Simulate Depth and Motion With the Blur Gallery
With photo manipulations, you often have to cheat your way to a realistic effect. For instance, if I want to create depth of field, I need to establish a clear sense of the foreground, middle, and background environments.
You can do this easily by taking advantage of the Blur Tools in Photoshop. Let your tools do all the heavy lifting for a real, magical result.
Recently, I made this elf photo manipulation inspired by fall. In order to create a sense of depth, I replaced the original background with an Autumn leaf setting and then blurred it slightly.
Next, I incorporated a blurred maple leaf (made with a 3D object) in the foreground, to show that the leaf was closer to the viewer.

This also helped draw in more focus to my lovely subject. Subtle techniques like this can transform your piece in mere seconds!
So whenever you need to create depth and movement, simply open up the Blur Gallery.
Toggle the sliders to experiment with how far you can push the blur. Study the changes between an intense blur and a subtler one.

Sometimes I go overboard on purpose so that I know immediately what I
don't want. Simple tricks like this can help you narrow down your
choices for the right selection.
Tackle these fun photo manipulation lessons with the Blur Tools:
 Photo ManipulationHow to Create a Rose and Spider Portrait Photo Manipulation in Photoshop
 Photo ManipulationHow to Create an Autumn Queen Photo Manipulation With Adobe Photoshop
 Photo ManipulationHow to Create a Queen of Hearts Photo Manipulation With Adobe Photoshop
 Photo ManipulationHow to Create an Enchanted Rose Photo Manipulation in Adobe Photoshop
Why Color Correction Changes Everything
One of the core techniques you'll need to know for photo manipulations is color correction.
Color correction is taking any ordinary photo, and using a variety of tools to change the colors. Maybe you want to turn a green apple into a red one, and you can do that easily with something like the Hue & Saturation Adjustment Layer.
Let's try this on a 3D apple. Go to Layer > New Adjustment Layer > Hue & Saturation.
Move the slider over for the Hue until the apple turns red.
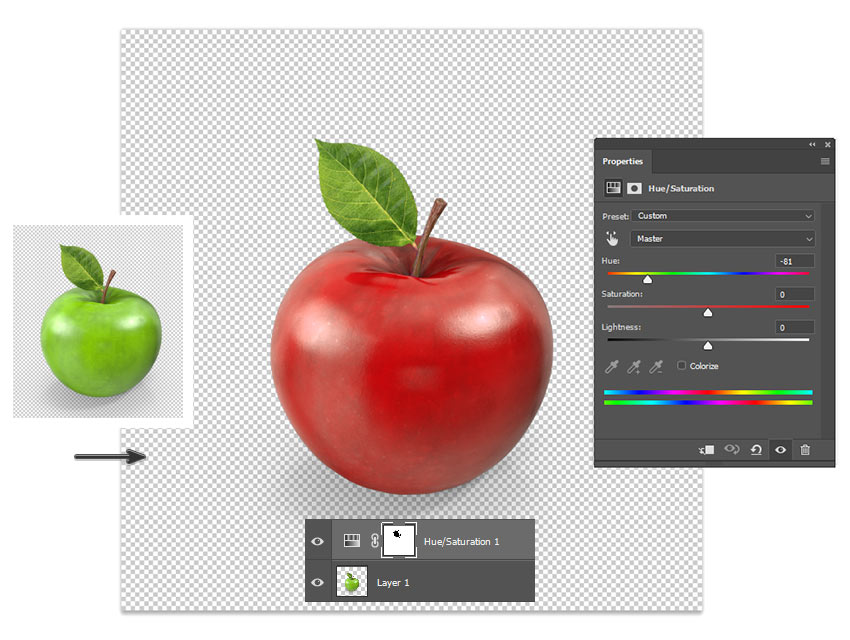
See, it's so simple!
Imagine what you can do with a quick technique like this one! I've used it to change the color of an outfit, hair, and so much more!
And there are many tools that can change colors in Photoshop. I advise you to study them all and implement them when you can. Not every scenario will work with an adjustment layer, unfortunately, so it's important to know which tool is appropriate for your project.
How to Incorporate 3D Objects
I love 3D objects! In fact, I think more people should use them for their photo manipulation projects.
3D objects are simply graphics made with 3D programs which are isolated on transparent backgrounds. Sometimes they're common, everyday objects like water bottles or cars, and sometimes they have fun themes for fantasy, sci-fi, and more.

Sites like Envato Elements let you use 3D objects easily, and I have used these elements pretty often in a few of my favorite tutorials (including the Cinderella photo art from earlier).

In this scenario, I incorporated a 3D pumpkin coach by previewing the 3D render first, and then changing the angle to the one I needed. Once I liked the position, I downloaded the object at that angle as a PSD or PNG file.
Afterwards, just copy and paste your object right into the scene, and adjust the lighting accordingly.

Pretty cool, right?
How to Finely Tune the Position of Any Object
Recently, I created a Photoshop course on How to Make a Flyer. It blew my mind that I had put off learning more about graphic design techniques because I was able to utilize what I did in the course for other digital art projects, including photo art!
See a pattern here?
...The more techniques you know, the easier art becomes.
And now I can tell you one of my favorite tricks to position any object!

Sometimes our mouse or even the program guides just aren't enough to get the position you want. Instead, use the Arrow Keys on your keyboard in combination with the Move Tool (V) to get that object to the spot you want, pixel by pixel.
To do this, select the Move Tool (V) and then press the Up/Down or Left/Right Arrow Keys to reposition a graphic.
It's a simple yet effective method I now use in nearly all my projects!
Why You Should Use Digital Painting Techniques
Before I embarked on any photo manipulation, I was first and foremost a digital painter. I'm glad I started out with this knowledge because it has helped me tenfold in every other creative arena.
But if you're a beginner to all of this then it's a good idea to learn core art techniques through specific digital painting methods. After all, being open minded is key to growth!
Here I used my knowledge of digital painting to create the face paint on this Calavera Sugar Skull portrait.

Digital painting knowledge can give you a considerable grasp of
composition, color, lighting, and more. You can also use it to emphasize certain details or even to add depth and atmosphere to your work.
Essentially, if you aren't able
to fake it with a picture, you can definitely fake it by painting it.
Just take your time and be patient!
Conclusion
I'm so glad I started making photo manipulations over a year ago. Not only are they fun to make, but they're also one of the easiest ways to learn how to creatively express yourself with Adobe Photoshop.
I hope this article has motivated you to tackle a photo manipulation today! Remember to take your time developing more knowledge of essential Photoshop tools to improve your work.
What other questions or tips do you have for photo manipulations? Let us know in the comments.
Find more fun photo manipulation projects with these lessons:
 Photo ManipulationHow to Create a Human Cyborg Photo Manipulation in Adobe Photoshop
 Photo ManipulationHow to Create a Surreal Boat Photo Manipulation With Adobe Photoshop
Original Link: https://design.tutsplus.com/articles/a-beginners-guide-to-photo-manipulations-in-adobe-photoshop--cms-32044
TutsPlus - Design
More About this Source Visit TutsPlus - Design