
An Interest In:
Web News this Week
- April 28, 2024
- April 27, 2024
- April 26, 2024
- April 25, 2024
- April 24, 2024
- April 23, 2024
- April 22, 2024
Some of Our Sources
- Mashable
- Simplebits
- Web Designer Wall
- Smashing Magazine
- Web Design Ledger
- Reencoded
- Line 25
- Daily Now
- The Verge
- TechPowerUp
Help Webnuz
Referal links:
How to Use Keynote Slides (Layout Dimensions, Sizes, & Design)
Apple's Keynote has gained a foothold for Mac users that need to build great-looking slides to supplement a presentation. Building a presentation aid is all about creating slides that help you drive the message to the audience.
It's practically expected that every presentation will include some type of visual aid for the audience. Putting some backing details or visuals in front of the audience can help you re-enforce your presentation's message.
Setting the Keynote slide sizes and dimensions is one of the first decisions that you'll make when designing a Keynote slide deck. These settings are crucial so that your presentation fills the screen and appears correctly when presenting.
This tutorial will help you learn how to use Keynote. You'll learn how to set up the presentation document so that you make the most of the screen that you're sharing the presentation on. Let's learn more.
Guide to Making Great Presentations (Free eBook Download)
Also, be sure to grab our free eBook: The Complete Guide to Making Great Presentations. It'll help you master the presentation process, from: initial idea, through to writing, design, and delivering with impact.

Now let's get started with this tutorial, to learn all about Keynote presentation dimensions and layouts.
What Is Keynote?
You might be wondering what Apple's Keynote software is, and why you should use it. It's certainly not the most popular presentation software—that title belongs to Microsoft's PowerPoint—but it has a dedicated following that prefers its ease of use and excellent design options.
Many people prefer Keynote to Microsoft PowerPoint for its ease of use and more advanced design options. Keynote continues to evolve, and I like that it's a "younger" app that reconsidered how people give presentations and the aids they use in the process.

If you're a macOS user, it seems like a no-brainer to me to use Keynote as your main presentation software. While Microsoft offers PowerPoint for the Mac platform, the user experience of Keynote's native app is better. In this tutorial, you'll learn how to use Keynote's key features to set the slide sizes perfectly.
Why Do Keynote Slide Sizes Matter?
Before you start designing your Keynote presentation, it's important to consider where it'll appear in its finished form.
Every screen has an aspect ratio. This describes the proportions width to height on the given screen. The goal is to build a Keynote presentation that matches the same aspect ratio of the screen that you'll present it on.
Here are some of the screens that your presentation may appear on:
- iPads and tablets
- Laptop screens
- Conference room projectors
- Widescreen, large format displays
Each of these screens could have a different aspect ratio. Most of these fit one of three standard sizes: 4:3, 16:19, and 16:10. You can think of those ratios as basically being, "4 inches wide for every 3 inches tall", or "16 inches wide for every 10 inches tall", for example.
If possible, start off by finding out what type of screen that you'll give your presentation on. If you're presenting on a large screen that can be used as a television, it's probably a safe bet that the screen size is 16:9, for example.
Setting your Keynote slide sizes correctly ensures that it appears the way you expect on the screen or finished form. There's nothing worse than having large black bars of wasted space on the edge.
Keynote Layout Basics (Watch & Learn)
Check out the screencast below for a walkthrough of Keynote's most important layout options. You'll see how to use Keynote essential settings for changing slide dimensions and sizes so that your presentation appears correctly.
Keynote slides can be changed in several key ways. That includes changing the design, dimensions, and ruler options. Let's learn how to change each of those in the written tutorial below.
1. How to Change the Keynote Layout Dimensions & Size
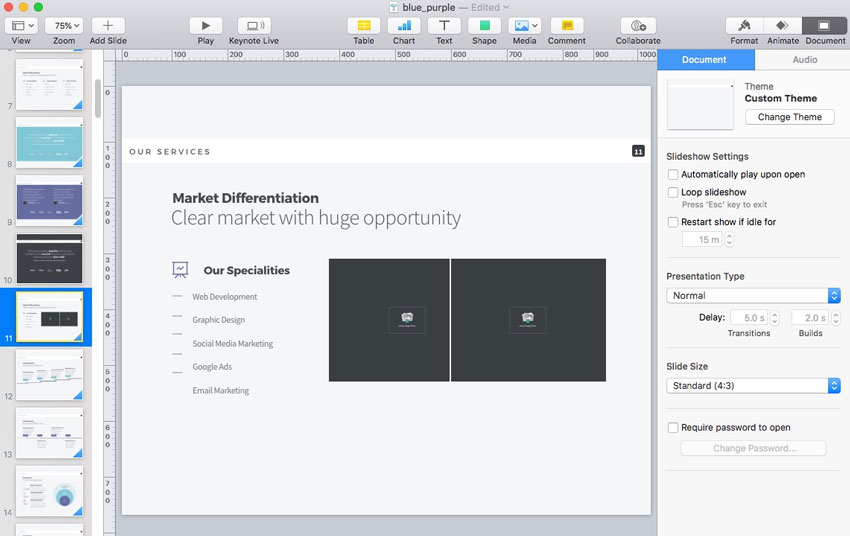
Most of the changes that we'll make in this section of the tutorial can be found on the Document panel.
Start off in Keynote by finding the Document option in the upper right corner of the app and clicking on it. You'll see a new panel open that has all of the options that we'll be covering in this tutorial.
After you open the Document panel, you'll see that there are two tabs on the panel. Make sure that you're working on the one labeled Document.

On the Slide Size dropdown, you can set the key option here for the slide dimensions. By default, you'll have two choices between 4:3 and 16:9. Slide sizes. Creating a new document will typically put your presentation in 4:3 mode, so check this setting first before designing a new Keynote slide deck.
One key watch-out is if you already have content on your Keynote slides. As you adjust the slide dimensions, you may clip or leave borders on the edges. By taking widescreen content to a more square shape, it sometimes requires re-arranging the content so that the slide is filled in the new format.
2. How to Change Keynote Design Options
With the Document tab still open, we can make changes to the Keynote theme that we're using with just a few clicks. Keynote themes control the overall look and feel of the presentation, and it's easy to change even after you've started working on a presentation.
On the same Document > Document panel, click on the Change Theme button. You'll see a number of different theme styles on the new pop-up window as you can see in the screenshot below.

Choose another theme thumbnail from this window and press Choose to re-theme your presentation. These settings control fonts, key colors, and more. When you change themes, all of the content will adapt to the newly selected style.
Advanced Keynote Themes
Even though Apple's Keynote has a few built-in themes that you can apply to your presentations, these aren't the only design styles you can add to your presentation.
A better alternative to the handful of built-in Keynote templates are premium options from Envato Elements. Elements is an all-you-can-download service that currently includes more than 800 Keynote templates that you can use to get ahead while designing a presentation.

In most of these Keynote template packages, the author includes multiple versions of the presentation. In the zip package, you're likely to find a zip file with both 4:3 and 16:9 options. These work a bit differently than the built-in theme settings, so make sure that you start with the correct format from the outset.

These premium themes are stronger than the built-in options in Keynote. Each package includes dozens of slide designs that you can simply add your own content to for a head start on designing your presentation. Instead of starting with a blank slate on each slide, use these with your own assets to get ahead in the presentation process.
Enable Rulers
When you're working on Keynote slides, one of my favorite features to turn on are the Rulers to help me ensure alignment while designing slides. Rulers go hand-in-hand with Keynote slide sizes to ensure the design you've got in mind.
Even though Keynote can help you by snapping elements to a specific alignment, Rulers can help you achieve pixel-perfect design.
Turn on Rulers by going to View > Show Rulers. Along the top and sides of your Keynote document, you'll see pixel measurements that correspond to the position on the slide.

These Rulers help you make sure that everything on the slide is perfectly aligned. For example, you could place two photos exactly 100 pixels from each edge by keeping an eye on the rulers while placing the object on the slide.
Learn All About How to Make Great Presentations (Free eBook)

Take the knowledge you gained in this tutorial further with our new eBook: The Complete Guide to Making Great Presentations. Grab this PDF Download now for Free with your subscription to the Tuts+ Business Newsletter.
It'll help walk you through the complete presentation process. Learn
how to write your presentation, design it like a pro, and prepare it to
present powerfully.
Recap & Keep Learning
Don't stop learning Apple Keynote here! We're just getting started on our learning journey by covering the Keynote slide size and design options in this tutorial.
Keep learning how to use Keynote using the tutorials below. They range from quick tips to complete guides that help you get started in the app.
.jpg) KeynoteHow to Use Instant Alpha in Keynote in 60 Seconds
KeynoteHow to Use Instant Alpha in Keynote in 60 Seconds KeynoteWhat is Apple Keynote?
.jpg) KeynoteHow to Hide and Delete Slides in Keynote in 60 Seconds
KeynoteHow to Hide and Delete Slides in Keynote in 60 Seconds
What do you want to learn about Keynote? Let me know with a comment on this tutorial so that I can answer your questions or produce future tutorials with the tips you need to master Apple's Keynote.
Original Link:
Freelance Switch
More About this Source Visit Freelance Switch