
An Interest In:
Web News this Week
- April 1, 2024
- March 31, 2024
- March 30, 2024
- March 29, 2024
- March 28, 2024
- March 27, 2024
- March 26, 2024
Some of Our Sources
- Team Treehouse
- The Logo Smith
- Smashing Apps
- You The Designer
- Creative Curio
- CSS Globe
- CSS Tricks
- Codrops
- Dev To
- Hashedout
Help Webnuz
Referal links:
How to Draw Horns

The theme of this tutorial is drawing animal horns with graphite pencils, but before we proceed to the artistic part, let’s dwell on the terminology just for a moment.
A horn is a pointed projection of a simple unbranched structure on the head of an animal; it consists of a keratin covering that surrounds a core of live bone. Horns are permanent and never shed, which makes them distinct from antlers. Also, they start to grow soon after birth and continue to grow throughout the life of the animal.
This term is also loosely applied to similar structures present on lizards, birds, dinosaurs, and insects—however, those are not true horns. The examples of true horns are those of cattle, sheep, goats, and antelopes. The outside of their horns is derived from a highly keratinized epidermis.
Horns usually have a curved or spiral shape, often with ridges or fluting. In many species, these structures belong only to males.
Horns are interesting from the artistic standpoint; they vary in size, structure, color, and texture. We’ll explore three common types and observe their shape and texture.
You may also be interested in these drawing tutorials:
 AnimalsHow to Draw Antlers Step by Step
 Drawing TheoryHow to Use an Animal Skull for an Art Study
 AnimalsHow to Draw a Goat Step by Step
What You Will Need
You'll need the following equipment to complete this project:
- An HB graphite pencil
- A 3B graphite pencil
- An eraser
- Drawing paper

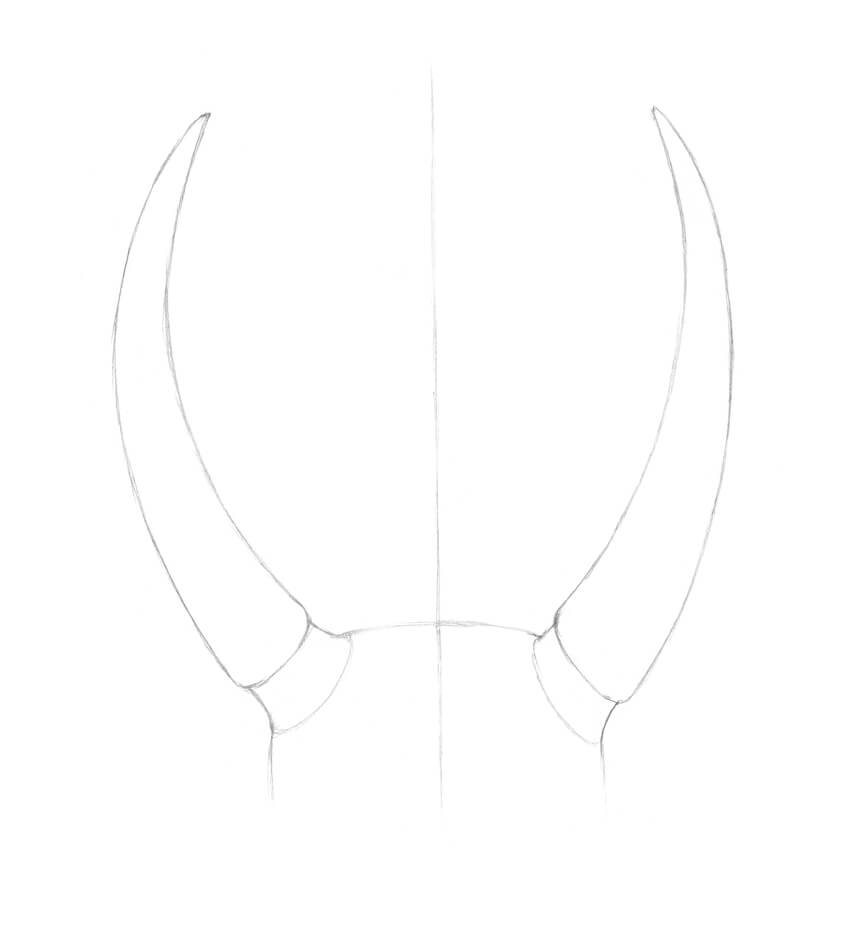
1. How to Draw Straight Horns
Step 1
Let’s begin with the simplest and quite common form of horns—the long structures that are almost straight.
This shape may have different variations and is typical for a number of antelope species (including springbok and oribi), cows, and goats (many domestic species; for example, stiefelgeiss).
With the HB pencil, I mark the central line and then add the upper and side borders of the skull (or the head) of an animal. This is a foundation—a stylized shape just for our reference; we won’t be drawing a full-fledged realistic skull in this tutorial.

Step 2
I add two ovals that mark the basis of each horn. Then I draw the core lines of the horns.
You can extend the central line upwards as you draw the horns, just to make sure you have a symmetry checkpoint.

Step 3
I outline the contours of the horns. Don’t be afraid to make them slightly uneven, asymmetrical, or different from each other; you may be surprised how versatile the world of nature is!

Step 4
I erase the subsidiary lines and refine the horns. One of the typical features of animal horns is a thinner base part that overlaps with a thicker layer above.
Although this form of horns is quite simple to draw, it doesn’t mean it’s too straightforward or boring.
You can vary the length of the horns, the distance between them, their direction, the curvature degree… In other words, you’ll get an amazing variety of options! It’s possible to observe even dramatically asymmetrical horns.

Step 5
As we are ready with the initial shape, it’s time to work on the texture of the horns. There are various kinds of patterns; however, they can be classified into two groups:
- a texture with a pattern of vertical main lines
- a texture with a horizontal or a diagonal pattern
The horns of a straight structure demonstrate the first variant more often; however, there are multiple exceptions. You can find an example of this pattern in the image below.

Let’s try to recreate a similar texture. With the HB pencil, I draw long lines that imitate the pattern.

Step 6
I add long hatches, using the HB pencil. The goal is to accentuate the relief, so the groups of hatches should be applied near the lines of texture, not just in a random order.
I also add a shadow under the protruding part of the horns.

Step 7
Now it’s time to increase the contrast. With the 3B pencil, I darken the vertical furrows of the texture, using soft graphite strokes. The horns are usually slightly lighter in the middle and upper parts, so I add fewer hatches there.
You can also draw dots or short lines to vary the texture, especially near the tips of the horns.
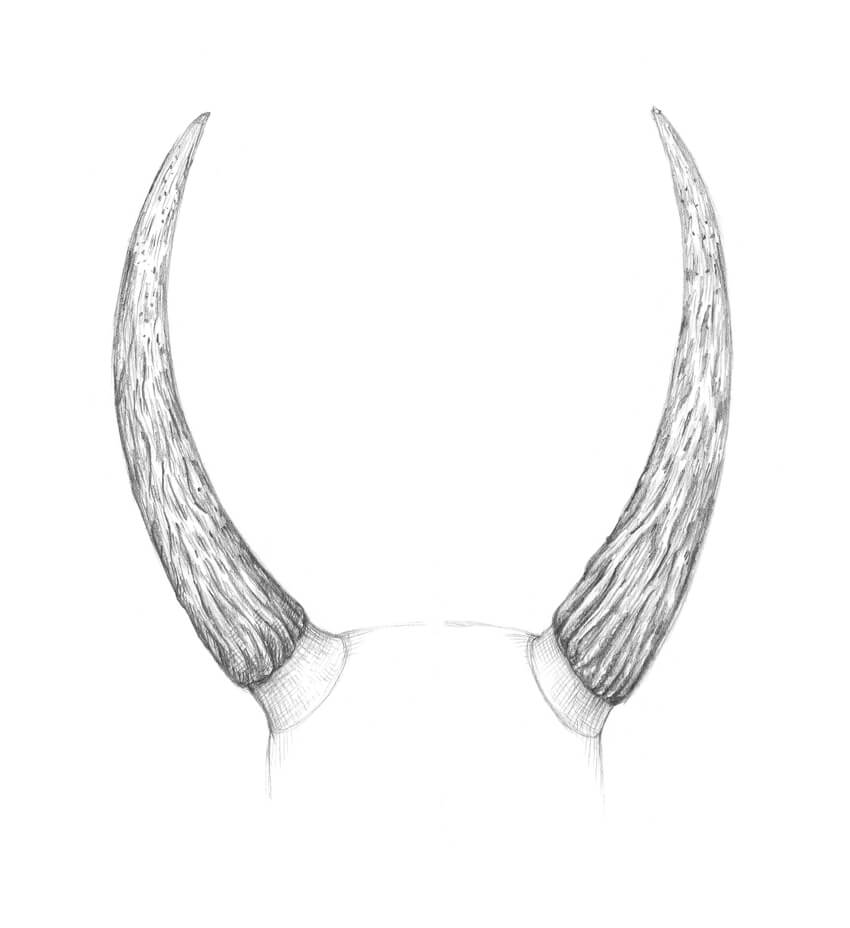
Step 8
With the HB pencil, I add some contour hatching to the sides of the horns to make them more three-dimensional. This drawing is complete!

2. How to Draw Spiral Horns
Step 1
This shape of horns is typical for many species of antelopes (like the addax, blackbuck, eland, and kudu) and goats (for example, the wild markhor goat and the domestic Girgentana goat).
Drawing spiral (or twisted) horns is a more challenging task, but we’ll try to find a simple yet effective way to solve it.
With the HB pencil, I mark the long central line and then outline the stylized borders of the skull.

I also mark the places where the horns are located.

Step 2
I draw the wavy core lines of the horns. Let them be slightly different from each other—horns are natural elements, so making them exactly the same probably isn’t a great idea.

Step 3
This type of horns is relatively complex, so we need to construct them in parts.
I draw the first part, following the general direction of the core line. The upper part of it is twisting, so we see just a thin line.

Step 4
I add the second, inner parts of the horns. If you notice that the reference core line becomes distracting, feel free to soften it with an eraser.

Step 5
I add the third part of the horns; it is quite long and has a distinctive curve.

Step 6
As a finishing touch, I add the small fourth part that forms the thickness of the horns.

Step 7
This type of horn usually demonstrates a moderate relief with a texture pattern of horizontally or diagonally oriented raised areas (or waviness of some kind). You can see an example in the image below.

Let's try to translate a similar pattern into our drawing. I mark the lines of the pattern, making sure it conforms to the overall direction of the horns’ parts. The more organic your lines are, the better.

Step 8
With the HB pencil, I apply the light hatching to accentuate the texture, paying particular attention to the bottom parts of the horns.

Step 9
I start increasing the contrast in my drawing, using the 3B pencil. I apply soft graphite strokes, darkening the hollows of the relief.
It’s also useful to add more hatches to the sides of the horns to give them more volume.

I continue working on the horn on the left-hand side.
Now I strengthen the core shadows of the twisted inner part—they should be really dark, especially in the upper and the bottom parts of the segment.

I complete the remaining segments of the horn, applying the hatching in a similar manner and alternating the areas of light and shadow.

Step 10
I add groups of short hatches to the horn on the right-hand side. The best option is to use both HB and 3B pencils by turns.
To make this drawing harmonious and realistic, I observe the horn that we’ve already completed and reflect the tonal pattern on the horn that is in progress.
It’s important to make sure that both horns have approximately the same range of value, amount of details, and the same contrast.
If you feel tired in the process of completing the second horn, just take a break and rest. Then come back with fresh eyes—I promise, the work will be done with a greater pleasure.

3. How to Draw Curved Horns
Step 1
This shape may have a variety of interesting deviations and is typical for various species of sheep (including the bharal, mouflon, and domestic male sheep), goats (the ibex), and the Caucasian tur, which is a goat-antelope.
As usual, I start by outlining the core line and the borders of the skull.

Then I add the base shape of the horns. Please make sure that you leave enough space for the horns on the paper sheet.

Step 2
I draw the core lines of the horns. This type of shape is quite complicated, so we’ll probably move away from this core line in the future steps, but we still need it as a guideline.

Step 3
I construct the bottom parts of the horns; they are thinner than the remaining dominant parts of the horns.
I use ovals for each base to make sure that the bottom parts of the horns will look three-dimensional.

Step 4
I add a bigger oval to each shape; the horns become much wider here.

Step 5
I draw a curved line that is adjacent to the bigger oval—this will be the contour of the horn’s side. This line is going at a distance from the core line and joins it at the tip of the horn.
I repeat this action with the other horn.

Step 6
It’s time to outline the other side of each horn. I draw a line that is starting from the bigger oval and ends at the point of intersection with the curve.
Feel free to soften or erase the subsidiary core lines of the horns as soon as you feel necessary.

I draw another curved line, starting from the tip of the horn; now we have a protruding front element—the bent part. This line should conform to the side contour that is behind (or above) this front shape.
As usual, I repeat this action with the other horn, keeping the drawing relatively symmetrical.

Step 7
I draw a line that divides the front element of a horn into two parts, creating an edge.
Repeat this action with the other horn.

Step 8
I add the inner parts of the horns.

Step 9
I draw the details that add to the credibility of our sketch—a couple of small segments of the protruding front elements. They mark the foreshortened side parts of the horns.
I also add the twisted sides, adjacent to the tips of the horns.
At this sketchy stage, your drawing may seem slightly irregular (which may seem disappointing), especially if you weren’t aiming for perfect symmetry in the previous steps. I recommend completing your artwork before making any final conclusions—chances are, you’ll love all the imperfections because they add unique, organic features.

Step 10
I add subsidiary lines that mark the relief planes of the upper parts of the horns. It’s useful to think over such nuances beforehand—they can make your further steps of drawing much easier.
Also, I’m going to draw a pattern of small ridges following these lines.

Step 11
The horns of this type usually have a considerable relief with extending prominent details, including various flutes and bumps. This kind of texture looks so interesting! Here are some close-up examples:

I start adding lines marking the general lines of the texture. I also draw small bumps on the edges between the inner and outer sides of the horns.

I complete the initial pattern of the texture. The edges of the front curve of the horns also have small ridges.

Step 12
I add some graphite hatching to the sides of the horns, using the HB pencil. I accentuate the shadow on the inner, bending parts.
At this stage of drawing, the pencil strokes are light, so the contrast is quite low.

I begin adding strokes with a softer 3B pencil, especially on the sides of the horns and the core shadows.

Step 13
I draw the small bumps of the texture in the upper parts of the horns. To make these bumps visually protrude, I accentuate the shadows under them, using the 3B pencil.

Step 14
I increase the contrast of the bottom part of the drawing, where the curved element is.
It’s important to differentiate the front and back segments, so I darken the inner parts of the horns. I also make sure that all areas of lighter values are alternating with the areas of darker values—this makes a drawing truly credible.

Your Drawings Are Complete
Congratulations! You’ve created three beautiful artworks; I hope you enjoyed both the process and the result.
I wish you much success in drawing with graphite pencils and depicting various textures. Have fun capturing the unique charm of the wonderful world of animals and nature!

Original Link:
TutsPlus - Design
More About this Source Visit TutsPlus - Design