
An Interest In:
Web News this Week
- April 28, 2024
- April 27, 2024
- April 26, 2024
- April 25, 2024
- April 24, 2024
- April 23, 2024
- April 22, 2024
Some of Our Sources
- TutsPlus - Code
- Pearsonified
- The Logo Smith
- Smashing Magazine
- Six Revisions
- Inspiredology
- Crazy Leaf Design
- Line 25
- Specky Boy
- CSS Tricks
Help Webnuz
Referal links:
How to Combine Two (Or More) Excel Spreadsheets Together
If you're a Microsoft Excel user, it doesn't take long before you have many different workbooks full of important spreadsheets. What happens when you need to combine these multiple workbooks together so that all of the sheets are in the same place?
Excel can be challenging at times because it's so powerful. You know that what you want to do is possible, but you might not know how to accomplish it. In this tutorial, I'll show you several techniques you can use to merge Excel spreadsheets.
When you need to combine multiple spreadsheets, don't copy and paste the data from each sheet manually. There are many shortcuts that you can use to save time in combining workbooks, and I'll show you which one is right for each situation.

Watch & Learn
The screencast below will show you how to combine Excel sheets into a single consolidated workbook. I'll teach you to use PowerQuery (also called Get & Transform Data) to pull together data from multiple workbooks.
Important: The email addresses used in this tutorial are fictitious (randomly generated) and not intended to represent any real email addresses.
Read on to see written instructions. As always, Excel has multiple ways to accomplish this task, and how you're working with your data will drive which approach is the best.
1. How to Move & Copy Sheets (Simplest Method)
The easiest method to merge Excel spreadsheets is to simply take the entire sheet and copy it from one workbook to another.
To do this, start off by opening both Excel workbooks. Then, switch to the workbook that you want to copy several sheets from.
Now, hold Control (or Command on Mac) on your keyboard and click on all of the sheets that you want to copy to a separate workbook. You'll notice that as you do this, the tabs will show as highlighted.
Now, simply right click and choose Move or Copy from the menu.

On the Move or Copy pop up window, the first thing that you'll want to do is select the workbook that you want to move the sheets to. Choose the name of the file from the "To book" drop-down.

Also, you can choose where the sheets are placed in the new workbook in terms of sequence. The Before sheet menu controls where sequentially in the workbook the sheets will be inserted. You can always choose (move to end) and re-sequence the order the sheets later as needed.
Finally, it's optional check the box to Create a copy, which will duplicate the sheets and create a separate copy of them in the workbook you're moving the sheets to. Once you press OK, you'll see that the sheets we copied are in the combined workbook.

This approach has a few downsides. If you keep working with two separate files, they aren't "in sync." If you make changes to the original workbook that you copied the sheets from, they won't automatically update in the combined workbook.
2. Prepare to Use Get & Transform Data Tools to Combine Sheets
Excel has an incredibly powerful set of tools that are often called PowerQuery. Beginning with Excel 2016, this feature set was rebranded as Get & Transform Data.
As the name suggests, these are a set of tools that helps you pull data together from other workbooks and consolidate it into one workbook.

Also, this feature is exclusive to Excel for Windows. You won't find it in the Mac versions or in the web browser edition of Microsoft's app.
Before You Start: Check the Data
The most important part of this process is checking your data before you start combining it. The files need to have the same setup for the data structure, with the same columns. You can't easily combine a four-column spreadsheet and a five-column spreadsheet, as Excel won't know where to place the data.

Often, you'll find yourself needing to combine spreadsheets when you're downloading data from systems. In that case, it's much easier to make sure the system you're downloading data is configured to download data in the same columns each time.
Before I download data from a service like Google Analytics, I always make sure that I'm downloading the same report format each time. This ensures that I can easily work with and combine multiple spreadsheets together.
Whether you're pulling data from a system like Google Analytics, MailChimp, or an ERP like SAP or Oracle that powers huge companies, the best way to save time is to ensure that you're downloading data in a common format.
Now that we've checked our data, it's time to dive into learning how to combine Excel sheets.
3. How to Combine Excel Sheets in a Folder Full of Files
A few times, I've had a folder full of files that I needed to put together into a single, consolidated file. When you've got dozens or even hundreds of files, opening them one-by-one to combine them just isn't feasible. Learning this technique can save you dozens of hours on a single project.
Again, it's crucial that the data is in the same format. To get started, it helps to place all of the files in the same folder so that Excel can easily watch this folder for changes.
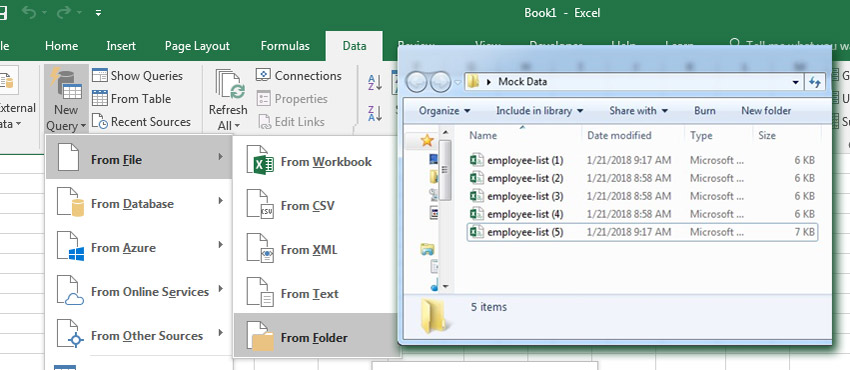
Step 1. Point Excel to the Folder of Files
On the pop-up window, you'll want to specify a path to the folder that holds your Excel workbooks.

You can browse to that path, or simply paste in the path to the folder with your workbooks.
Step 2. Confirm the List of Files
After you show Excel where the workbooks are stored, a new window will pop up that shows the list of files you're set to combine. Right now, you're only seeing metadata about the files, and not the data inside of it.

This window simply shows the files that are going to be combined with our query. You'll see the file name, the type, and the dates accessed and modified. If you're missing a file in this list, confirm that all of the files are in the folder and retry the process.
To move on to the next step, click on Edit.
Step 3. Confirm the Combination
The next menu helps to confirm the data inside your files. Since we've already checked that data is the same structure in our multiple files, we can simply click OK on this step.

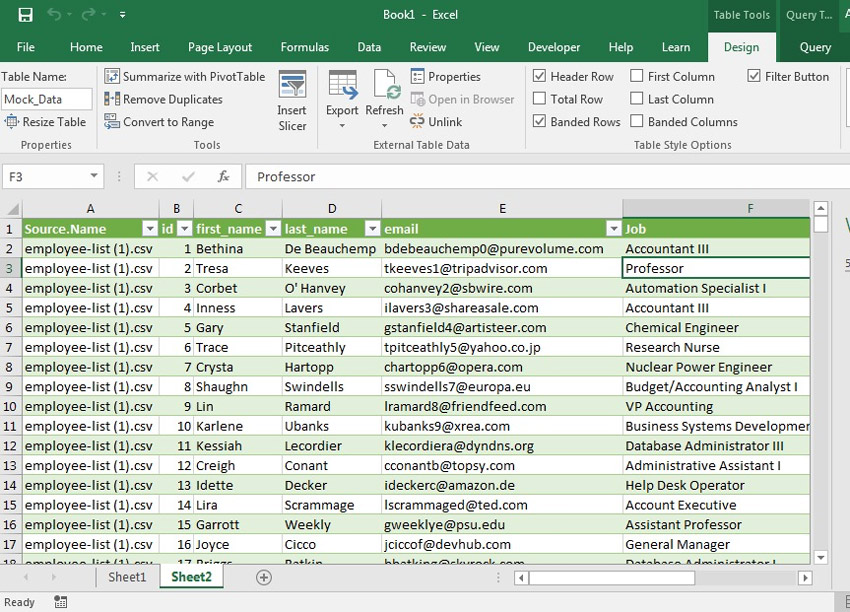
Step 4. How to Combine Excel Sheets With a Click
Now, a new window pops up with the list of files we're set to combine.
At this stage, you're still seeing metadata about the files and now the data itself. To solve that, click on the double drop-down arrow in the upper right corner of the first column.

Voila! Now, you'll see the actual data from inside the files combined into one place.

Scroll through the data to confirm that all of your rows are there. Notice that the only change from your original data is that the filename of each source file is in the first column.
Step 5. Close and Load the Data
Believe it or not, we're basically finished with combining our Excel spreadsheets. The data is in the Query Editor for now, so we'll need to "send it back" to regular Excel so that we can work with it.
Click on Close & Load in the upper right corner. You'll see the finished data in a regular Excel spreadsheet, ready to review and work with.
Imagine using this feature to roll up multiple files from different members of your team. Choose a folder that you'll each store files in, and then combine them into one cohesive file with this feature in just a few minutes.
Recap & Keep Learning
In this tutorial, you learned several techniques for how to combine Excel sheets. When you've got many sheets that you need to stitch together, using one of these approaches will save you time so that you can get back to the task at hand!
Check out some of the other tutorials to level up your Excel skills. Each of these tutorials will teach you a method for accomplishing tasks in less time in Microsoft Excel.
 Microsoft ExcelHow to Create an Invoice in Excel Quickly (From a Template)
 Microsoft ExcelHow To Convert Columns To Rows In Excel With Power Query
 Microsoft ExcelHow to Link Your Data in Excel Workbooks Together
How do you merge Excel workbooks? Let me know in the comments section below whether you've got a preference for these methods, or a technique of your own that you use.
Original Link:
Freelance Switch
More About this Source Visit Freelance Switch