
An Interest In:
Web News this Week
- April 19, 2024
- April 18, 2024
- April 17, 2024
- April 16, 2024
- April 15, 2024
- April 14, 2024
- April 13, 2024
Some of Our Sources
- Techcrunch
- Spoon Graphics
- TutsPlus - Design
- Fuel Your Creativity
- Web Designer Depot
- Stylized Web
- Design Modo
- Android Dissected
- Daily Now
- The Verge
Help Webnuz
Referal links:
How to Create a Purple, Spirit Day-Inspired iPhone Wallpaper in Adobe Photoshop

Learn how to design a purple iPhone wallpaper in honor of Spirit Day! For this tutorial, I'll show you how to use gradient backgrounds, star brushes, and more to create an iPhone wallpaper design.
Take a Stand Against Bullying
Each year, millions wear purple on Spirit Day as a sign of support for
LGBTQ youth and to speak out against bullying. Take the pledge to go
purple! — GLAAD.org
So last year, I created this Photoshop Action to create a quick photo effect for Spirit Day.
By running the custom action, you can apply a purple filter and a few simple shapes onto any picture to show your support for the awareness.
This time, I wanted to do something a little different.

My mind is just blown that I get access to so many lovely goodies on Envato Elements, so lately I've been sifting through all the background collections to find one to put my spin on.
Keep in mind, you will need a subscription for the gradient and vector items I used, but you can also play around with free stocks for this, while still using our free brush pack.
Tutorial Assets
The following assets were used in the productions of this tutorial:
Expand your collection! Paint stars, draw hair, or apply grunge effects with this free Photoshop Brush Pack of 10 essential brushes.
1. How to Set Up the Wallpaper Size
iPhone Wallpaper Dimensions
The size of your wallpaper will depend on your personal iPhone. I've got an iPhone 6, so we'll just go with that.
Here are a few sizes you can consider:
Screen: 1334 x 750
Wallpaper: 1608 x 852
• for iPhone 6
Screen: 1920 x 1080
(downsampled from 2208 x 1242)
Wallpaper: 2662 x 2662
• for iPhone 6 Plus
Find the right wallpaper size for your iPhone. Here are some helpful links I used:
Now create a New Document (Control-N) at this size:
Width/Height: 852x1608 pixels
Resolution: 150 dpi

(I like small file sizes, so feel free to adjust the resolution as needed.)
Let's move on to the background!
2. How to Create the Purple Background
Step 1
First, download the Gradient Backgrounds 2. These two cosmic-like backgrounds were my favorite.

I'll be using #16 for my wallpaper.

Step 2
Now Copy (Control-C) and Paste (Control-V) the gradient onto a New Layer for your wallpaper document.

- The image is pretty big, so we'll need to rotate it to show off my favorite area, the orange color.
- Use the Free Transform Tool (Control-T) to rotate it counter-clockwise. Adjust the size if needed.
Step 3
The official Spirit Day color is similar to this purple #6f009a color.
Create a New Layer. Use the Paint Bucket Tool (G) to Fill the layer with purple. Then set the Layer Blend Mode to Hard Light and lower the Opacity to 26%.

Step 4
Great! Now Duplicate (Control-J) the gradient layer. Drag the layer above the Hard Light one within the Layers panel.

Let's create a new background using these two gradient layers. Use the Free Transform Tool (Control-T) to help reposition this layer towards the bottom of the blue area.

Step 5
Add a Layer Mask to the gradient copy.
Select the Brush Tool (B), use a Soft Round Brush with 0% Hardness and 90-100% Opacity to paint black onto the white Layer Mask. Paint away the harsh edge from the picture and keep adjusting it until you're happy.

3. How to Add More Texture and Color
Step 1
With the background gradients all set, we can move on to texture and color.
But first, let's add an Adjustment Layer of Color Lookup. Go to Layer > New Adjustment Layer > Color Lookup, and select this setting:
3DLUT File: 3Strip.look

Step 2
Let's paint some texture using the Star Brush from this Photoshop Brush Pack.
This brush is meant to resemble tiny, far-away star dots, so we can use it to paint lots of glittery texture.

Create a New Layer. Set the Foreground Color to white and paint dots all around the gradient background for texture. Vary the Brush Size to your preferences.

When you're finished, use the Eraser Tool (E) to softly erase away some stars. Start with a medium to low Opacity and increase it when needed.

Step 3
Create a New Layer.
Use the Paint Bucket Tool (G) to Fill it with the same purple #5a009a color from before. Set the Layer Blend Mode to Overlay and lower the Opacity to 43%.

Step 4
Let's continue tweaking the colors until we're happy with the result.
Design is all about patience and experimentation!
Create a New Adjustment Layer of Color Balance. Adjust the settings for the Midtones, Shadows and Highlights to the following:

Then create another New Layer and Fill it with a rich purple #6f009a. Set the Blend Mode to Hue and the Opacity to 43%.
Here's the result. Now it's more in line with Spirit Day colors!

4. How to Make a Geometric Composition
Step 1
Use the Ellipse Tool (U) to create a large purple #690092 circle. Place it in the center of the composition.

Set the purple circle layer to Darken.
Create a quick Layer Mask to erase some of the lower left area of the circle. Feather it out by using a Soft Round Brush. This will help blend it into the background.

Step 2
For more depth, let's establish the foreground, middle and background sections of this composition with more geometric objects.
Use the Custom Shape Tool (U) to add a triangle shape to the bottom left side.
Right-click the shape layer and go to Blending Options. Add a pink Gradient Overlay with the following options:
Gradient Colors:#8c3148to#ff5984
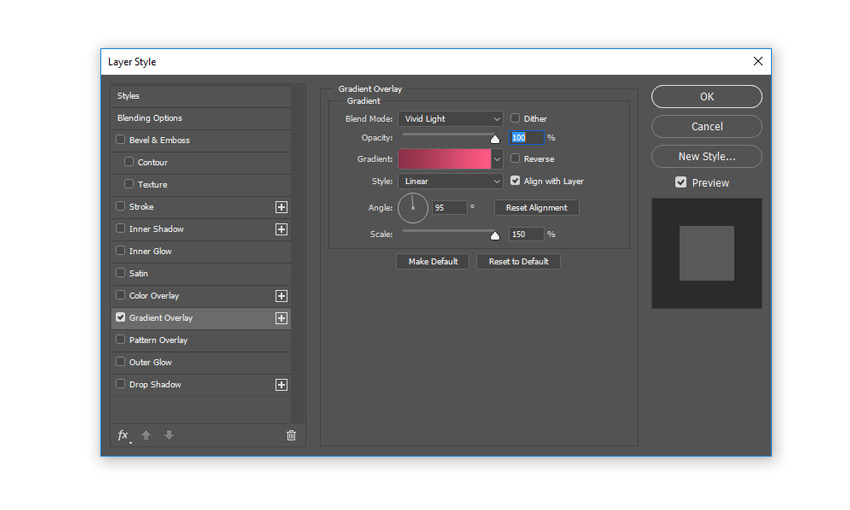
Then add another purple triangle #6102e4 to the top right side. Here's the result:

Step 3
For a little more sultry atmosphere, we're going to adjust the lighting of this scene.
Fill a New Layer with red #720f0e. Add a Layer Mask and paint black with a Soft Round Brush to hide certain parts of the red layer away. Then lower the Opacity to 33% and set it to Multiply.

Step 4
Let's add the "sun" object for this piece. It wasn't originally intentional, but it'll later help to draw in the viewer.
Use the Ellipse Tool (U) to create a purple #570f9c circle. Position it towards the right side of the other.
Then Right-click to go to Blending Options. Add a Gradient Overlay with the following settings:
Gradient Colors:#aa9780and#e4cbac

We'll leave the final circle shape which holds the date for Spirit Day for the last steps.
For now, Duplicate the left lower triangle. Set the color to this purple #7000cc. Make it bigger before setting it to Screen. Enjoy the subtle effect!

5. How to Finish the iPhone Wallpaper
Step 1
For the last steps of this iPhone wallpaper design, we'll need to adjust the contrast and add a date!
Let's start with a New Adjustment Layer of Color Lookup.
Set the 3DLUT File to filmstock_50.3dl.

Step 2
Create the last ellipse. Set the color to magenta #751772.

Add a Gradient Overlay to the ellipse. Use a colorful Yellow, Pink, and Purple preset you can find by accessing the Pastel gradients within the Gradient Editor.

Next, add an Outer Glow with the following settings:

Here's the result—it's subtle, but well worth the effort.

Step 3
Add some light for some wicked effects! Use a Soft Round Brush to paint white onto a New Layer set to Overlay.

Step 4
For a little movement, let's create a 3D trianglular shape that floats into the scene.
First, use the Custom Shape Tool (U) to create the purple #5a1390 triangle. Adjust the perspective with the Free Transform Tool (Control-T).
As with our previous steps, add a gradient. Use the same Pastel Gradient from before, but lower the Opacity to 30%.

To make this triangle 3D, first duplicate it. Delete the gradient overlay and use this triangle to set the lower base of the 3D effect. Next, use the Pen Tool (P) to connect the two triangles together by filling in the gaps with purple shapes.

Step 5
Now for the text.
Create the text for the date and hashtag with two new text layers. I'll be using this Reef Font and Arial Rounded MT Bold. Set the date to white and #spiritday to pink #ff28ff.

Right-click to go to Blending Options.
Follow these settings to create a Drop Shadow, Gradient Overlay, and Bevel and Emboss effect.

Here's the result:

Step 6
Set the magenta circle to Soft Light.
Use one of geometric shapes from this vector shape bundle for more detail on the circle. Copy and Paste the shape onto a New Layer, and then use the Eraser Tool (E) to erase the areas where the lines are intersecting.
It may help to hide the text for this step.

Step 7
Balance out the composition by using a Soft Round Brush to add more light and color to the scene. Use your natural intuition to help blend areas together.
Finally, brighten it with a New Brightness and Contrast Adjustment layer.
Brightness: 6
Contrast: 49

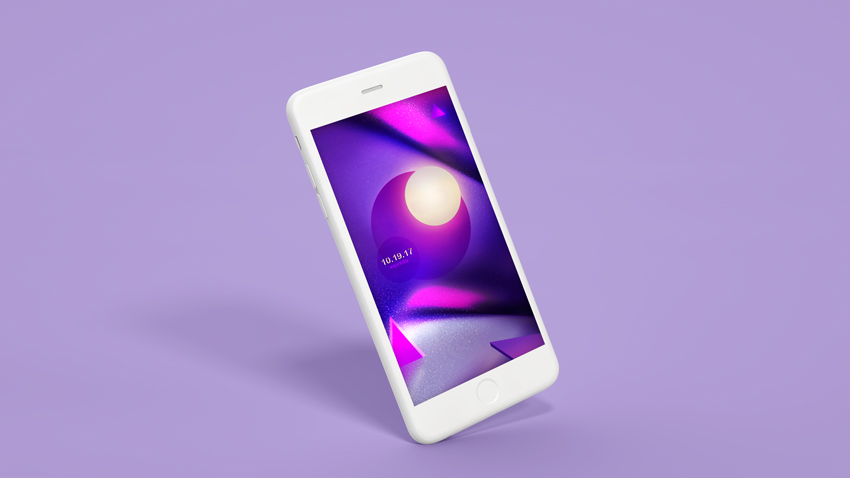
That's it! Check out the final result below.
Free Spirit Day iPhone Wallpaper
Get this wallpaper at full size and join us for Spirit Day! Set it as your wallpaper to show your support of this important anti-bullying mission.
Like this iPhone Mockup? Try it out!
I hope you've enjoyed this tutorial. Feel free to leave comments, results, and any questions below!
For more Spirit Day tutorials, check out these links:
 Spirit DayHow to Create a Set of Spirit Day Icons in Adobe Illustrator
 Colour BalanceCreate a Rich Purple and Gold Look in Adobe Photoshop
Original Link:
TutsPlus - Design
More About this Source Visit TutsPlus - Design