
An Interest In:
Web News this Week
- April 29, 2024
- April 28, 2024
- April 27, 2024
- April 26, 2024
- April 25, 2024
- April 24, 2024
- April 23, 2024
Some of Our Sources
- Engadget
- Techcrunch
- Smashing Apps
- Abduzeedo
- My Ink Blog
- Fudge Graphics
- Web Design Ledger
- Line 25
- Spyre Studios
- The Verge
Help Webnuz
Referal links:
How to Draw a Horse Step by Step

In this tutorial I will show you how to draw a realistic horse step by step, without any reference. You'll learn how to build its body out of simple shapes, and how to add all the details. And most importantly, I will show you how to achieve the right proportions for a horse's body.
1. How to Draw a Horse's Body
Step 1
Draw an oval for the chest. Sketch it lightly, without pressing too hard. This is supposed to be a sketch, not a part of the final picture.

Step 2
Draw a big, fat "6" in front of the chest. This will be the shoulder area.

Step 3
Gently sketch some space behind the chest to define the "waist"—the gap between the chest and hips. It's very small in horses.

Step 4
Draw an even fatter, reversed "6" to create the thickness of a thigh at once.

Step 5
Draw a circle on top to define the edge of the hip.

Step 6
Connect both parts with a curve.

Step 7
Outline the belly now.

Step 8
The main body is done! Let's add the head. Draw another curve for the neck. Make it slightly shorter than the curve of the back.

Step 9
Connect the curve to the body with a straight line. Leave some space right at the tip.

Step 10
Draw the curve of the head. Make it roughly as long as the shoulder.

Step 11
Build the main shape of the head with a teardrop and a circle.

Step 12
Close the shape of the head.

Step 13
Finish the curve of the neck.

2. How to Draw a Horse's Legs
Step 1
First we need to find the distance to the ground. The safest way is to use the height of the chest + some space for the hooves.

Step 2
Sketch the direction of the foreleg.

Step 3
Mark the middle of the leg.

Step 4
Draw the hind legs. The ankles should be placed slightly higher than the wrists.

Step 5
Draw symbolic hooves.

Step 6
Attach a circle to each hoof. This will give a shape to the joint.

Step 7
Add definition to the other joints as well.

Step 8
Create a basic shape of the forearms and the calves (that's right—the elbow and the knee are higher than you would expect!).

Step 9
Add more details to the shape of the calves.


Step 10
Outline the "hands" and "feet".

3. How to Draw a Horse's Head
Step 1
Time for the details of the head. Start with a slim ear.


Step 2
Draw a line between the ear and the tip of the mouth.

Step 3
Draw the base of the eye socket.

Step 4
Draw a big circle in its lower area.

Step 5
Draw a smaller circle inside.

Step 6
Draw the nose on top of the muzzle.


Step 7
Draw the mouth in the lower part of the muzzle.

Step 8
Add the lips and the chin.

Step 9
There are some interesting muscles between the mouth and the cheek. Draw them as an oval.

Step 10
Draw some more "muscles" between the nose and the eye.

Step 11
There's a bony protrusion over the cheek—a very important element of a horse's head.

Step 12
Finish the shape of the eye.

Step 13
Add more detail here and there.


4. How to Draw the Details of the Horse's Body
Step 1
Draw some small ovals where the elbows and knees should be.

Step 2
The forearm "cuts" very visibly into the arm/shoulder area, and the thigh has a gentle curve on top.

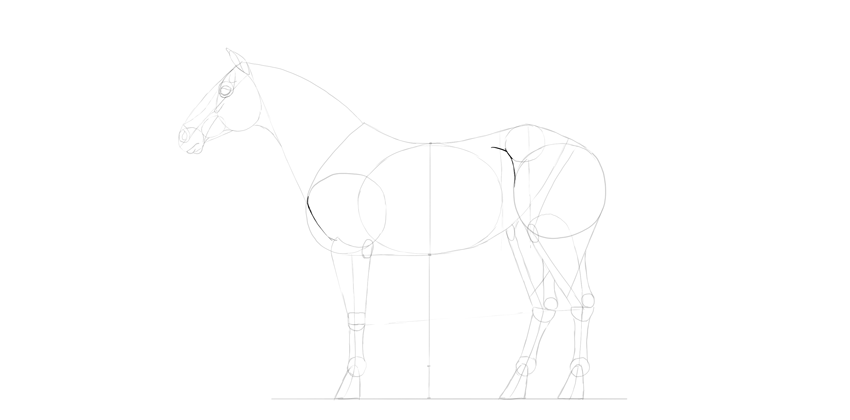
Step 3
To make both limbs look muscular, we need to add special outlines of the muscles. Start with the big elements...

... and slowly add more detail.


Step 4
The torso has special details as well.

Step 5
Draw the shoulder.


Step 6
The neck has many complicated muscles, but we can simplify it:


Step 7
Finally, add the tail. It's not as long as you might expect!

5. How to Draw Details of the Horse's Legs
Step 1
Cut the lower part of the hooves with a slanting line.

Step 2
Cut the back of the hooves to give them a more accurate shape.

Step 3
Add a "cap" to each hoof.

Step 4
Connect the hooves to the joint with some curves—deeper in the back and gentler in the front.

Step 5
The lower parts of the legs are very bony, with no muscles. So they should have a very clear shape.

Step 6
Add some muscles to the forearm area.

Step 7
Add muscles to the calves, too.

Step 8
Make the joints bonier.

Step 9
Draw the little hollow under the Achilles tendon.

Step 10
Add more details to the lower legs.

6. How to Finish the Drawing of a Horse
Step 1
The sketch is done, and we can draw the final drawing now. If you were drawing lightly enough, you should be able to draw the final lines over it. If not, you can either draw the final lines with a thicker, darker tool, or put a new sheet of paper over the sketch.
Let's draw the hair first, in case it covers some details. Sketch its direction gently.

Step 2
The outline of the mane and tail should have the shape of rough strands, not single hairs.

Step 3
Finish the hair with the technique described here:

Step 4
Outline the details of the head. You don't need to outline every "muscle"—just make a suggestion that something's there.

Step 5
Outline the whole body. Keep the outline of the muscles "open"—they're not separate objects, they're covered with skin!

Step 6
Finish the drawing by making some of the lines darker and "coloring" the dark parts.

Good Job!
Now you know how to draw a horse step by step! If you want to learn more about drawing horses, don't forget to check out our huge tutorial on them—with advanced anatomy and detailed description of all the gaits:
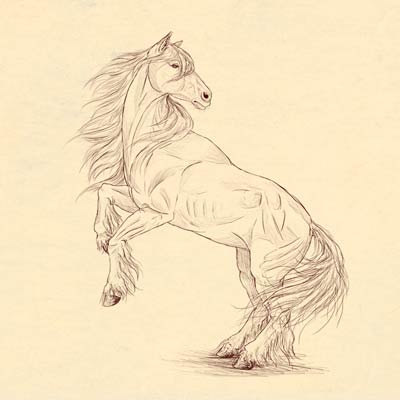
And if you want to draw a magical unicorn, you'll love this tutorial:


Original Link:
TutsPlus - Design
More About this Source Visit TutsPlus - Design