
Some of Our Sources
- Engadget
- Mashable
- Team Treehouse
- Pearsonified
- TutsPlus - Design
- Creative Curio
- Noupe
- My Ink Blog
- CSS Tricks
- Codrops
Help Webnuz
Referal links:
How to Create a Steampunk Owl Photo Manipulation in Adobe Photoshop

Steampunk is a fun genre of science fiction that combines advanced technological features with historical (often steam-powered) machinery. And in this tutorial, I'll show you how to construct your own owl figurine using a collection of great stock images.
Love steampunk design? Check out our amazing selection of Steampunk Designs and Resources available through GraphicRiver and Envato Elements.
Tutorial Assets
The following assets were used in the production of this tutorial:
- Owl
- Steampunk Glasses
- Top Hat(the original image I used is no longer available, but you can usethis top hat imageas an alternative)
- Keyhole
- Armor
- Armor Gloves
- Metal Sphere
- Wooden Box
- Gears
- Ornate Frame
- Silver Frame
- Belt
1. How to Draw the Owl
Step 1
Historically, owls are known to symbolize wisdom and mystery, and are often a protector of secrets. Inspired by the old mythology surrounding them, I'll create a metal figurine with a unique keyhole as well as steampunk-related features. For more style inspiration, I'll be basing the construction of this owl on Steampunk Owls I found on Pinterest.
Open a New Document in Photoshop at 1260 x 1000 pixels and 100 dpi. A higher resolution will allow us to retain some of the intricate details we create later on.
Select the Brush Tool (B) and use a Hard Round Pressure Opacity Brush to begin sketching your owl.

Step 2
Start by taking a good look at your references. Here I've used everything from ornate frames to jewelry and armor to construct the final owl. Keeping this in mind, I base the sketch on simple shapes that are related to these references.

I also want to make sure I can easily duplicate and flip these shapes to create balance for the owl and make the process much easier.
Step 3
Although it's a photo manipulation, a sketch will allow us to understand how to construct the owl figure. It will also tell us how many stocks we may need to finish it.
As you sketch, start with simple shapes like large circular ones for the head and body. Then begin to add more details. This owl will be outfitted with a top hat, steampunk goggles, a keyhole, and a belt. Make sure all these extra details are included in the sketch to ensure a seamless transition throughout this process.
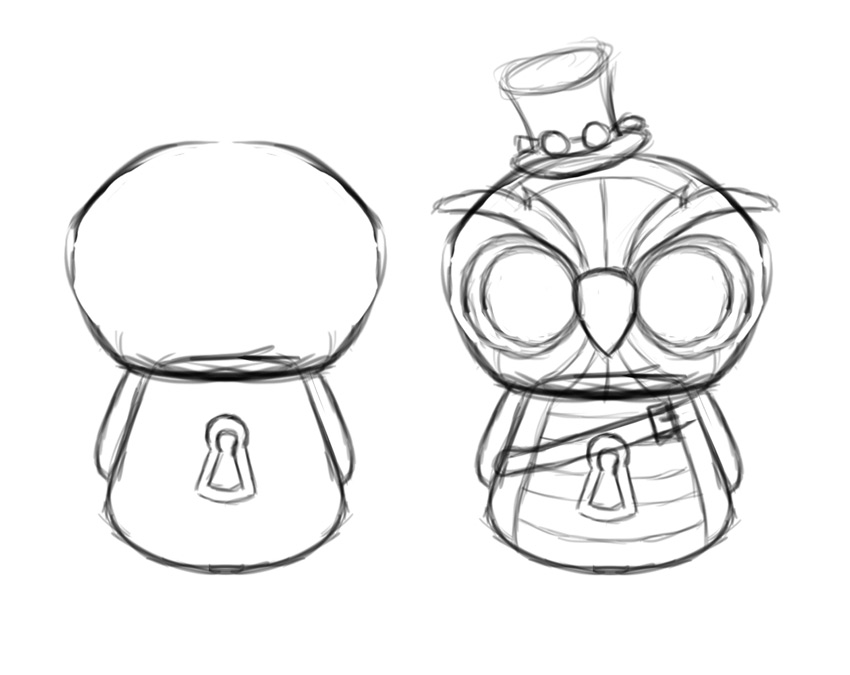
Because it's inspired by steampunk design, keep in mind that this owl is only loosely based on the actual animal. Feel free to add character by exaggerating certain details like the beak, while keeping the rest of the design relatively minimal.
Here is the final sketch.

2. How to Construct the Owl Body
Step 1
Now that the sketch is done, we can move on to a solid game plan to understand how to piece the parts together. It's essential that we lay in each stock first, before applying shadows and texture so that we can understand how to make the lighting work harmoniously.
Use the Paint Bucket Tool (G) to Fill the background with a dark gray color #747474. Open your Metal Sphere Reference and use the Elliptical Marquee Tool (M) to extract the rusty sphere from the photo. Copy and Paste the sphere into a New Group underneath the sketch.

Use the Free Transform Tool (Control-T) to resize the sphere and Rotate it so that the shadow faces the top of the head. Follow up by going to Image > Adjustments > Hue & Saturation, and lowering the Saturation to -100 to turn the sphere black and white.
Finish the lower half of the body by using the Polygonal Lasso Tool (L) to select the top half of the Helmet Armor, and then Copy and Paste it before positioning it for the body. Add a quick Layer Mask to the helmet to mask out any metal that goes outside the edges of the sketch.

Step 2
Now that we've got the base of the body down, let's move on to more pertinent details. Open your Owl Reference and use the Polygonal Lasso Tool (L) to extract the golden beak from the necklace. Copy and Paste it onto the canvas, positioning it above the sketch layer. Use the Free Transform Tool (Control-T) to resize the beak, making it large so that it stands out. If needed, clean up the edges with the Eraser Tool (E).

Step 3
Continue to place each detail on layers above the sketch until you no longer need it. Now extract the metal mesh area from one of the sides of the Silver Frame. Free Transform (Control-T) to Rotate and adjust this part, positioning it at the bottom of the owl before using the Warp function to mold it to the body.

Next, extract the Belt and the small detail from the Ornate Frame. I made the belt shorter by Copying and Pasting the buckle part onto the strap to overlap it. Then I decorated the belt by Rotating the small frame detail and placing it on top.

Step 4
Continue building the body. Extract the Keyhole and place it on the center of the body underneath the belt. Then use the Polygonal Lasso Tool (L) to extract one of the metal parts from the Armor Gloves.
This metal will help form the wings. Paste one onto the canvas, Control-T to Free Transform and Rotate it, and then position it in place. Then hit Control-J to Duplicate it, and Flip the copy for the other side by going to Edit > Transform > Flip Horizontal.

Step 5
To create the eyebrows, extract one of the ornamental swashes from the Silver Frame. Enlarge the swash with the Free Transform Tool and stretch it so that it's much longer. Place it underneath the sketch, and then use the Eraser Tool (E) to erase the edges in order to form the shape of an eyebrow. It's alright if it doesn't match the sketch completely.
Control-J to Duplicate the first eyebrow, and then Flip it by going to Edit > Transform > Flip Horizontal.

Step 6
Now that we have a general understanding of the owl's body, we can complete his entire outfit. Place the next elements into the Group that contains the body. First, use the Polygonal Lasso Tool (L) to extract the Top Hat from its reference. Copy and Paste the hat onto the canvas and use the Free Transform Tool (Control-T) to adjust the perspective of the hat so that it fits perfectly on the owl's head.

Start Erasing parts of the sketch to help with this step. Then add a Layer Mask to the hat, painting black on the mask to adjust the shape even further. We'll fix any lighting or color issues later down the line.
Currently, this design has too much metal. Since steampunk often
incorporates other materials, I'll be reusing the material from the hat
to outfit the owl. Use the Rectangular Marquee Tool (M) to make a large selection of the hat's shiny black material and Copy and Paste
it onto the canvas. Position the material over the metal body, making
sure that the wings, keyhole, belt, and mesh details are still visible.

Steampunk characters always have a pair of goggles on. So extract the Goggles from your reference using the Polygonal Lasso Tool (L). Flip them horizontally, and then Control-T to Free Transform the goggles, adjusting the perspective so that they fit perfectly onto the hat. To keep the goggles within the hat layer, set it as a Clipping Mask to the hat.

3. How to Create the Owl Eyes
Step 1
To keep the number of stocks used to a minimum, feel free to use the same stock more than once. This is especially necessary for the gear-inspired eyes. First, create a New Layer and use the Brush Tool (B) to paint black onto the eyes.

We paint them black because black will represent the darkest part of the eyes.
Step 2
Before you add the gears, first extract them from the Gear Reference with the Polygonal Lasso Tool (L) and Paste them onto New Layers. Make a Duplicate of one and use the Elliptical Marquee Tool (M) to select and Delete the center of it to create a new gear shape.
When you're finished, Duplicate these gears so that you have multiple copies. You can also easily clean up the edges with the Eraser Tool (E).

Step 3
Now that you have all the gears ready, begin creating the eyes. Place two of the gears with the open middle for the left and right sides of the eyes.

Take that same gear and make six copies. Adjust the copies on the left side so that they almost cascade down the eye, and then Merge the copies together. Duplicate this set, andFlip it by going to Edit > Transform > Flip Horizontal to create more balance. Again, Merge the two sets together.

Now use the two main gears for the actual eyes, andMerge the two layers together. There should be three main layers for the eyes now: the outside gears, the main eyes, and the gears behind the eyes.

Step 4
Before we move on to the background, let's embellish the
outfit a little more. Extract one of the round bolt details found on
the Helmet Armor. Then Copy and Paste it onto the canvas. Duplicate it seven more times, adding small bolts to the left and right sides of the owl's outfit.

For even more decoration, you can also add two extra bolts to the keyhole as well!
4. How to Create the Background
Whether you're searching for a background image or creating one from scratch, try to be smart about your reference choices. Choose a background that is at the same angle and perspective of your figurine so that it fits perfectly into the scene.
Here I'll be using this Wooden Background. Copy and Paste the background onto a New Layer, adjusting the size so that the middle box is the main focus. Also make sure that the cube is large enough to house the figurine, since it will appear to be sitting on a shelf by itself.

5. How to Add Light, Shadows, and Color
Step 1
Now that we have the whole scene set up, we can move on to the lighting scheme! First set a New Adjustment Layer of Hue & Saturationas a Clipping Mask to the Group that contains the body, hat, and head. Adjust the Hue, Saturation, and Lightness with the following settings:
- Hue: 48
- Saturation: 13
- Lightness: -6

Step 2
Currently, the hat is too dark for the scene, so set a New Adjustment Layer of Levels as a Clipping Mask to the hat. Adjust the RGB, Green, and Blue Channels with the following settings:

The hat should read more clearly now.

Step 3
Let's match the lighting for the hat to the wooden background. Set a New Adjustment Layer of Curves as a Clipping Mask to the background layer. Adjust the curves for the RGB, Green, and Blue Channels like the ones below. Try to add more light first, and then add a slight green tint.

We will come back to the color shortly, but for now, let's move on to the shadows of the figurine.
Step 4
Now set New Layers as Clipping Masks to the eyebrows, gears, and beak. Use either dark brown or black to paint soft shadows on each layer with a Soft Round Brush. Start with the eyes, creating depth by painting more shadow on the background gears than on the actual eyes.

Then move on to the beak and eyebrows. Create realistic shadow by sweeping the brush to the edges of the metal to create realistic curves.

Continue shading your owl. Bring the shadow onto the head to make it appear more round. On a New Layer above the wooden background, cast shadows against the back wall of the shelf.

Step 5
For more color harmony, add a New Adjustment Layer of Color Lookup at the top of your layers. Set the 3DLUT File to Candelight.

Follow up with another New Adjustment Layer for Curves. Adjust the curves for the RGB and Green Channels to up the intensity of your previous result.

6. How to Finish the Owl Scene
Step 1
In this last section we'll still need to balance out the lighting, clean up our details, and adjust the colors even more. To keep things simple, I'll be adding all New Layers above my last two Adjustment Layers for these final tweaks.
First, create a New Layer dedicated to cleaning the scene up. Use a Hard Round Brushwith 50-100% Hardness to make the edges of the owl crisper.

Notice that this also means that I'll need to draw certain details like the brim of the hat, the top of the hat, and the lines underneath the beak.
Continue refining your manipulation. Another great way to create sharp lines is to use highlight colors to break up some of the dark shadows you're seeing. So in this instance, you'll see highlights around the beak, gears, and eyebrows, which all help to make the owl sharper.

Step 2
Now create a New Layer and set it to Overlay.Use a Hard Round Brush to add white highlights to the metal before switching over to a Soft Round Brush to add more light to the background and figure.
I basically want to make sure that the owl is very well lit since the box is quite dark at the moment.

Step 3
Adjust the lighting even further by creating more realistic shadow. Create a New Layer and set it to Multiply. Use black or a dark brown color to create a vignette effect around the box.

Lighting is all about finding balance. So once you have the vignette in place, start painting more shadow onto the right side of the figurine. This helps to set the scene even further by allowing the owl to look as if it's actually standing on this shelf.

Step 4
To finish this manipulation, add one last Adjustment Layer for Color Lookup. There's currently too much red showing through, so set the 3DLUT File to FoggyNight and lower the Opacity to 24%.

Like Clockwork, You're Done!
The key to a great photo manipulation is to pay attention to your references. Be smart with the ones you choose! And no matter how many stocks it takes, study all of their light sources so that you're able to construct a result that is practically lifelike.
I hope you enjoyed this tutorial! Feel free to leave any questions or concerns in the comments and I'll be happy to assist you. For more great photo manipulation tutorials, check out my Instructor Profile here on Envato Tuts+. And good luck!

Original Link:
TutsPlus - Design
More About this Source Visit TutsPlus - Design