
An Interest In:
Web News this Week
- April 27, 2024
- April 26, 2024
- April 25, 2024
- April 24, 2024
- April 23, 2024
- April 22, 2024
- April 21, 2024
Some of Our Sources
- Pearsonified
- The Logo Smith
- TutsPlus - Design
- Naldz Graphics
- FanExtra - PSD
- Web Design Ledger
- 24 Ways
- Stylized Web
- Specky Boy
- Android Dissected
Help Webnuz
Referal links:
Create an Algorithm Trading Robot: The Basics of Writing An Expert Advisor in MQL4
The world's financial markets offer you a huge potential for profit and loss. There is always a potential for profit in the market as you can place trades in either direction. Whether your stance be bullish or bearish, the ability for the trader to make money is always present—as is the ability to make a loss.
Far too often, emotions, psychological mind traps and mental discipline stand in the way of profits and are the main reasons 95% (or more) of all new traders lose all their investment capital in the first month.
Using an Expert Advisor algorithm trading robot in Meta Trader written in the MQL4 language is one way of accessing the market via code, thus taking the emotions out of the picture and working with just the numbers and your program logic.
Taking emotions out of the equation is one measure, but this does not mean robots cannot lose. In fact, even the big investment banks have had to pull the plug on their trading robots before the loss became fatal. In 2013, Goldman Sachs had serious faults in their trading algorithms that cost $100 million.
You need to be aware, before continuing with this guide and even contemplating using your real, hard-earned cash, that you can lose all your deposit in your brokerage account from your code (and maybe in worst cases more with some brokers if additional charges apply)
You are responsible ultimately for the trades, even if program code is placing them for you. While loss is a possibility, you can also multiply the account and make it grow exponentially while you sleep.
If you like to run completely on auto-pilot, this could be achieved without any interaction at all. You could literally make money passively whilst you continue with your day-to-day life.
This strategy of totally hands-free trading is not one I promote—nor is it one I ever use and have found profitable at all. Monitoring an active robot and the current trades, in conjunction with keeping an eye on the economic calendar and events, is very different from letting it off wild and hoping for the best. The wins may be epic, but the unattended losses far grander.
Installing MQL4
Please download MT4 from their website and install it on your machine.
Once MT4 is running, you will need an account with a broker that supports MT4. They will then be able to give you your MT4 login credentials.
All brokers will offer a demo account, and you are encouraged to always use the demo account for writing and testing your software.
Once you have configured MT4 on your desktop, we can continue to creating our own Expert Advisor algorithm trading robot.
How to Write a Robot
There are many languages which would be suitable for writing an algorithm trading robot from scratch, but the complications that you will encounter are in fact with the API to direct market access that your stock broker will provide—that is how you will actually enable yourself to place the trade orders in the financial markets.
Processing market data could be achieved in a plethora of languages, and probably to a faster extent than the MT4 MQL4 can run back tests (back tests are a way of testing your algorithm robot; more on this later). For the reasons of ease of functionality and general support for financial software, I highly recommend using MQL4 (MetaQuotes Language 4), the native language of MetaTrader 4, to write your algorithm trading robot.
MQL4's Syntax
MQL4 is similar in its form to PHP, C, C++ or VBScript. Below is an example of a function that will be called on every tick of market data:
void OnTick()
  {
       if(Bars<100 || IsTradeAllowed()==false)
          return;
       if(CalculateCurrentOrders(Symbol())==0){
          CheckForOpen();
       } else {
          CheckForClose();
       }
  }
Here we check if there has been enough market data loaded with Bars < 100. MQL4 sets predefined variables such as Bars (which contains the number of bars loaded into the chart).
Additionally, we check with an or || conditional for IsTradeAllowed(). This is a check function to check that the trading context is not currently busy.
Elements of MQL4 such as these predefined variables and chart operation functions like Symbol() make writing your strategy a walk in the park, and for me are why it is really preferable to code algorithm trading robots in MQL4 over other languages.
I recommend you take a look through the MQL4 Reference whenever you have time to get more confident in using MQL4 to further satisfy your needs.
Editing MQL4 Code in the MetaEditor
I recommend using the built-in MetaEditor IDE that comes with the MT4 trading platform. To enter the editor, just right-click on an existing expert advisor in the left-hand navigator pane and select modify from the menu.
The MetaEditor of MT4 will then open, and you will be able to create a new file. This offers the user syntax highlighting and debugging output.
Important: You will have to compile your mq4 files into ex4 expert advisors using the MetaEditor if you are editing in an external editor. So getting familiar with the MetaEditor is a must.
Our Algorithm
For our strategy, we will begin using a basis of support and resistance from the SMA (Smoothed Moving Average) indicator. The SMA can predict a bullish or bearish entry/exit signal. The smoothed moving average helps us cut out the noise from the market, giving us a clearer view of the direction of the price action.

In either an uptrend or downtrend, the SMA can behave as a support or resistance, depending on the orientation. When the price is going up, the SMA will behave as a floor of support, and when the price is declining, vice versa as a resistance/ceiling.
Basis for Entry
When we plot two SMAs of different periods—one of a 40 period and one of a 100 period—we can then see how they cross over and create a basis for entry. As we mentioned before, when the SMA is below the price (less than the close price), we consider it a basis for support, and when the SMA is above the price (greater than the close price), we consider this a line of resistance.
So, in code, we do the following first to create a method for checking the cross-over of inputs for later determining our basis for entry:
//+------------------------------------------------------------------+
//| Check for cross over of inputs                                      |
//+------------------------------------------------------------------+
int CheckForCross(double input1, double input2)
{
  static int previous_direction = 0;
  static int current_dirction = 0;

  // Up Direction = 1
  if(input1 > input2){
    current_direction = 1;
  }

  // Down Direction = 2
  if(input1 < input2){
    current_direction = 2;
  }

  // Detect a direction change
  if(current_direction != previous_direction){
    previous_direction = current_dirction;
    return (previous_direction);
  } else {
    return (0);
  }
}
Now we can calculate our SMA using the iMA technical indicator method provided by MQL4 and run that through our CheckForCross function to see if there has been a cross like so:
shortSma = iMA(NULL, 0, PeriodOne, 0, MODE_SMMA, PRICE_CLOSE, 0);
longSma = iMA(NULL, 0, PeriodTwo, 0, MODE_SMMA, PRICE_CLOSE, 0);

// Check if there has been a cross on this tick from the two SMAs
int isCrossed = CheckForCross(shortSma, longSma);
Here we are using the MODE_SMMA to return us the Smoothed Moving Average from the iMA technical indicator method for our chosen smoothing method.
If you wish to use another smoothing method, there are several choices such as Simple, Exponential, and Linear-weighted.
As with all support and resistance, the standard trading methodology works here: buy support and sell resistance!
So, for our algorithm, we are going to do just that. When there is a cross in either direction, we are going to apply the appropriate direction of trade and enter the market.
f(isCrossed == 1){
        ticket = OrderSend(Symbol(),OP_BUY, LotsOptimized(),Ask,3,0,0,"Double SMA Crossover",MAGICNUM,0,Blue);
        if(ticket > 0){
          if(OrderSelect(ticket, SELECT_BY_TICKET, MODE_TRADES))
            Print("BUY Order Opened: ", OrderOpenPrice());
          }
          else
            Print("Error Opening BUY Order: ", GetLastError());
            return(0);
        }
    if(isCrossed == 2){
      ticket = OrderSend(Symbol(),OP_SELL, LotsOptimized(),Ask,3,0,0,"Double SMA Crossover",MAGICNUM,0,Blue);
      if(ticket > 0){
        if(OrderSelect(ticket, SELECT_BY_TICKET, MODE_TRADES))
          Print("SELL Order Opened: ", OrderOpenPrice());
        }
        else
          Print("Error Opening SELL Order: ", GetLastError());
          return(0);
      }
    }
Here we check for the return of the CheckForCross function we defined prior, after loading it with our two SMAs defined by the iMA technical indicator.
We use OrderSend, which is provided by MQL4, to open the trade. As a best practice, the result is stored in the ticket variable and later checked for a positive return value so as to handle any error that may have been reported from the broker's side.
Basis for Exit
Like the basis for entry (except in the inverse case), when the SMA creates a death cross, we can use this signal for closure of our trade, if any trades are open. The logic for this would be written as so:
// Get the current total orders
  total = OrdersTotal();

// Manage open orders for exit criteria
  for(cnt = 0; cnt < total; cnt++){
    OrderSelect(cnt, SELECT_BY_POS, MODE_TRADES);
    if(OrderType() <= OP_SELL && OrderSymbol() == Symbol()){
      // Look for long positions
      if(OrderType()==OP_BUY){
        // Check for Exit criteria on buy - change of direction
        if(isCrossed == 2){
          OrderClose(OrderTicket(), OrderLots(), Bid, 3, Violet); // Close the position
          return(0);
        }
      }
      else //Look for short positions - inverse of prior conditions
      {
        // Check for Exit criteria on sell - change of direction
        if(isCrossed == 1){
          OrderClose(OrderTicket(), OrderLots(), Ask, 3, Violet); // Close the position
          return(0);
        }
      }
    }
  }
Here we enter a for loop to iterate over all the open orders, although currently we will only trade one trade at a time—this allows us to expand in the future and have multiple open trades if we feel we need it.
This also makes usage of the OrderSelect method easier, as we can use the cnt variable from our for loop.
Once inside the iteration, we simply look at the current OrderType (checking for a Buy OP_BUY or Sell OP_SELL order) and then apply the conditional logic from the return of our CheckForCross method.
Adding Money Management
Right now our algorithm is simple with a basis for entry and exiting of trades, but still quite dangerously stupid when it comes to fund management. For us to keep the risk under some control, we will only place one-fifth of the tradable equity on each trade, so now we need to factor that into our algorithm.
lot = NormalizeDouble((AccountFreeMargin()/5)/1000.0,1);
if(lot<0.1) lot=0.1;
return(lot);
This means if you have $10,000 in the account, we only trade with one-fifth at a time ($2,000), so the script will only place a trade with a smaller size lot of 0.1 or 0.2, for example—based on this one-fifth calculation.
We use AccountFreeMargin and NormalizeDouble to generate this lot size, and if it's calculated at below the minimal lot size of 0.1, we will set it to 0.1.
As the account grows (or shrinks!), the exposure is only going to be set at one-fifth of the account equity. This means that over-exposure of a fixed amount (e.g. trading a specific fixed lot on any size account) theoretically cannot happen, ergo the risk of margin call from over-trading is removed or greatly reduced.
Margin call is a very real risk if the market moves against you drastically before returning due to a spike/fluctuation whilst you are not around to deposit more funds.
In layman's terms, the lot size of the trade will be calculated dynamically by our script to meet the equity size. So the potential for larger and larger profits is very real.
Note: A nice feature could be to provide a parameter to cap the tradable pool. For example, if you wished only to ever trade with $1,000 of your account, regardless of the available margin, you could set the available tradable to just $1,000 rather than your whole account size.
Personally I always use features like this when going live with new scripts in order to reduce my exposure to risk, until I am really sure the script is functioning solidly enough to be allowed more funds.
Programmatically, this requires a parameter and a slight change to the code example above to check for that variable rather than the AccountFreeMargin() value.
Break Even
Additionally, we will attempt to perform some break-even situations, meaning that if the market has changed against us to create a loss substantially from opening, we look to exit with minimal loss and at least break even so as to retain our capital.
This can be achieved by monitoring the loss of our trade and relation to the open price. If the direction changes and our trade is left out of the money, we can attempt to close out the trade as close to the entry price as possible:
  bool BreakEven(int MN){
    int Ticket;

    for(int i = OrdersTotal() - 1; i >= 0; i--) {
      OrderSelect(i, SELECT_BY_POS, MODE_TRADES);

      if(OrderSymbol() == Symbol() && OrderMagicNumber() == MN){
        Ticket = OrderModify(OrderTicket(), OrderOpenPrice(), OrderOpenPrice(), OrderTakeProfit(), 0, Green);
        if(Ticket < 0) Print("Error in Break Even : ", GetLastError());
          break;
        }
      }

    return(Ticket);
}
The above uses OrderModify to attempt to set the stop loss to the order open price. This is a crude but simple method to ensure that we step out when the price comes back to our entry price. This is only applied when the current unrealised profit is in a loss.
Adding a Break-Even Margin
A margin for break-even could be added by simply adding to the OrderOpenPrice method like so:
Ticket = OrderModify(OrderTicket(), OrderOpenPrice(), OrderOpenPrice()+10, OrderTakeProfit(), 0, Green);
For this example, we allow 10 points difference in our entry to closure via stop limit.
Note: Direction of trade should be checked for this method—as in whether it should be added to or subtracted from the entry price according to whether it is a buy or sell position.
Another way to ensure our gains are not lost is to use a trailing stop, which will be discussed in detail in another guide.
The Whole Script
Here is the full listing for our expert advisor. We have several parameters available at our disposal such as the take profit level, stop loss, and the SMA periods.
Please feel free to play with the parameters to see what is working best for your trading situation and fine tune your algorithm.
Remember: past performance is in no way indicative of the future.
//+------------------------------------------------------------------+
//|                                                   Double Sma.mq4 |
//|                                   Copyright 2017, Tom Whitbread. |
//|                                           https://www.gript.co.uk |
//+------------------------------------------------------------------+
#property copyright   "2017, Tom Whitbread."
#property link        "https://www.gript.co.uk"
#property description "Smoothed Moving Average sample expert advisor"

#define MAGICNUM  20131111

// Define our Parameters
input double Lots          = 0.1;
input int PeriodOne        = 40; // The period for the first SMA
input int PeriodTwo        = 100; // The period for the second SMA
input int TakeProfit       = 40; // The take profit level (0 disable)
input int StopLoss         = 0; // The default stop loss (0 disable)
//+------------------------------------------------------------------+
//| expert initialization functions                                  |
//+------------------------------------------------------------------+
int init()
{
  return(0);
}
int deinit()
{
  return(0);
}
//+------------------------------------------------------------------+
//| Check for cross over of SMA                                      |
//+------------------------------------------------------------------+
int CheckForCross(double input1, double input2)
{
  static int previous_direction = 0;
  static int current_direction  = 0;

  // Up Direction = 1
  if(input1 > input2){
    current_direction = 1;
  }

  // Down Direction = 2
  if(input1 < input2){
    current_direction = 2;
  }

  // Detect a direction change
  if(current_direction != previous_direction){
    previous_direction = current_direction;
    return (previous_direction);
  } else {
    return (0);
  }
}

//+------------------------------------------------------------------+
//| Calculate optimal lot size                                       |
//+------------------------------------------------------------------+
double LotsOptimized()
  {
   double lot = Lots;
   // Calculate Lot size as a fifth of available free equity.
   lot = NormalizeDouble((AccountFreeMargin()/5)/1000.0,1);
   if(lot<0.1) lot=0.1; //Ensure the minimal amount is 0.1 lots
   return(lot);
  }


//+------------------------------------------------------------------+
//+ Break Even                                                       |
//+------------------------------------------------------------------+
bool BreakEven(int MN){
  int Ticket;

  for(int i = OrdersTotal() - 1; i >= 0; i--) {
    OrderSelect(i, SELECT_BY_POS, MODE_TRADES);

    if(OrderSymbol() == Symbol() && OrderMagicNumber() == MN){
      Ticket = OrderModify(OrderTicket(), OrderOpenPrice(), OrderOpenPrice(), OrderTakeProfit(), 0, Green);
      if(Ticket < 0) Print("Error in Break Even : ", GetLastError());
        break;
      }
    }

  return(Ticket);
}

//+------------------------------------------------------------------+
//+ Run the algorithm                                               |
//+------------------------------------------------------------------+
int start()
{
  int cnt, ticket, total;
  double shortSma, longSma, ShortSL, ShortTP, LongSL, LongTP;

  // Parameter Sanity checking
  if(PeriodTwo < PeriodOne){
    Print("Please check settings, Period Two is lesser then the first period");
    return(0);
  }

  if(Bars < PeriodTwo){
    Print("Please check settings, less then the second period bars available for the long SMA");
    return(0);
  }

  // Calculate the SMAs from the iMA indicator in MODE_SMMA using the close price
  shortSma = iMA(NULL, 0, PeriodOne, 0, MODE_SMMA, PRICE_CLOSE, 0);
  longSma = iMA(NULL, 0, PeriodTwo, 0, MODE_SMMA, PRICE_CLOSE, 0);

  // Check if there has been a cross on this tick from the two SMAs
  int isCrossed = CheckForCross(shortSma, longSma);

  // Get the current total orders
  total = OrdersTotal();

  // Calculate Stop Loss and Take profit
  if(StopLoss > 0){
    ShortSL = Bid+(StopLoss*Point);
    LongSL = Ask-(StopLoss*Point);
  }
  if(TakeProfit > 0){
    ShortTP = Bid-(TakeProfit*Point);
    LongTP = Ask+(TakeProfit*Point);
  }

  // Only open one trade at a time..
  if(total < 1){
    // Buy - Long position
    if(isCrossed == 1){
        ticket = OrderSend(Symbol(), OP_BUY, LotsOptimized(),Ask,5, LongSL, LongTP, "Double SMA Crossover",MAGICNUM,0,Blue);
        if(ticket > 0){
          if(OrderSelect(ticket, SELECT_BY_TICKET, MODE_TRADES))
            Print("BUY Order Opened: ", OrderOpenPrice(), " SL:", LongSL, " TP: ", LongTP);
          }
          else
            Print("Error Opening BUY  Order: ", GetLastError());
            return(0);
        }
    // Sell - Short position
    if(isCrossed == 2){
      ticket = OrderSend(Symbol(), OP_SELL, LotsOptimized(),Bid,5, ShortSL, ShortTP, "Double SMA Crossover",MAGICNUM,0,Red);
      if(ticket > 0){
        if(OrderSelect(ticket, SELECT_BY_TICKET, MODE_TRADES))
          Print("SELL Order Opened: ", OrderOpenPrice(), " SL:", ShortSL, " TP: ", ShortTP);
        }
        else
          Print("Error Opening SELL Order: ", GetLastError());
          return(0);
      }
    }

  // Manage open orders for exit criteria
  for(cnt = 0; cnt < total; cnt++){
    OrderSelect(cnt, SELECT_BY_POS, MODE_TRADES);
    if(OrderType() <= OP_SELL && OrderSymbol() == Symbol()){
      // Look for long positions
      if(OrderType() == OP_BUY){
        // Check for Exit criteria on buy - change of direction
        if(isCrossed == 2){
          OrderClose(OrderTicket(), OrderLots(), Bid, 3, Violet); // Close the position
          return(0);
        }
      }
      else //Look for short positions - inverse of prior conditions
      {
        // Check for Exit criteria on sell - change of direction
        if(isCrossed == 1){
          OrderClose(OrderTicket(), OrderLots(), Ask, 3, Violet); // Close the position
          return(0);
        }
      }
      // If we are in a loss - Try to BreakEven
      Print("Current Unrealized Profit on Order: ", OrderProfit());
      if(OrderProfit() < 0){
        BreakEven(MAGICNUM);
      }
    }

  }

  return(0);
}
Testing It Out

We can test the previous days, months, or even years of market data for a financial instrument with ease in the MT4 (Meta Trader 4) environment. However, traders are encouraged not to trust back testing alone, but to use it as a guide to steer their trading strategy and see how effective an idea is.
Back testing enables traders to check if their thinking holds water, so to speak, before committing more effort and moving forward—writing more of their algorithm into code.
Where to Place the Expert Files?
If you have been using an external text editor to write your advisor, you will need to load your expert advisor into MT4 trading platform to compile it and error check. Simply add the .mq4 file to your MetaTrader installation in the Expert directory, e.g. /MetaTrader4/MQL4/Experts.
The Expert Advisor will then be available inside your MT4 software from the Navigator menu on the left-hand side under the experts section.
Note: Make sure you are testing on a demo account. A real account will trade with real money, and although the profits will be real, so will the losses.
Back Testing
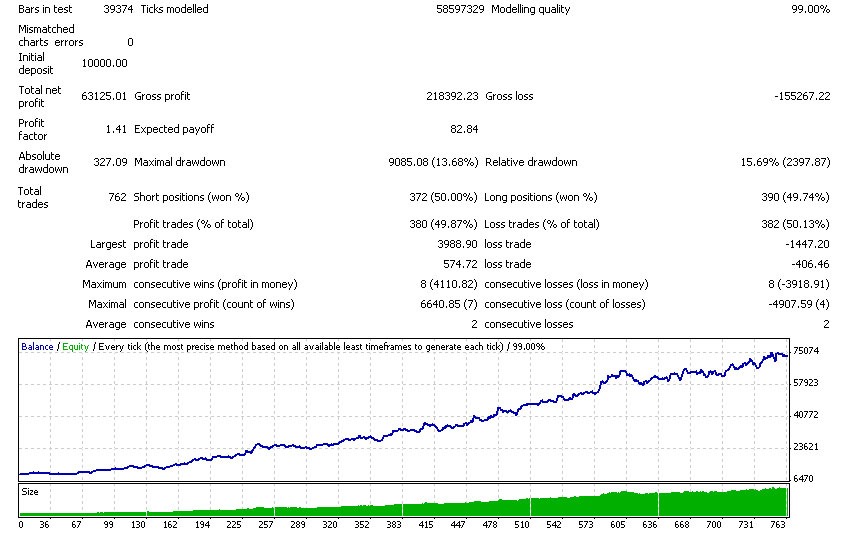
If you tested a strategy on the last year of cable (GBP/USD) and found the profit ratio to be above 1 (meaning you made money), then you could be onto a good thing.
Whether this will work out in the real world is a whole other question, and is why forward testing is equally important, as is Z score testing. That's a much more advanced topic for machine learning your algorithm, which will not be discussed here, but in later more advanced guides.
How to Start a Back Test
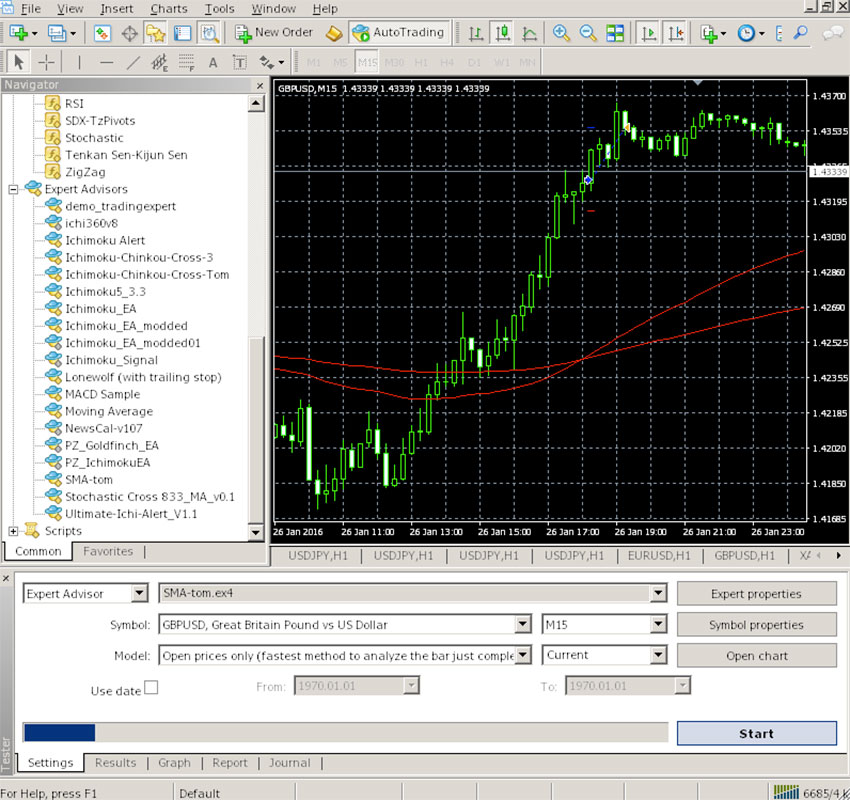
Use the shortcut Control-R to open the Strategy Tester or select it from the View menu. The tester pane will open in the bottom of your window.
From here, you can select the algorithm to run in the first dropdown menu, so choose the filename of the Expert advisor you have created here. Next, you can choose the symbol (financial instrument). I will be testing on the forex GBPUSD symbol of the British Pound to US Dollar pair.
We can also select the time period resolution to run on (15-minute period, 1-hour period, 1-day period, and so on). I will be using the 30-minute setting.
Finally, we have an option for modelling on Every Tick, Control Points, or Open Prices only. While writing your script, you can opt for the Open Prices only, as it will rapidly execute your test—although the results won't be worth banking real money on yet!
For this, when you are looking for a real test before going to forward testing, it is recommended to run on Every Tick. This will take a lot longer to process! (You can leave it running in an MT4 VPN online or of course overnight on your local machine if you wish.)
Modifying the Parameters
We set a couple parameters (PeriodOne and PeriodTwo) for our expert advisor so that the time periods of the two Moving Averages can be modified.
These can be accessed via the Strategy tester by clicking the Expert Properties button and viewing the input tab.
A numerical value can be given for each parameter here—the defaults are PeriodOne = 40 and PeriodTwo = 100.
Forward Testing
Once you have tested over historical data, you can start to test with the live market as you have already seen if your ideas weathered the storm from the back test—and (hopefully) have found some confidence in what you believe to be a winning strategy!
In the live market, you may find your strategy falls flat on its face due to elements you had not factored in your prior back tests. Remember the market is always right. Your code is never smarter than the market, and there is no such thing as being lucky in trading.
A forward test really is the acid test to see if the strategy will be profitable for you to put real money on it.
The forward test is usually best performed on a dedicated VPN for MT4 EA (Expert Advisors) which is often provided free by most FX brokers. The script will run 24/5 whilst the market is open, and you will be able to monitor the trades live by logging in to the account from a terminal as it will run on your mobile device via the MT4 app—or desktop machine via the MT4 software.
High Volatility
What can be a real killer to our scripts is high volatility in the market, which can occur from many outside factors.
For example, any crash or flash crash, war, election, interest rate hike, bond yields or significant economic report such as the CPI, GDP or changes to the tax system are going to cause big changes throughout the global economy and its many financial markets. So also, indirectly, your trade in one currency pair or security can be affected by another country's events, which you may not have anticipated at first.
Most recently, Brexit and later Hillary Clinton's FBI investigation during the run-up to the US elections were examples of high volatility in the market for anyone interested in taking a closer look.

Let's take the case of Brexit. The British public seemed to believe in the majority that a Brexit vote would be highly unlikely. I was not so optimistic and pulled all my pounds out, saving a lot of my equity in the UK due to the plummeting exchange rate.
As for others, I'm afraid to say they were not so lucky. Hedging on a stay vote—as some of the major banks' advisors had stated—would of course have resulted in the inverse, and a loss of approximately 15% to those vested in the pound, as they wait for it to recover.
Situations like this are ideal to turn off your trading robot and only trade outside of high market volatility. Coding for this kind of outcome is going to be very hard automatically going on leading or lagging indicators and is better traded after the event or manually. The chances for false or contradictory signals are always higher during big events, and a manual fundamental approach rather than a technical one may be more profitable.
There is nothing wrong with pausing your robot because you are expecting a crisis. It may save you a loss, whilst on the other hand it may make you miss out on a huge win. In my experience, the chances of the win are far slimmer, due to the sheer uncertainty and likelihood of margin call or hitting your stop loss before the trade can progress due to extreme momentary spikes.
Conclusions
We've laid down some of the basics of writing a trading algorithm and introduced many new ideas. From walking through the code, I hope you can now see the inner workings of an algorithm in MQL4, and see how a technical indicator like the moving average is used for generating an entry and exit signal.
In terms of money management, we have gone over the possibility of including break-even conditions and dynamic lot sizing to use one-fifth of the available equity. Feel free to tweak these parts of the code to your desires for risk. We have gone over the back-testing strategy tester of MT4 and opened the doors for the potential of forward testing and even Z-score testing in the future, all of which are vital before going live.
With more fine tuning and research, you can possibly have a very profitable experience in the markets one day soon. Now that you have a good foundational expert advisor as a base script, you can start writing your own strategies into the MQL4 language—and testing out if they really work as well as you feel they ought to, or as some trading books and mentors may allude to!
Going forward, you will definitely want to test your algorithm more before committing real money to it. Once you feel confident enough that you have a good performing script, you may also want to join a community to take your ideas further and help brainstorm, or take apart other algorithms to see their workings and how you could incorporate them into your strategy.
Sharing expert advisors with other traders is a great way to collaborate and see how other people are writing their algorithm for the plethora of technical indicators out there such as MACD, RSI, CCI, ADX, Bollinger Bands and Ichimoku... the list goes on and on.
Maybe in the future, if you are confident enough, you may wish to sell your script to others, in which case the MT4 marketplace or on your own site could be ideal places to get started!
For doing more testing, I really recommend you download all the previous market data and load it into MT4 so as to be able to do a more thorough back test. For more information on that, please refer to this guide, and have a great time trading!
Disclaimer: This article is not intended as investment or financial advice—it is intended purely as a technical tutorial for software creation and research. The code is provided for educational purposes only, as-is, with no warranty or guarantees.
Original Link:
TutsPlus - Code
 Tuts+ is a site aimed at web developers and designers offering tutorials and articles on technologies, skills and techniques to improve how you design and build websites.
More About this Source Visit TutsPlus - Code