
Some of Our Sources
- Just Creative
- Smashing Magazine
- Smashing Apps
- Abduzeedo
- Fudge Graphics
- Freelance Switch
- Design Modo
- Android Headlines
- Willems Lab
- TechPowerUp
Help Webnuz
Referal links:
How to Draw a Classic Steam Locomotive From Scratch

Since the 19th century, man has used the steam engine as a means of transport and travel. The design, size and pace of these machines continue to fascinate generation after generation! In this tutorial, come with me as we look into drawing one of these mighty machines from years past.
1. Set Up a Guide in Perspective
Step 1
Firstly, we are going to establish a rough guideline for our
train. We are looking to make this train quite imposing, and to do this we are
going to have a low horizon, so we shall start by drawing a simple line across
our page just below halfway up the page.

Step 2
We then need to set out some vanishing points that will
help us with our perspective, and for this particular image we are going to use
a two-point perspective setup. I find it best if these are placed quite a
distance from each other and, in this case, that means placing points off the
page. To do this, you may have to use two pieces of masking tape placed on either side of your canvas and add both of your points using a ruler.

Step 3
We can now draw the guide for our engine, and for this
particular example we are going to draw a large box using our horizon line and
vanishing points. Start by drawing a
straight line coming from the right vanishing point.

Step 4
Then we draw a second line coming from the same point, but
this time above the horizon line.

Step 5
Add two more lines coming from this vanishing point, and we
will now have the rear of our box.

Step 6
Now we are going to move to the left-hand vanishing point
and draw in two lines below the horizon line leading from this second point going across the page.

Step 7
Add another two lines above the horizon line, and you can now see that we have two
stretched rectangles either side of this line.

Step 8
To complete the box, draw in four vertical lines that will
join both rectangles together.

Step 9
Now that we have our first box in place, remember to keep the perspectivein mind. Most steam engines of this type are high sided and quite tall
so it might look rather unusual at this stage, but don’t worry.

2. Construct the Engine and Boiler
Step 1
Now that we have a guideline for our train, we are going to begin
constructing the engine and cab car in more detail. To begin with, we want to
draw a simple circle.

Step 2
Next, you want to extend this circle to become a long
cylinder towards the left vanishing point. This will be our boiler and
firebox.

Step 3
Then, at the very front of our cylinder, draw a second smaller
circle within the first one.

Step 4
Underneath the boiler lies the chassis and running gear for
the engine. To create it, we shall draw a long box that runs the same length as the boiler.

Step 5
At the very front of the engine, a wide rectangle will become
the front buffer beam. Again, keep in mind perspective when you draw this as it
is very easy to make a mistake here which might spoil the piece.

Step 6
Back underneath the boiler, draw in two small triangles that
will act as the first of a series of supports that run along the length of the
boiler and are attached to the chassis. You can create these with simple
triangles.

Step 7
At the rear of the boiler comes the cab section, and this is
made up of a tall box that runs level with the top of the boiler, but notice it
overlaps slightly. This will be fixed when we work on the details.

Step 8
Let’s not forget to draw the side window in the cab; aslightly skewed square will make this up.

Step 9
The fire box lies between the boiler and the cab section. There is not much to define it, but this particular area has a small sloping
section that joins the two parts together, and it runs across the boiler down
either side of the locomotive.

Step 10
Remember to add the funnel and dome on top of the boiler.
The perspective we are working with means much of these two will be hidden, but
what can be seen needs to be included!

Step 11
Now that we have all of our main details in place, we can start
bringing them all together. You may notice many more little details need to be added, but these will come!

3. Work on the Tender
Step 1
Behind the main driving engine comes the tender, which is
the small second trailer that runs behind locomotives of this type. Because
this engine is built for speed, the tender itself is the same height and width as
the engine and is designed to run hand in hand with the engine. A simple box
will start us off on the drawing.

Step 2
A smaller box drawn below our first will be for a series of
small wheels that support the tender.

Step 3
At the top of the tender, there is an opening to allow coal
to be loaded on board. Thanks to perspective, not much can be seen of this opening,
but it is still visible towards the rear.

Step 4
At the front of the tender on this locomotive, there is a
slight cutaway towards the top to allow the drivers and firemen to get both on
and off the loco easily and to observe things ahead and behind when in motion,
so remember to draw this in as we progress.

Step 5
The wheels on the tender do not have any connecting rods or
pistons and are only attached with axles and suspension parts. To make some of these, we can draw in a series
of downward pointing triangles, one next to the other.

Step 6
Then, below the triangles, draw several small boxes that
will become suspension springs. The wheels will follow later.

4. Draw the Wheels and Gears
Step 1
Before we begin with this next section, it is a good idea to
practice drawing circles and ellipses, as you will need to be comfortable with
these to carry out the following steps.

Step 2
Starting from the front of the train and working backwards,
we shall first draw three small ellipses that will be for the leading wheels. There
are of course two wheels on the opposite side too, but one of these is hidden by
the running gear in the centre of the engine.

Step 3
Behind these leading wheels are the main driving wheels, and
there are six of these on this type of engine, with of course three on either
side.

Step 4
At the very back of the engine, we now also draw the small
trailing wheel at the back. Of course, there is another on the opposite side.

Step 5
All of the wheels require a second circle inside the first;
this will be for an inner rim.

Step 6
Again, as the result of perspective, some of the spokes of
the wheels are obscured so it may look as if they are not there, but be assured
they are. Once again we shall start from the small leading wheels and work backward.

Step 7
The larger driving wheels will have even more of the spokes
obscured by the driving rods, but it is easier in the long run to draw the
spokes in now.

Step 8
Now that we have finished the spokes, we come to the driving and
connecting rods. These are rather complicated as they have to both pivot and
rise up and down at the same time. To start creating them, you can draw a small
series of long boxes at various angles.

Step 9
At the ends of some of the rods are the pivots, and you can draw
these using small ellipses and cylinders. Make sure to erase the parts that will be attached to
your rods.

Step 10
Don’t forget to draw in the many bolts that hold everything
together!

Step 11
To complete the running gear, we must not forget the trailing wheels on the engine and the tender. Drawing ellipses will help you here again.

Step 12
Once you have all the wheels in place, add all the connecting rods and suspension parts that are fitted to these. Remember, there is no drive going to them, so do not add any more driving rods, but the locomotive has to remain stable as it travels at speed!

5. Add the Details
Step 1
Now that we have all the main parts in place for our train, we are ready to add all the little parts that will help bring our creation
together! We shall go from the front of the engine and now draw in the buffers that
protect the engine from major knocks.

Step 2
Then, in between the two buffers come the connecting hook
and chain, which are all important when towing carriages or wagons.

Step 3
Also in the centre of the buffer bar come the brake hoses
and lamp lines. These need to be placed either side of the connecting hook, though.

Step 4
On the front access door of the engine, add in the locking mechanism
and name plate—that is, if your engine has a name! On this particular engine, there are also some name plates that go above the middle driving wheel.

Step 5
On either side of the front of the boiler are some
additional side plates that can be removed if needed, but on this occasion we
shall leave them attached.

Step 6
Continuing with the boiler, we need to add a series of lines that define the outer sections of this part of the engine. Take note that the size and space of each of these lines is different thanks to perspective, and remembering little points like this will make your drawing more believable!

Step 7
Running down the side of the boiler and tender are several
hand rails that need to be included.

Step 8
The tops of the main driving wheels have guards which need
to be added next.

Step 9
Funnily enough, there are two sets of steps that need to be
added at the front and at the cab end of the engine!
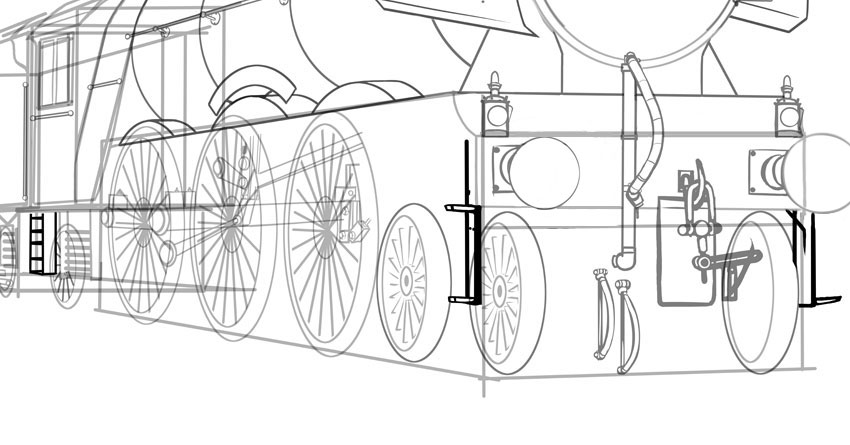
Step 10
Ahead of the driving rods comes the housing for the piston and cylinder that transfer all the steam pressure from the boiler to the wheels. This may seem like an ordinary box, but is actually "U" shaped in order to let the two large pistons inside work properly.

Step 11
At the front of the cab is a very small window that allows
the drivers to see what is ahead. There is one either side of the boiler, so do
not forget to draw these in.

Step 12
Any other remaining finishing touches that are currently
outstanding need to be added at this point. If you wish to do so, you can
include your own little special touches to make your locomotive unique!
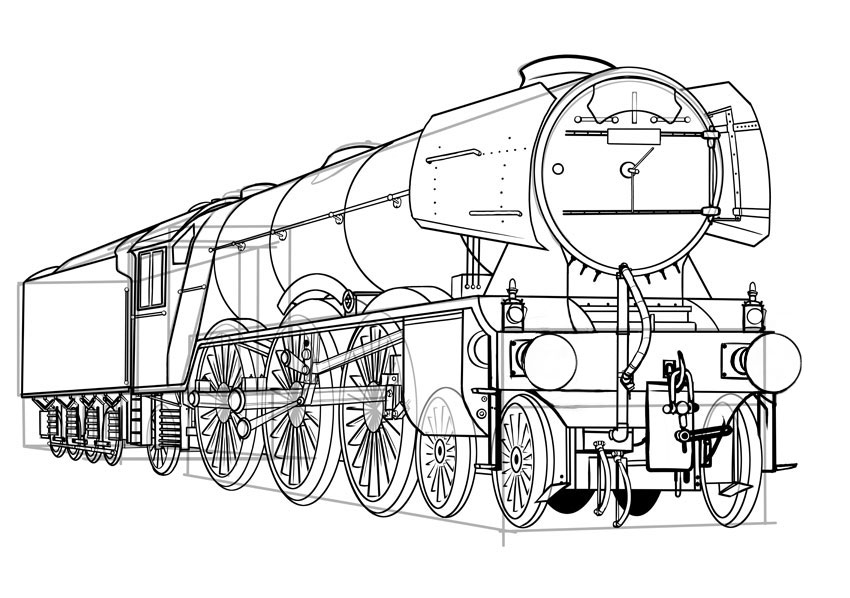
Step 13
All that is left for you to do now is to tidy up your
drawing and remove any remaining construction lines.

Awesome Work, You're Done!
If you are feeling adventurous, you can even add in a little splash of colour to your creation. The choice of colour scheme is up to you!
I hope you have enjoyed this arty trip into rail history. Using the principles and tips discussed in this tutorial, you too can help keep it alive!

Original Link:
TutsPlus - Design
More About this Source Visit TutsPlus - Design