
An Interest In:
Web News this Week
- April 25, 2024
- April 24, 2024
- April 23, 2024
- April 22, 2024
- April 21, 2024
- April 20, 2024
- April 19, 2024
Some of Our Sources
- Engadget
- Joshua Blankenship
- Six Revisions
- Creative Curio
- Fuel Your Creativity
- 24 Ways
- CSS Tricks
- Web Resource Source
- Android Headlines
- Hashedout
Help Webnuz
Referal links:
How to Creatre a Childrens Picture Book in Adobe InDesign

Children’s picture books are enjoying a huge resurgence in publishing at the moment. Sure, they’ve always been available, but now they’re more in-demand than ever, perhaps because they provide an old-fashioned antidote to our tech-dominated lives.
If you’re looking to design your own children’s book, this tutorial will show you how to create a high-quality template for the cover and inside pages, and share with you top tips for making your pages look stylish, legible and, above all, fun and engaging for little ones.


You’ll need access to Adobe InDesign and Adobe Illustrator for this tutorial, which is suitable for beginner-to-intermediate users of the software.
Ready to create a picture-perfect children’s book? Fantastic! Let’s get started...
1. Standard Sizes and Page Count
Whether you’re self-publishing or going through a publishing house, children’s books all need to meet certain technical criteria before you can get your book on shop shelves.
Although you’ll find that many online printing companies will print children’s books in a broad range of sizes, you should be aware that there are a few accepted ‘industry’ sizes. If you size your book to industry-friendly dimensions, you’ll be more likely to have your book bought by a distributor or bookshop.
The three most popular industry-standard sizes for children’s books are:
- Portrait-orientation—10 inches (254 mm) in Height by 8 inches (203.2 mm) in Width.
- Landscape-orientation—8 inches (203.2 mm) in Height by 10 inches (254 mm) in Width
- Square—8 inches (203.2 mm) by 8 inches (203.2 mm)
If you stick to one of these standard sizes, it will be much more efficient for the printer to produce large batches of copies, which means it will work out cheaper for you too.
The number of pages in a children’s book is also subject to general rules. Most books are 32 pages in length, but some shorter books are 24 pages (stick to multiples of four if you decide to go off-piste). Young children may not be able to concentrate for more than 24 or 32 pages, so it really is wise to go for the ‘less is more’ approach, in both page count and word count. When storyboarding, try to stick to a maximum of 500–1,000 words. If you’re aiming at a very young audience, stick closer to the 500 limit, increasing the word count upwards to 1,000 for slightly older audiences.
2. Create Your Cover Template
In this tutorial I’ll show you how to create templates for the cover and inside pages of a landscape-orientation (8 inches by 10 inches) children’s book.
You can choose to simply follow the template steps and create your own unique design, skipping the design steps when directed, or read the full tutorial to see how I add design elements like color, texture, graphics and type to the template.
First up, we’ll create the basic template for the cover...
Step 1
Open up Adobe InDesign. Go to File > New > Document.
Set the Intent of the document to PrintandNumber of Pages to 1, and deselect Facing Pages.
Under Page Size choose Custom. In the Custom Page Size window, name the new size Children’s Book Landscape; set the Width to 254 mm (10 in) and Height to 203.2 mm (8 in). Click Add, and then OK.

Step 2
Back in the New Document window, set the Margins on all sides to 20 mm and add a Bleed of 5 mm all the way around the page.

Click OK to create the new document.

This page will be the front cover for your children’s book. It’s always best to design your front cover on its own first, before you create the full wrap-around design. This will make it much easier for you to judge the impact of the front cover as it stands, and it also allows you to better judge how elements are aligned on your front cover.
We can create a second expanded page for the full cover, including the back and spine, after we’ve designed the front cover. If you’d prefer to just create the blank template for the cover, skip forwards to Step 12.
If you’d like to follow along with how I recreated the front cover design here, go straight on to the next step.
Step 3
Expand the Layers panel (Window > Layers), and double-click on the default Layer 1 name. Rename the layer Paper Texture and click OK.
Click on the Create New Layer button at the bottom of the panel to create a second new layer. Rename this as Background.
Create a further two new layers, Image, and then, at the top of the pile, Typography.

Lock all the layers except Paper Texture at the bottom.

Step 4
Download a simple paper texture image, like the one I've downloaded from Envato Market.
Take the Rectangle Frame Tool (F) and drag onto the page, extending the frame to the top, bottom and right edges of the bleed. Extend the left side of the frame just up to the page edge (trim).
File > Place, choose your paper texture image, and Open. Arrange the image in the frame so it fills it completely; then go to Object > Effects > Transparency. Reduce the Opacity to 35% and click OK.

Step 5
Return to the Layers panel and lock the Paper Texture layer. Unlock the Background layer.

Expand the Swatches panel (Window > Color > Swatches) and click on the New Swatch button at the bottom of the panel. Double-click to edit the swatch.
Name it Mustard, Color Type to Process, Mode to CMYK, and set the values to C=0 M=23 Y=78 K=0. Click OK.

Take the Rectangle Tool (M) and drag onto the page to create a shape the same size as the frame sitting on the layer below. Set the Color Fill to Mustard.
With the shape selected, go to Object > Effects > Transparency, and set the Mode to Multiply. Click OK.

Step 6
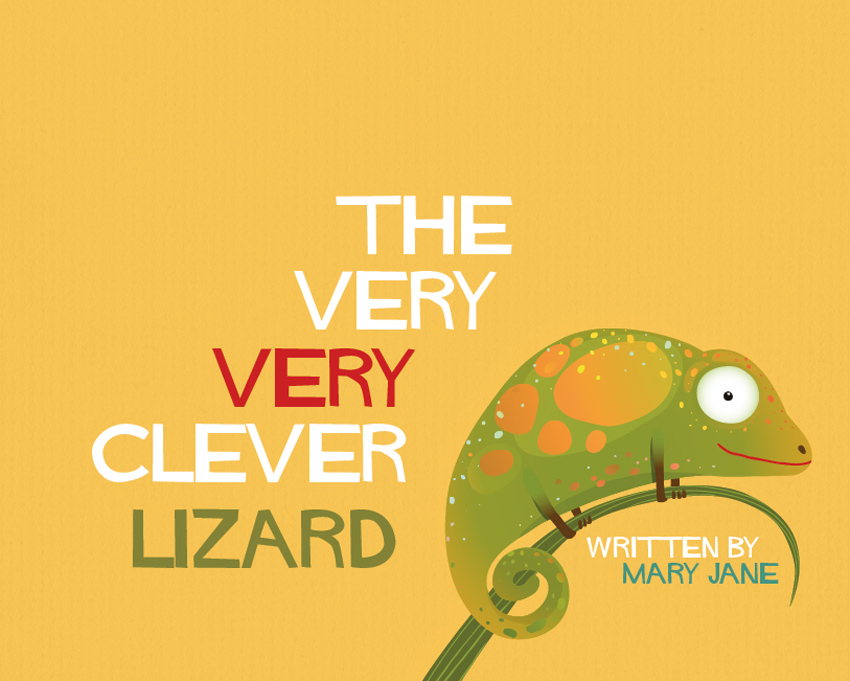
Download this cute illustration of a lizard. Open up the EPS file in Adobe Illustrator.

Remove the background of the image, and the lettering beneath the blade of grass.

File > Save As the image as a new EPS file with a transparent background.
Return to your InDesign document and lock the Background layer. Unlock the layer above, Image.

Create a new frame using the Rectangle Frame Tool (F) at the bottom-right of the page. File > Place, choose the new EPS file, and Open. Arrange the image nicely in the frame.

Step 7
Lock the Image layer and unlock the top layer, Typography.

I want to create a style for this book that’s similar to that of the famous 1960s graphic designer Saul Bass. Saul was no stranger to children’s book design, and he loved bright colors, strong graphics, and jaunty typefaces.
This Hitchcock font is a lovely tribute to Saul Bass’s well-known style, and it’s free to download.
Download and install the font, and then return to your InDesign document.
Take the Type Tool (T) and drag onto the page to create a small text frame. Type in ‘THE’, setting the Font to Hitchcock (from either the top Character Formatting Controls panel or the Character panel [Window > Type & Tables > Character]), Size to 50 pt and Font Color to [Paper].

Copy and Paste the text frame below the first, editing the text to read ‘VERY’.

Step 8
Create a new CMYK swatch, name it Red, and set the levels to C=11 M=98 Y=99 K=3.

Copy and Paste the ‘VERY’ text frame, set it below, and change the Font Color to Red.

Step 9
Create another new CMYK swatch, name it Green, and set the values to C=50 M=33 Y=92 K=19.

Paste another text frame below ‘VERY’, and type in ‘CLEVER’, setting the Font Color to [Paper].
Paste another text frame, type in ‘LIZARD’, and set the Font Color to Green.

Step 10
Create another new swatch, C=74 M=20 Y=56 K=4, and name it Jade.

Create a new text frame and position it in the bottom-right corner of the page. Type in ‘WRITTEN BY [AUTHOR NAME]’ and set the Font to Hitchcock, Size 18 pt. Set the top line to Align Left and the second line to Align Right.
Pull out the author’s name in the Jade swatch.

Step 11
Now that you’ve completed your front cover design, you’re ready to expand the cover into a full wrap-around design, complete with back cover and spine.
Go to the Pages panel (Window > Pages) and drag the Page 1 icon down onto the Create New Page button at the bottom of the panel. This will create a duplicate of the whole page.

Scroll down to Page 2 of your document. Before you expand the cover, you need to work out the width of the book’s spine. This will be dependent on both page count and the weight of the paper stock. You should try your best to pin these down before you design the whole of your cover.
Pay a visit to this spine width calculator—this can tell you the expected spine width given your expected page count and paper stock.
Let’s say here that I’m going to have 32 pages in my book, printed on 130 gsm coated paper. This results in a 2.8 mm spine, but we’ll also need to add an extra 3 mm to that to accommodate for a hardback cover. So that’s a total spine width of 5.8 mm.
To expand our cover, we’ll need to use this equation:
Page Width + Page Width + Spine Width = Total Cover Width
So that’s going to be...
254 mm + 254 mm + 5.8 mm = 513.8 mm
OK, great, let’s set that up on the InDesign document. Take the Page Tool (Shift-P) and click your mouse onto Page 2. In the top Controls panel, type513.8 mm into the Width text box.

If you need to move the elements on the front cover over to the right side, unlock all the layers and shift everything over until it meets the right edge of the bleed.

Step 12
To mark out where the spine and back cover should sit, pull out a guide from the left-hand ruler (View > Show Rulers) to 254 mm. Pull out a second guide to 256.9 mm, to mark out the central point of the spine.

Step 13
Now we’re ready to add artwork to the spine and back cover. If you’d like to recreate the design here, stick with me. If you want to simply create the template for the inside pages, skip ahead to Section 3 of the tutorial.
Return to the Layers panel and lock the top two layers. Unlock the Paper Texture and Background layers. Drag your mouse over the front cover artwork and Copy, Paste.
Move the pasted elements over to the left side of the page, until they hit the right edge of the bleed.

Paste again, and reduce the width of both elements to 5.8 mm; position over the spine on the center of the page.

Step 14
Add a new CMYK swatch, C=8 M=58 Y=30 K=0, and name it Pink.

Create a second new swatch, C=49 M=0 Y=70 K=0, and name it Lime.

Select just the top colored rectangle on the left side of the page and change the Fill Color to Lime. Select just the colored shape sitting over the top of the spine and change its Fill to Pink.

Step 15
Add your finishing touches—a barcode in the bottom-left corner using the Rectangle Frame Tool (F)...

... and rotated text along the spine of the cover, using the central guide as an aid for aligning it just right. Set the text in Hitchcock, Size 11 pt.

Step 16
Your cover artwork is finished—great work!

All that’s left for you to do is export the cover as a print-ready file, ready for sending off to your chosen printer. To do this, head up to File > Export.
Choose Adobe PDF (Print) from the Format drop-down menu, name the file ‘Cover Artwork’,and click Save.
In the window that opens, choose [Press Quality] from the Adobe PDF Preset menu at the top of the window.

Make sure that the Page Range is set to just 2, so that only Page 2 is exported.

Click on Marks and Bleeds on the left-hand menu, and check All Printer’s Marks and Use Document Bleed Settings.

Click Export.

3. Set Up the Inside Pages of Your Book
For the inside pages, you’ll have to set up the artwork in a separate InDesign file. This will allow you to export the inside pages separately and send your artwork for the cover and pages to the printer as two separate print-ready files.
We’ll start by creating the template for the pages in InDesign.
Step 1
Go to File > New > Document.
Increase the Number of Pages to 32 and keep Facing Pages selected.
Under Page Size choose your pre-saved custom size, Children’s Book Landscape.
Set the Margins to 20 mm and add a Bleed of 5 mm on all sides except the Inside edge (where the page will be sucked into the spine).
Click OK to create the document.

Step 2
This will be your 32-page template for the inside pages. Now all that’s left for you to do is start designing!

If you’d like to add page numbers to your book, double-click on the A-Master page icon at the top of the Pages panel to access the master for the document.
Take the Type Tool (T) and drag onto a corner of the left or right-hand page. Set your type cursor in the frame, and then go to Type > Insert Special Character > Markers > Current Page Number.

You can then format the page number as you like (here with the Hitchcock font); the ‘A’ will adapt to the correct page number back on the main document.

And it’s as simple as that! Now you can start designing your pages. Try to design your storyboard in spreads, not single pages, as children’s books work much better in pairs of pages. Read on to see how I formatted the first few pages, to pick up some inspiration for your own designs...
Step 3
Click onto Page 1 to be able to edit it. This is a good place to repeat the title of your book and the author name too.
I pulled out a guide to the center point of the page (127 mm) to help to align the text centrally. If you’re worried about the text appearing off-center if quite a bit of the page will be sucked into the spine when binding, place the text slightly off-center, to the right.
I set the text as on the cover, in Hitchcock, with similar colors* to those on the cover.

* Note:You can easily share color swatches across documents by saving your colors as an Adobe Swatch Exchange (ASE) file. Go to the Swatches panel in the cover document, highlight the swatches you’d like to share, and choose Save Swatches from the panel’s menu. You can then choose Load Swatches from the Swatches panel's menu in the destination document.
Step 4
Scroll down to Pages 2 and 3, the first spread of your book. This is where you want to introduce your story and main character(s).
Use the Rectangle Tool (M) to create a background wash of Mustard color.
On top of this, create a text frame in the left-hand corner of Page 3. Set the text in a highly legible, clear font. Rounded sans serifs like Charlevoix Pro Medium, which I’ve used here, are perfect for children’s books.

Step 5
Over on Page 3, File > Place a copy of the lizard EPS file, in roughly the same position as it sits on the front cover.
To add depth to transparent background graphics and allow them to stand out against block colors, you can add a drop shadow.
Select the lizard image, and go to Object > Effects > Drop Shadow. Adjust the color of the shadow to a more subtle orange shade, and reduce the Opacity to 25%. Set the Distance to 6 mm and Size to 2 mm.

Click OK.
Step 6
Add a new swatch, C=96 M=83 Y=0 K=76, and call it Midnight Blue.

Copy the background and text from Pages 2 and 3, scroll down to Pages 4 and 5, and Edit > Paste in Place.
Adjust the color of the background to Midnight Blue, and change the color of the text to create more contrast.

Step 7
Head back to your lizard illustration in Adobe Illustrator. Delete all the elements of the illustration except the eye, nose, and mouth. File > Save As this as a new EPS illustration.

Head back to your InDesign document and File > Place this onto Page 4 of your inside pages document.
Step 8
Now it’s up to you to fill the rest of your 32 pages! Creating a children’s book can be so much fun. Remember that it can be really helpful to storyboard your ideas before you really delve into designing your pages—having a clear story planned out to fit across 15 spreads will make the whole process much smoother and more enjoyable.
Once you’ve finished your inside pages, you’re ready to export these as a print-ready file, just as we did with the cover file.
To do that, go to File > Export. Choose Adobe PDF (Print) for Format, and click Save.
Choose Press Quality for the Preset and make sure the document is set to export as Pages, not Spreads.

Then make sure to include All Printer’s Marks and Use Document Bleed Settings.

Click Export.


Conclusion
I hope this tutorial has been a useful introduction to some of the key design issues you need to consider when designing books for children. Stick to a couple of industry-approved rules and you can’t go wrong! Make the most of this opportunity to be as creative and fun as possible, and you’ll end up with a book you’ll want to treasure forever.
We’ve covered a range of essential skills for tackling book design projects in this tutorial. You can now:
- set up industry-sized templates for the cover and inside pages of a children’s book in Adobe InDesign
- design a front cover that’s stylish and audience-appropriate, and expand this into a wrap-around hardcover design with an accurately-sized spine
- apply typography, graphics, and color to your templates to make a fun, on-trend design
Awesome work! I’d love to see some samples of your own children’s book designs—please do share them in the comments below.
Original Link:
TutsPlus - Design
More About this Source Visit TutsPlus - Design