
An Interest In:
Web News this Week
- April 28, 2024
- April 27, 2024
- April 26, 2024
- April 25, 2024
- April 24, 2024
- April 23, 2024
- April 22, 2024
Some of Our Sources
- Joshua Blankenship
- Smashing Magazine
- TutsPlus - Design
- Creative Curio
- Fuel Your Creativity
- FanExtra - PSD
- My Ink Blog
- 24 Ways
- Android Dissected
- The Verge
Help Webnuz
Referal links:
How to Create a Vintage Style Poster for World Blood Donor Day in Adobe InDesign

On 14June, supported by the World Health Organization (WHO), countries around the world celebrate World Blood Donor Day. This special day aims to raise awareness about the need for regular blood donations by the public to keep hospitals supplied and ultimately help save lives.
To encourage your friends, family and colleagues to consider donating blood, why not create this motivational poster to circulate at your office, school or college?
This tutorial is suitable for beginners to Adobe InDesign and Adobe Illustrator—you’ll end up with a high-quality, ready-to-print poster at A3 size, with a cool vintage-inspired style.
Looking for aready-to-edit posterthat will suit your next event? Discover a wide range offlyerandposter templatesover on Envato Market.
Ready? Great! Let’s get designing...
1. Create the Poster Template
Step 1
Open up Adobe InDesign. We’ll be using this software to create the poster layout, and use Illustrator a little later to add in a strong graphic.
Go to File > New > Document. Set the Number of Pages to 1 and deselect Facing Pages. Under Page Size choose A3 (297 mm by 420 mm).

Set the Margins on all sides to 10 mm and add a Bleed of 5 mm to all edges of the page.

Click OK to create the new document.

Step 2
Expand the Layers panel (Window > Layers) and double-click on the default Layer 1 name. In the Layer Options window that opens, rename the layer as Paper Background and click OK.

Step 3
From the Layers panel’s drop-down menu, choose New Layer... to create a second new layer.

Double-click on the layer’s default name to be able to rename the layer as Paper Border. Click OK.
Create a further four layers, named Typography Behind, Heart, Blood, and finally, at the top of the pile, Typography in Front.

Lock all the layers except the bottom layer, Paper Background.

2. Add a Vintage-Style Background
Step 1
Download a paper texture image—go for something with an aged, vintage feel like this one that I’m using here.
Take the Rectangle Frame Tool (F) and drag onto the page, up to the edges of the bleed on all sides. Go to File > Place and choose your paper texture image. Click Open.
Click on the Fill Frame Proportionally button on the top Controls panel to make sure the image completely fills the frame.

Step 2
Expand the Swatches panel (Window > Color > Swatches) and click on the New Swatch button at the bottom of the panel. Double-click the new swatch to open the Swatch Options window.
Name the swatch Off-White, and set the Color Type to Process and Color Mode to CMYK. Set the percentage levels to C=3 M=2 Y=4 K=0. Click OK.

Step 3
Take the Rectangle Tool (M) and drag onto the page to create a rectangle that extends across the whole page again, up to the edge of the bleed.
Set the Fill Color to [None] and Stroke Color to Off-White.
Open the Stroke panel (Window > Stroke), and increase the Weight of the rectangle’s stroke to 40 pt. Adjust Align Stroke to Align Stroke to Inside.

Select the rectangle shape and head up to Object > Effects > Transparency. Choose Screen from the Mode menu and reduce the Opacity to 30%.


Step 4
Select the rectangle and Edit > Copy, Edit > Paste in Place, to create a second copy of the rectangle layered over the top of the first.

Step 5
Return to the Layers panel and lock the Paper Background layer. Unlock the next layer up, Paper Border.

Create a new CMYK Process swatch, name it Cream and set the values to C=3 M=3 Y=11 K=0.

Step 6
Using the Rectangle Tool (M) create a new rectangle that extends just up to the margins of the page on all sides. Set the Fill Color to Cream.

Select the rectangle and go to Object > Effects > Transparency. Choose Multiply from the Mode menu, and click OK.


3. Create Your Heart Graphic
Step 1
Head up to File > Save As and save your InDesign file. Minimize the InDesign window for now; we’ll come back to it a little later.
Open up Adobe Illustrator and create a new document, about 7.5 inches wide and 10.5 inches in height.
Take the Arc Tool and drag onto the page to create a single curved line, creating the left half of a heart shape, as shown below. Make sure both the top and bottom anchor points are vertically aligned with each other. Pull out a guide from the left-hand ruler (View > Rulers > Show Rulers) if you need more guidance.

Step 2
Select the curve and Right-Click (Windows) or Control-Click (Mac OS) > Transform > Reflect.

Set the Axis to Vertical and click OK.

Move the flipped curve into position so it meets the original curve perfectly to create a whole heart shape.

Select both curved lines, and Right-Click (Windows) or Control-Click (Mac OS) > Join.


Step 3
Expand the Swatches panel (Window > Swatches) and create a New Swatch. Name it Heart Red, and set the Type to Process Color and Mode to CMYK. Move the sliders to C=18 M=100 Y=98 K=8, and click OK.

Create a second new CMYK swatch, and name it Heart Blue. Set the levels to C=74 M=24 Y=3 K=0, and click OK.

Step 4
Set the Stroke Color of your heart shape to [None] and the Fill Color to Heart Red.

Then select the heart and Edit > Copy, Edit > Paste in Place. Adjust both the Fill and Stroke Color to Heart Blue, and increase the Weight of the stroke to 20 pt.

Select the blue heart and Right-Click (Windows) or Control-Click (Mac OS) > Arrange > Send to Back, so that it now sits behind the red heart.


Step 5
Select the Ellipse Tool (L) and, holding Shift, drag onto the page to create a small circle. Position it at the top center of the heart shape, and adjust the Stroke Color to Heart Blue. Make the circle appear a little chunkier by upping the stroke’s Weight to 10 pt.

Step 6
Using the Arc Tool create a single curved line at the bottom of the heart, leading from its tip down to create a kind of ‘S’ shape.

Increase the Weight of the stroke to about 7 pt; then head up to Object > Path > Outline Stroke.

With the outlined stroke selected, set the Fill Color to Heart Red and Stroke Color to Heart Blue.
Select both the outlined stroke and the blue heart shape sitting behind it, and Right-Click (Windows) or Control-Click (Mac OS) > Arrange > Send to Back, to pull the red heart forward.


Step 7
We want to make it look as if the blue section of the drawing is a blood bag—to emphasise this we can make the red section look more like blood sitting within the bag.
Take the Arc Tool and create a single curved line slicing across the top of the red part of the heart, as shown below.

Then select the Scissors Tool (C) and cut the stroke of the red heart at the points where the curved line touches its edge on both the left and right sides.

Select and delete the top part of the red heart that’s been separated.

Select both the remainder of the red heart shape and your new curved line, and Right-Click (Windows) or Control-Click (Mac OS) > Join.
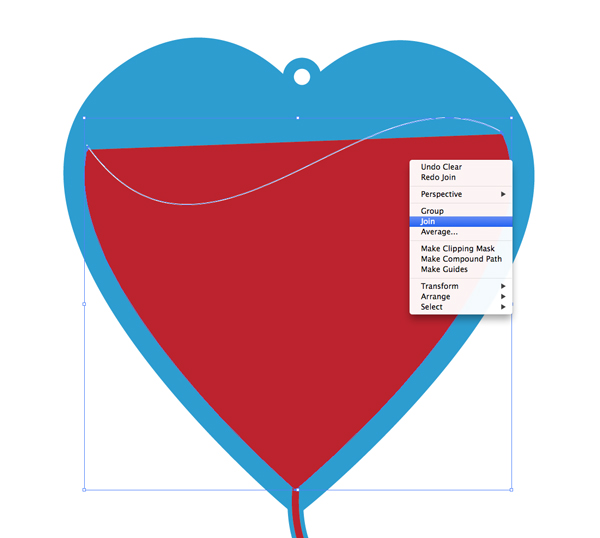
Adjust the Fill Color of the shape back to Heart Red if you need to.

And your heart graphic is finished! Great work!

File > Save As your illustration as an AI file, and minimize your Illustrator window. We’ll finish the rest of the poster in our InDesign document...
4. Add the Illustration to Your Poster Layout
Step 1
Return to your InDesign document and lock the Paper Border background. Unlock the Heart layer.
Take the Rectangle Frame Tool (F) and drag onto the page to create a frame about 250 mm in Width and 380 mm in Height. Position it centrally towards the bottom of the page.

Go to File > Place and choose your saved heart AI file. Click Open. Size the image in the frame so it fits quite snugly, with the curved line at the bottom of the blood sack visible.

Step 2
Select the image frame and go to Object > Effects > Transparency and set the Mode to Multiply.

Click OK.

Step 3
Return to the Layers panel and lock the Heart layer. Unlock the next layer up, Blood.
Minimize your InDesign window and head back to your Illustrator document briefly. Select just the red part of the heart shape at the front of the illustration and Edit > Copy.

Return to your InDesign document and Edit > Paste. Resize it so that it is similar in size to the red shape sitting below, but it doesn’t need to be perfect—this will add to the vintage-style effect.

Go to Object > Effects > Transparency and set the Mode to Multiply. Click OK.


5. Bring in High-Impact Typography
Step 1
Return to the Layers panel and lock the Blood layer. Unlock the Typography in Front layer at the top of the pile.

From the Swatches panel, create a new CMYK Process swatch, C=7 M=96 Y=99 K=1. Name it Bright Red and click OK.

Step 2
Download the Pier Sans Regular typeface. This font is great for vintage styles with a modern twist. Install the font and return to your InDesign document.
Take the Type Tool (T) and drag onto the center of the page, creating a long text frame. Type in ‘LOVE’ and set the Font to Pier Sans Regular, Align Center, Size 170 pt, Font Color Bright Red. Decrease the Tracking a little (to around -40) to make sure the letters can fit inside the heart.

Select the text frame, go to Object > Effects > Transparency and set the Mode to Screen. Click OK.


Step 3
Lock the Typography in Front layer and unlock the Typography Behind layer.

Create a new text frame at the top of the page using the Type Tool (T) and type in ‘SHOW’. Set the Font to Pier Sans Regular, Size 170 pt, Tracking 30, and adjust the Font Color to Bright Red.
Position it over to the left side of the page, close to the margin line, as shown below.

Step 4
Edit > Copy, Edit > Paste the text frame, moving the copy below the original frame on the right side of the page, crossing behind the top of the heart graphic.
From the Swatches panel, create a new CMYK Process swatch, C=74 M=24 Y=3 K=0. Name it Heart Blue and click OK.

Adjust the text in your pasted text frame to read ‘SHOW’ and change the Font Color to Heart Blue.

Copy and Paste the ‘SHOW’ text frame and position the copy below, to the left side of the page, resting the text against the edge of the page. Adjust the text to read ‘GIVE’.

Paste again, moving this text frame below ‘GIVE’, to the right side of the page. Adjust the text to read ‘BLOOD’ and change the Font Color to Bright Red.


Step 5
Create a new CMYK Process swatch, name it Off-White, and set the values to C=3 M=2 Y=4 K=0.

Scroll back up to the top of the page and select the ‘SHOW’ text frame. Copy, Paste and adjust the Font Color to Off-White. With the white text frame selected, Right-Click (Windows) or Control-Click (Mac OS) > Arrange > Send to Back. Shuffle the text frame so that it sits behind the red ‘SHOW’, just allowing a bit of the white ‘shadow’ to poke out at the back.

Repeat the same process for the ‘SOME’ and ‘GIVE’ text frames, creating an off-white shadow behind each.

Step 6
Create a new text frame, and type in ‘world blood donor day’, setting the Font to Pier Sans Regular, Size 68pt. Pull out the word ‘blood’ in Bright Red, and set the remainder of the text in Heart Blue.
Position towards the bottom of the page, allowing a little more space between ‘blood’ and ‘donor’ to allow the cord of the blood bag to be channelled in-between.

Set the date of the event, ‘06.14.16’ in a separate text frame below this, resting against the bottom margin. Set the text to Pier Sans Regular, Size 73 pt, and Font Color to Off-White.

6. Export Your Poster for Printing
Fantastic work—your poster artwork is finished, and it’s looking fabulous! All that’s left to do now is to export it, ready for sending off for professional printing*.
*Note: If you’re on a tight budget, you can also print your posters to an office or home computer straight from Adobe InDesign, by going to File > Print.
Step 1
First, Save your InDesign document for safe-keeping.
Then head up to File > Export. Choose Adobe PDF (Print) from the Format drop-down menu, and click Save.
In the Export to PDF window that opens, choose [Press Quality] from the Adobe PDF Preset drop-down menu at the top.

Step 2
Click on the Marks and Bleeds menu option at the left-hand side of the window.
Check All Printer’s Marks and also check Use Document Bleed Settings to preserve your prepared 5 mm bleed in the exported file.

Then hit Export to create your print-ready file.

Congratulations!
Your poster is complete, and it looks awesome. Now the only job left is to distribute it, and raise awareness about the important need for regular blood donation—your poster may well help save lives!

In this tutorial we’ve covered a wide range of skills which you can apply to other poster and flyer design projects, particularly if you want to recreate that vintage-meets-modern style that looks really fantastic across all sorts of media and subjects. You can now feel more confident with:
- Creating a poster template in Adobe InDesign and building up tactile, papery background textures
- Creating new layers and new CMYK swatches in Adobe programs
- Drawing simple, high-impact graphics from scratch in Adobe Illustrator that look great on poster designs
- Applying transparency effects to graphics and typography to create a multi-layered, complex-looking design
- Working with bold, poster-friendly typography and creating vintage text effects, like letterpress-style drop-shadows
- Exporting your poster designs as press-quality PDF files, ready for sending straight to the printers
Looking for a ready-to-edit poster that will really catch the eye? Browse a huge range of flyer and poster templates here on Envato Market.
Original Link:
TutsPlus - Design
More About this Source Visit TutsPlus - Design