
An Interest In:
Web News this Week
- April 30, 2024
- April 29, 2024
- April 28, 2024
- April 27, 2024
- April 26, 2024
- April 25, 2024
- April 24, 2024
Some of Our Sources
- Simplebits
- Web Designer Wall
- Smashing Magazine
- You The Designer
- Naldz Graphics
- Fudge Graphics
- Freelance Switch
- Web Resource Source
- Dev To
- TechPowerUp
Help Webnuz
Referal links:
How to Create a Set of Zodiac Icons in Adobe Photoshop
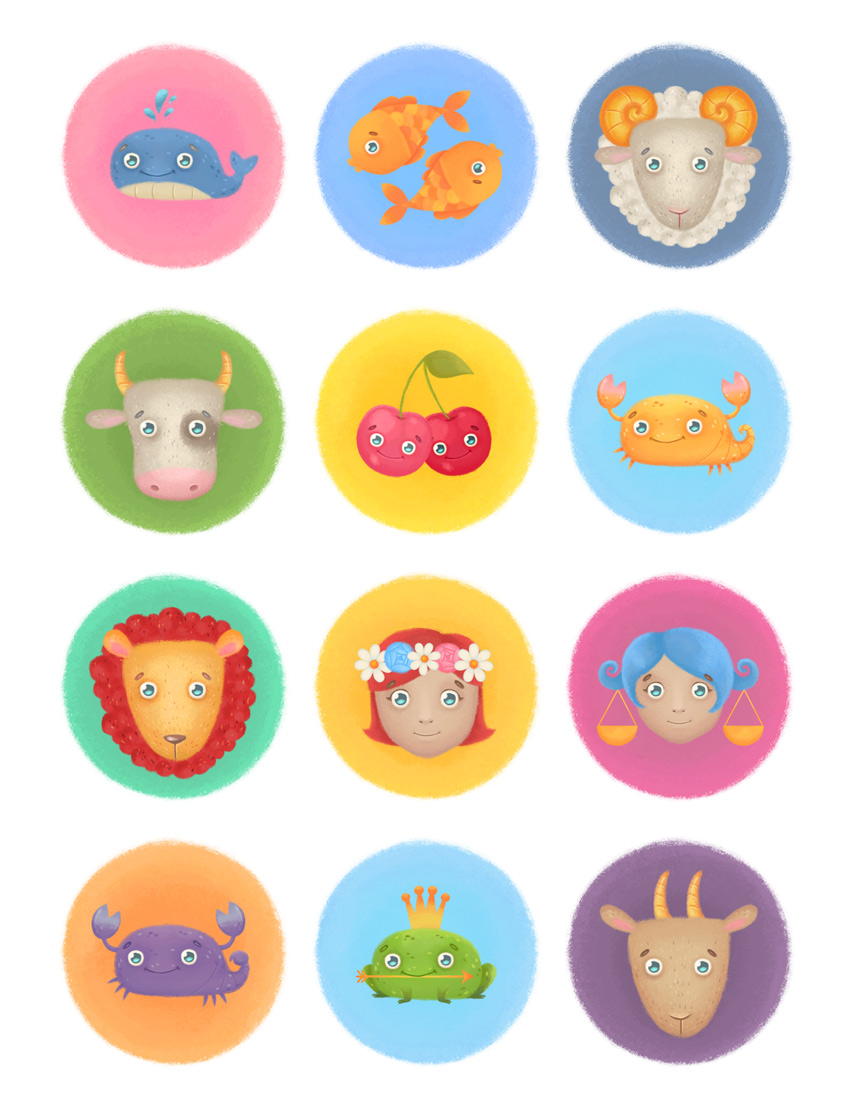
In this tutorial we’ll go through the inspiring process of creating a set of funny cartoon zodiac icons. We’ll be using basic shapes as well as simple freehand drawing. In order to make our images detailed and intricate, we’ll be using various textured brushes, picking some of them from the sets and adjusting their settings for our own needs.
We’ll make each new zodiac sign from the previous one by modifying the shapes, recoloring them, and changing the position of the elements. That way we’ll see how we can create the whole set quickly and easily in one and the same style.
As you will notice during the process of drawing, we won’t be creating the signsin their usual astrological order. However, by the end of this tutorial we’ll be
able to create each single element and then rearrange the signs as they should be.
You can use the described techniques not only to draw zodiac signs, but also to
create any other animal icons or textured illustrations. Envato Market can give
you a lot of inspiring ideas for your future artwork! Be sure to check it out, and then let’s start!
1. Select and Modify Your Brushes
Step 1
First of all, let’s make a New Document of A5 size, RGB Color Mode.

We’ll be using various grungy andgrainydry brushes to create a subtle noise effect on our images, making them look
original and detailed. In order to make your images unique, try using any of
these brush sets to your liking. They will help you to reach the desired textured effect:
Let’s see how we can unite the selected
brushes into our set for more convenience. Open the Brush Presets panel (Window
> Brush Presets) or select the Brush Tool (B) and click theright mouse
button to open the list of brushes. Click the tiny cog icon in the top right
corner to open the drop-down menu. From here we can Load Brushes or select custom sets from the list.
Select a set of brushes, for example Dry Media Brushes, and either replace
your current brushes set or click Append
to add them to your list. Now open the Preset
Manager and from here we can select any brushes that we don’t need and Delete them.
Repeat this action any time you append
another brush set, leaving only those brushes you’ll be working with.

Step 2
I’ve loaded the following built-in sets:
- Dry
Media Brushes - M
Brushes - Thick
Heavy Brushes
I used the Preset Managerto delete all the
brushes I don’t need except the following (you can find them in the screenshot below):
- Pastel
Rough Texture brush - Soft
Oil Pastel brush - Dry
Brush 1 #2 brush - Round
Bristle brush

I also modified the first brush from the list to give it a unique textured look. Let’s see how we can do it.
Step 3
Select the Pastel Rough Texture brush and open the Brushes panel (Window >
Brushes). From here, click the Texture
tab. You will see a texture sample on top of the menu.
Click the arrow to
open the drop-down list of textures, and let’s alter the appearance of our brush
by selecting the Extra Heavy Canvas swatch. Move the Scale slider to 30%,
making the texture thicker. You can either leave all other options as default
or play with the settings, giving our brush more of a grainy look.

Step 4
Tick the Noise checkbox, making the brush a bit more textured. Switch to the
Brush Tip Shape tab and move the Spacing slider to 15%. Now our brush looks textured and at the same time it has sharp, hard edges, making it perfect for drawing minor details, if we want to make them
crisp and clear.

Step 5
Try applying new settings to other brushes
from the sets to give them a new look and to expand your textured set of
brushes. Below you can see another example of a modified brush.

2. Draw a Capricorn Icon
Step 1
We’ll start by making the Capricorn zodiac
sign and then transform it into other signs, modifying the elements and changing the colors.
Take the Ellipse Tool (U) and make a 730 x 900
px brown shape for the head. Switch to the Direct Selection Tool (A) and select both side anchor points. Drag
the points up, making the top of the shape flat, reminding us of a goat’s head.
As you can see from the Layers panel, our
shape is marked with a sign indicating that we're working witha vector shape, editable
and scalable without any quality loss. We can move the anchor points and change the size and colorat this stage, but we can’t use a brush and draw above our
shape until we rasterize it.

Step 2
So, when you’re happy with the shape, go
ahead and click the layer with theright mouse button to open the fly-out menu and Rasterize the layer. Now we have a
pixel shape. Let’s select one of our grungy, drybrushes and make a few strokes
along the edges of the shape on the same layer, making the edges textured. Move
along the edge, covering the whole shape with texture.
You can adjust the Opacity and Flow of your
brush from the control panel on top. At this stage, I want my brush strokes to be thick, so I’m setting all the values to 100%. We can control the size of our brush with the[ and ] keys.

Step 3
If you want to change some parts of your
shape, feel free to use the Eraser Tool
(E) and then paint above the erased areas again, giving your shape the desired
look. Here, for example, I wanted to make the top of the shape flat as it
became too rounded in the process of drawing. So I just erased it and edited, usingthe brush.
And now we can start adding dimension to
the head by making darker and lighter areas. We can make this
process easier by selecting the head layer and clicking the tiny Lock transparent pixels icon on top of
the Layers panel. This way we will
draw only above (or inside) our shape, without crossing its edges.

Step 4
Pick a lighter brown color in the Color panel and start painting over the
center of the shape, making it pop out. Leave the edges of the shape dark, making itspherical.
Use the Ellipse Tool (U) to make an
115 x 155 px white circle for the eye.

Step 5
Right-click the eye layer to Rasterize it, and use a dry, grungy brush to work along the edges of
the eye. Lock transparent pixels of
the eye layer and make the edges a bit darker, making the eye spherical.
Pick a dark-blue color and draw a round spot
for the iris. Switch to vivid blue color and make a bright overtone in the
bottom part of the iris, enlivening the eye.

Step 6
Draw a white spot on top of the eye for the
highlight. Select the Head layer and add a dark-brown shadow underneath the eye, making it fit the face.
This subtle shadow adds quite a lot of realism to our image.

Step 7
Make a New
Layer by clicking the appropriate icon at the bottom of the Layers panel.
Use one of the hard, round, textured brushes
that we’ve created (or modified) to draw a small dark-brown eyebrow. Make its
edges more textured, using a grungy, dry brush.

Step 8
Select the eyebrow layer and Duplicate (Control-J) it. Go to Edit > Transform > Flip Horizontal
to mirror the shape and place it on the opposite side of the face. Duplicate
the eye as well, but don’t mirror it, so that the highlights of both eyes
remain on the same side.
Use a round, textured brush with hard edges
and paint a dark-brown arched line for the nose. Hold Shift and add a vertical line. Add a lighter spot on top of the
nose for the highlight.

Step 9
Create a New Layer and continue using the same round brush to add darker and
lighter strokes above the muzzle, depicting stylized hairs of fur. Don’t speckle
the strokes randomly; try imitating the real animal’s hair growth lines. If
you’re not sure whether you remember how it looks in real life, check outEnvato Market for proper references. For example, here’s a good goat photo reference.

Step 10
Make a New
Layer for the ear and use a hard, round, textured brush to draw the outline. Paint
inside the ear, filling it with the same color as the head (you can press Alt while painting to pick the desired
color from any spot of your screen).
Make the edges of the ear textured, and
when you’re happy with the entire shape, Lock
transparent and start filling the inner part of the ear, adding darker
areas for the shadows and lighter spots to make the ear three-dimensional. Add pink
strokes for the inner part of the ear, and speckle some hairs as well.

Step 11
Duplicate
(Control-J) the ear layer and Flip it Horizontal to add a second ear on the opposite side of the
head.
Draw a yellowish-orange horn in the same
way as we did with the ear. Remember to create a New Layer for each new element you create. This will help to edit
our objects more quickly and easily.

Step 12
Add a second horn and make both of them slick and
detailed by adding light yellow highlights with a hard, round, textured brush.
Let’s finish our first zodiac icon
by adding a circular icon base. Use the Ellipse
Tool (U) to make a 1700 x 1700 px
violet circle. Rasterize the violet
circle layer and work over the edges of the shape with one of our dry, grungy
brushes.
If you want to keep the icon circle editable, try using a Clipping Mask instead of using the
brush directly. Just select the layer and click theAdd layer mask button at the
bottom of the Layers panel. Use blackto erase the elements and whiteto make the erased details
visible again. Easy as that!
Click the circle layer again, Lock transparent pixels and continue
drawing inside with lighter violet to add more of a textured touch to our icon.
Remember to keep all your layers neat and
organized in order to make your workflow convenient. Give proper names to your
layers and unite them into a single group
(Control-G).
Great! We have the first zodiac sign ready!
Let’s see how we can edit it to make the next sign quickly and easily!

3. Create the Aries Sign From
the Capricorn Icon
Step 1
Let’s start making our next zodiac icon: Aries. Select the Capricorn group of layers and press Control-J to duplicate
it. Delete the horns layer and make the ears layer invisible in the Layers panel by clicking the eye pictogram.
Select the Head layer and click theCreate new
fill or adjustment layerpictogram at the bottom of the Layers panel. Select Hue/Saturation from the fly-out menu.
Now that we have a new adjustment layer created, we need to link it to the Head
layer in order to change only the head color, without influencing other
layers.
Select the adjustment layer and hold Alt.
You will notice your mouse cursor change into a small arrow. Now you can select
the layer you want to link to, so click the Head layer. Great!
Now we can double-click the Hue/Saturation
adjustment layer and move the sliders to change the color of the head. Let’s
set the Hue value to about -16, Saturation to -15 and Lightness to +13 in order to make the head light grey.

Step 2
The head looks quite flat after color
adjustments, so we need to add dimension. First of all, select both the Head layer
and the linkedHue/Saturationadjustment layer and
press Control-E to Merge Layers.
Lock
transparent pixels of the Head layer and use a
textured, grainy, dry brush of a darker grey color to add shadows along the edges
of the head and around the eyes.
Move to the layer with the fur hair
strokes, Lock transparent pixels
and paint over the hairs to change their color from brown to grey. Otherwise,
you can create a new linked Hue/Saturation adjustment layer for the Fur layer
and change the color of the hair stroke from there. Don’t forget to recolor the
brows as well, making them fit the new color palette.

Step 3
Now let’s depict thick, woolly fur around the
head. Create a New Layer and make a
schematic outline, using a hard round brush. Switch to the Lasso Tool (L) to trace along the edge
of the outline. Use the Paint Bucket
Tool (G) to fill the selection with light beige.
Work on the edges with a dry, grungy brush
to make the fur textured.

Step 4
Lock
transparent pixels of the Fur layer and continue
using the same brush with a darker beige color to add dimension by drawing
circular strokes. Make lighter spots on top of the curls and outline them with
dark-grey strokes, making the fur thick and woolly.

Step 5
Let’s draw a pair of new swirled horns for our Aries.
Make a New Layer and use a hard
round brush to make an orange curl for the outline. Switch to the Magnetic Lasso Tool (L) to make a
precise selection along the edge of the outline. Fill the selection with
light yellow and use a textured dry brush to paint with orange along the edge of
the swirl, adding dimension to the horn.

Step 6
Make the orange and yellow parts of the
horn blend with each other nicely and add minor details such as arched notches and
highlights, making the horn realistic and slick. Duplicate the horn by pressing Control-J
and Flip it Horizontal, placing the copy on the opposite side of the head.

Step 7
Finish up the Aries icon by adding
ears. You can draw a new pair of ears or use a copy of Capricorn’s ears (the one we've kept invisible),
recolor them and rotate, placing the ears under the horns.
Add a new Hue/Saturation adjustment layer
and link it to the circular icon base layer. Move the sliders, setting the Hue to -80, Saturation to +45 and Lightness to +15, thus
changing the color to a nice shade of blue.
And here we have it! Let’s move on and see
how we can transform the Aries icon into the Leo zodiac sign!

4. Shape the Leo Zodiac Sign From the Aries
Icon
Step 1
Duplicate the Aries group of layers, and
let’s start shaping the new zodiac sign. First of all, select the Ear layer and
press Control-T for Free Transform. Resize the ear and
place it on top of the head. Repeat the same for the second ear.
Now we can add linked Hue/Saturation
adjustment layers to the Ears and Head layers and play with the colors, turning
our ship into a lion!
Set the Hue value to -3, Saturation to +80 and Lightness to -4. Feel free to change the values to
your liking if your colors look different from mine. Try to make the head
yellowish-orange, reminding us of a lion’s pelt.

Step 2
Let’s change the shape of the nose to make
it look more like the nose of a lion. Make an outline, fill the inner part of
the nose with dark brown for the shadowed area, and add a lighter spot on
top. Make the nose more true to life and shiny by adding a bright highlight.

Step 3
Add a new linked Hue/Saturation layer to the fur around the head and let’s recolor
it, turning the sheep’s wool into a lion’s mane! Check the Colorize box and move the Hue
slider to its extreme left position, making the mane bright red. Set the Saturation value to 65 and the Lightness to -40. Change
the color of separate hairs above the mane as well, making them fit the new red
palette.
Finish up the icon by changing the
color of the circular icon base to bright turquoise.

Awesome! Our third zodiac sign is ready! Now we've got the main principles of modifying the elements, recoloring and adding minor details in order to create new signs. We also got used to the described drawing techniques, using mainly two types of brushes (the round hard brush and the textured dry brush) to draw crisp outlines and then create grungy textured edges. Remember to create New Layers and Lock transparent pixels in order to keep the process of drawing easy and convenient!
Let’s cut a long story short and see the main points of how we can further edit our elements, creating the remaining zodiac signs!
5. Render the Taurus, Virgo and Libra Icons
from the Created Zodiac Signs
Step 1
Let’s discover another useful trick that
will help us to modify shapes!
Duplicate the Aries group of layers once
again, and let’s create Taurus. Select the Head layer and go to Filter > Liquify. In the Liquify options window, set the Brush Size to about 718 and leave all other options as
default. Now we can sculpt the head to our liking. Try making the bottom of
the head into a muzzle, making it look more like a bull’s head. When you’re happy with the
result, click OK to apply the
adjustments.

Step 2
Let’s shape the nose! Remember to keep the transparent pixels of the Head layer locked, take the Brush Tool (B) and set its Blending
Mode to Color in the control
panel on top. Select pink color and paint over the bottom part of the head,
shaping a big nose.
Now switch the Blending Mode of the brush back to Normal
again, select a darker pink color and form a rounded nostril. Make the nostril three-dimensional, depicting its inner cavity and adding a lighter pink highlight
around it.

Step 3
Draw a dark-brown spot around the eye,
making the Taurus look individual.
Duplicate
(Control-J) the Horn layer from the Capricorn group
and attach the horn to the Taurus’s head. Use the Liquify filter again to make the horn a bit more arched.
Duplicate the horn and Flip it Horizontal to the opposite side of the
head. Finish with the Taurus icon by changing the color of the circle icon base to a nice
grass-green color.

Step 4
Now let’s duplicate the Capricorn group of
layers and use the Liquify technique
once again to turn the Capricorn into the Virgo zodiac sign!
Select the Head layer and apply Filter > Liquify. Shorten the head a
bit and make the bottom of the face wider. Shape a pointed chin, forming a
girl’s face.
Link a Hue/Saturation
adjustment layer to the Head layer and edit the color, adding a touch of pink
to the face. In my case, I set the Hue
value to -5, Saturation to -5 and Lightness to +15. Use the same values or pick your own to find the
desired skin-tone color.

Step 5
Now let's add some human facial features. Use the dark-brown color and a hard, round, textured brush to add arrow-shaped eyelashes on a New Layer beneath the Eyes layer. Use the same color to depict a
pair of tiny nostrils and a smiling mouth.
Switch back to the Head layer and pick a dry, textured brush to make
the nose three-dimensional by putting a gentle shadow over the nostrils area and a
bright highlight from the tip of the nose to the nose bridge. Add some highlights around the mouth as well.
Select a bright red color and shape a short
haircut.
Let's change the
circle icon's base color to bright yellow, using the adjustment layer.

You can add more details to our lovely Virgo to make her more intricate and attractive.

Great work! As you can see, such transformations not only make the workflow much faster, but also help to keep all the symbols in one and the same style, as we’re using the same elements and preserving a harmonic color palette.
Let’s continue and see some basic tips on how we can make our next icon!
Step 6
Now that we have a cute Virgo icon ready,
let’s use the girl’s image to form another zodiac sign: Libra.
Duplicatethe Virgo group of layers, and let’s make a New Layer for an additional element. Let’s depict the pan of the balance scales.
Make a 390 x 390 px circle and place a
rectangle over the top half of the circle. Select both shapes, click theright mouse button and Subtract Front Shape.
Rasterize the created half-circle and paint over it, creating shadows and
highlights on the golden surface.

Step 7
Use the Pen Tool (P) and hold Shift to draw a triangle shape on top of the
pan. Click theright mouse button and
select Stroke Path. Select Brush from the drop-down menu and click
OK to apply our textured brush
stroke to the triangle, forming a plain, crisp line for the handle.

Step 8
Now duplicate the Virgo group of layers and
let’s change her appearance.Flip the
hairdo Horizontal and use a linked adjustment Hue/Saturation layer to change the hair color. I’ve changed it to
blond at this step, but I’m not very happy with that, so I’ll continue playing
with colors. Start changing the shape of the hairdo as well. Use a hard, round, textured brush to add a pair of elegant hair locks by both sides of the
face.

Step 9
Change the hair color to bright blue and
draw two playful swirls by the sides of the head. Attach the balance scales to
the hair locks.
And here we have it! Our Gemini icon is
ready! Pick a nice tint of violet for the icon base, and let’s move on.

6.Depict the Aquarius, Cancer, Scorpio and Sagittarius
Zodiac Signs
Step 1
Let’s make a funny, stylized Aquarius sign,
depicting a whale. This time we won’t be using the heads from our previous signs, so arm
yourself with the Ellipse Tool (L)
and make a 713 x 471 px dark-blue
shape for the body.
Take the Direct Selection Tool (A), select both side anchor points and drag
them down, making the bottom of the body flat.
Rasterize the body layer and use our dry
textured brush to work on the edges of the shape. Draw a whale’s tail and fill the whole body with dark blue. Lock transparent pixels to add shadows and highlights, sculpting the
body and making it three-dimensional.
Paint a light-beige tummy for the whale and
duplicate the eyes from any of our previous icons in order to preserve the same
style.
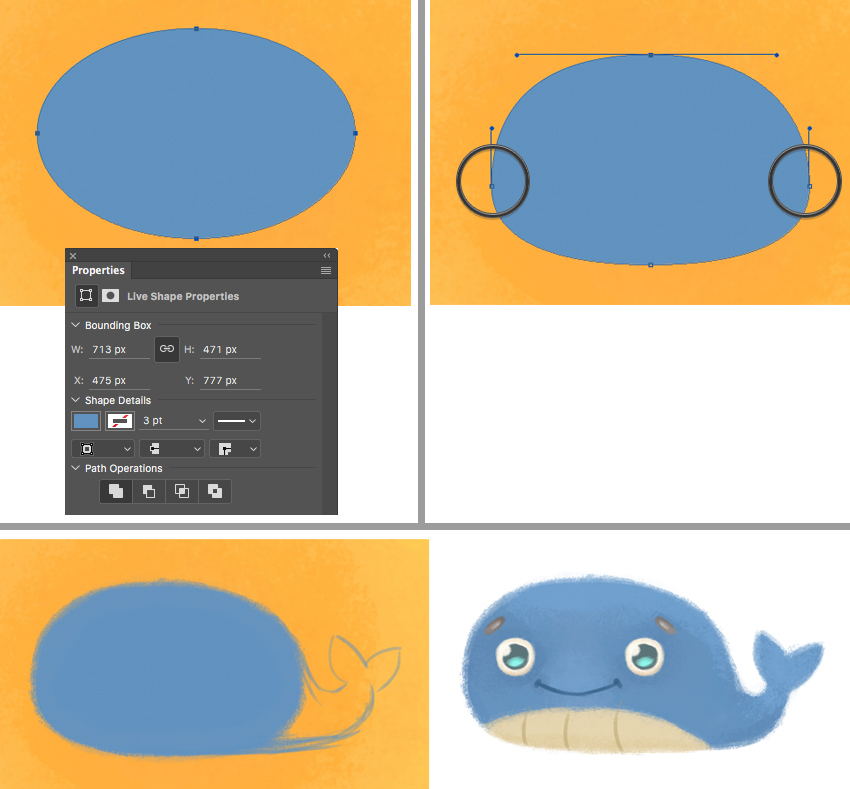
Step 2
Finish up the Aquarius icon by adding
spots to the body and depicting a few water drops on top.
Use an adjustment layer to make the circle
icon base pink.
Looking good! Let’s see how we can modify
our whale to get three more zodiac signs!

Step 3
Now let’s duplicate the Aquarius group of layers and turn our whale into a
funny Cancer!
Change the tip of the tail of our whale
into a thick swirl and cover the tummy to smooth out the color.
Create a new Hue/Saturation adjustment
layer, linked to the Body layer, and move the sliders, changing the body color
to yellowish-orange. Add dark-orange notches above the tail, dividing it into
segments.

Step 4
Draw a pincer on theNew Layer, Lock transparent
pixels and use our dry textured brush to make the pincer three-dimensional by
adding proper shadows, highlights and overtones.
Duplicate the pincer layer and Flip
it Horizontal to add a copy on the
opposite side of the body.

Step 5
Finish up the Cancer sign by adding
tiny legs to our cute character and changing the icon's base color to bright
blue.

Step 6
Let’s continue our transformations and turn
our Cancer into Scorpio!
Duplicate the Cancer group of layers. Select all the body parts of our
character (except the eyes) and group
(Control-G) them once again, creating a subgroup. Create a Hue/Saturation adjustment layer and
link it to the subgroup. This way we can change the color of the body and turn
our yellow cancer into a dark-violet scorpion.
Set the Hue value to -124,
Saturation to -65 and Lightness to -17 or pick other values to your liking, but try to preserve those
dark-violet and dark-blue tints, which are associated with scorpions.

Step 7
Let’s change the tip of the tail, depicting
a sting. Paint over the tail and use the dry textured brush to make the sting three-dimensional.

That’s all for our Scorpio icon! You can
try picking a different color for the icon base, but I’ve decided to leave this
nice blue tint for now.

Step 8
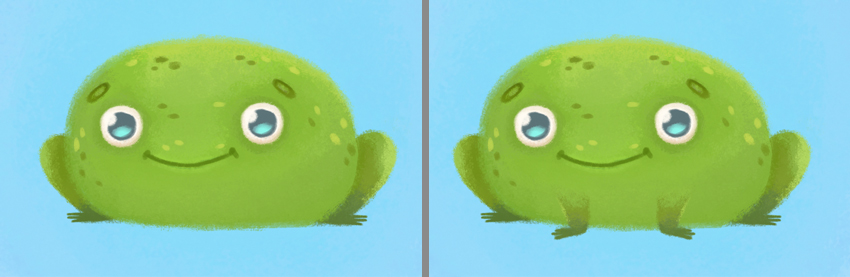
There is one more sign that we can make using the Cancer icon! Let’s duplicate
the Cancer group of layers and turn it into Sagittarius. You’ve probably heard
of a well-known Russian fairy-tale “The Frog Princess”, if you’re acquainted
with Russian folklore. Or maybe you’ve seen some pictures dedicated to this
fairy-tale, depicting a frog with an arrow in its mouth. I’ve decided to use
this image for our next Zodiac sign, because we’re depicting every
sign of our set as a stylized animal or human. So let’s stick to the overall
style of our set, keeping the signs connected.
Delete the unneeded elements from Cancer’s body, and use the Eraser Tool
(E) to erase its tail. Use a linked adjustment layer to change the orange body
color to green. It's already beginning to look like a frog!

Step 9
Create a New Layer for the back legs, placing it right beneath the Body
layer. Create a New Layer for the
front legs on top. Make the legs a bit darker to separate them from the body.
Step 10
Let’s add an arrow to our frog. Take the Custom Shape Tool (U) and find the drop-down list of custom shapes in the control panel on top. Find the arrow
shapes and pick one to your liking. I’ve selected the Arrow 16 shape.
Place the shape above the frog while
holding Shift in order not to distort
the shape. Use the Direct Selection Tool
(A) to select the anchor points of the arrowhead and drag it to the right,
thus extending the arrow without deforming it.
Rasterize the arrow layer, Lock transparent pixels and work on the colors, adding texture and
dimension.

Step 11
Let’s add a crown to our frog in order to
make the icon more detailed. I’m usingCrown
4 from the list of custom shapes. Use the Delete Anchor Point Tool to delete the bottom element of the crown
and the Direct Selection Tool (A) to extend and modify the shape of the crown.
Rasterize the crown layer and work on the colors, picking them from the
arrow.
Now our Sagittarius icon looks complete!
Let’s move on!

7. Draw the Pisces and Gemini Icons
We have only two zodiac icons left, and they
will differ from our previous icons a bit, as we’ll be using new shapes.
However, a similar feature of these icons is that each of them will have two
copies of one and the same object in order to form a balanced composition.
Step 1
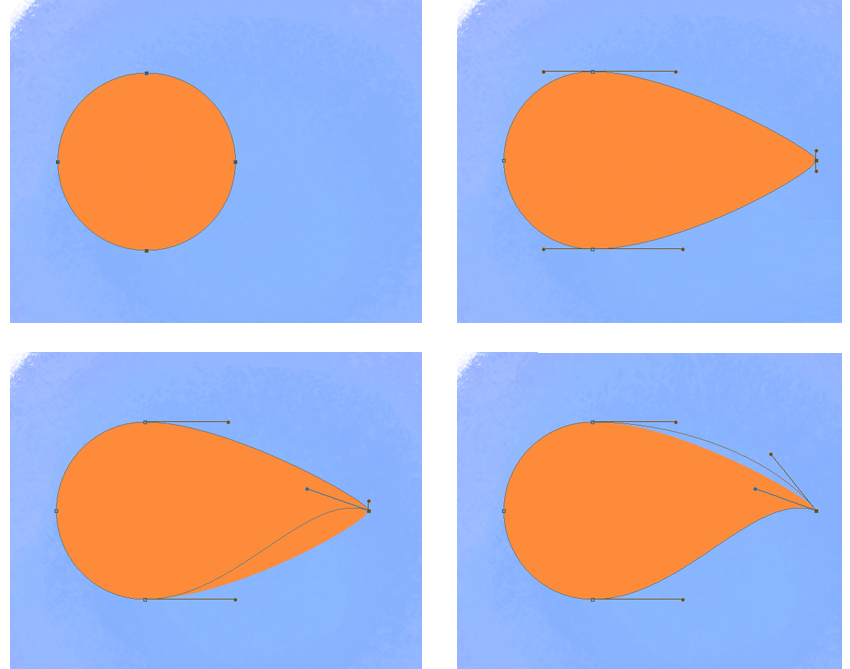
Let’s start with the Pisces icon. Make a New Layer and use the Ellipse Tool (U) to form a 500 x 500 px orange circle. Use the Direct Selection Tool (A) to drag the
right anchor point further right. Hold Alt
and reposition the anchor handles as shown in the screenshot below, forming a smooth curve for the tail of our fish. Rasterize the layer as soon as you’re happy with the result.
Step 2
Let’s use one of the eyes from our previous
icon to form the fish’s eye. Work on the edges of the body, making them
textured. Lock transparent pixels
and start painting over the body, adding dimension and depicting essential
details, such as the head and colorful scales.
Make a New
Layer for the tail and fins and add any other details to your liking, which
can help to make the character more intricate. Finally, Group (Control-G) all the elements of the fish.

Step 3
Finish up the Pisces icon by making a
copy of our character, and thenFlip the
fish Horizontal. Rotate both fish,
forming a balanced composition.

Step 4
Let’s draw the last icon of our cute zodiac
set: the Gemini icon. Gemini is usually depicted as a pair of twins. You can
draw human twins or animal twins, anything you wish. Let’s try being more
creative and draw a pair of funny cherries, connected with the same
stem!
Use the Ellipse Tool (U) to make a 510 x 510
px circle of pinkish-red color. Select the top anchor point with the Direct Selection Tool (A), hold Alt and change the position of the
anchor handles to make a dimple on top of the shape, looking like the top of a
heart.
Rasterize the cherry layer and paint along
the edges with a dry textured brush. Add shadows and highlights, making the
shape three-dimensional and glossy.
Use the eyes and the mouth from one of our
previous zodiac icons, enlivening our character.

Step 5
Group all the elements of our cherry and
duplicate the group. Use a linked adjustment layer to make a copy a bit darker
in order to add contrast and to separate the objects from each other.
Make a New
Layer and draw a thin green stem, connecting our cute cherry twins. Decorate
the top of the stem with a green leaf. I’ve created the leaf shape using the same
technique as for the body of the fish in the Pisces icon.

Step 6
Finish up the Gemini icon by adding
minor details to the leaf and using an adjustment layer to change the color of
the circular icon base to a sunny yellow color.

Wonderful! Our Zodiac Icon Set Is
Finished!
Great job! We did a huge job and
finished a big and detailed set of 12 zodiac icons! I hope you’ve enjoyed
following this tutorial and had a lot of fun while drawing those cute, smiling
characters. We’ve learned some new techniques for working with textured brushes
and their settings, and using locked layers and adjustment layers to paint and
recolor the elements. We’ve also played with the Liquify filter, which can transform any shape just in a few clicks.
You can use these simple tips and tricks to
draw a set of animals, people, food, or inanimate objects, making one element
from another using the described techniques. This can save you a lot of time and
help to preserve the overall style of your images.
Have fun and be inspired!

Original Link:
TutsPlus - Design
More About this Source Visit TutsPlus - Design