
An Interest In:
Web News this Week
- April 30, 2024
- April 29, 2024
- April 28, 2024
- April 27, 2024
- April 26, 2024
- April 25, 2024
- April 24, 2024
Some of Our Sources
- Techcrunch
- Technology Review
- Team Treehouse
- Abduzeedo
- Stylized Web
- Freelance Switch
- Design Modo
- Web Resource Source
- Dev To
- TechPowerUp
Help Webnuz
Referal links:
How to Create a Collage Illustration in Adobe Illustrator

So far I’ve been making tutorials strictly by using vector shapes. But in this tutorial, I will show you how to create a fun digital collage in Adobe Illustrator by using photo textures.
What You Will Need
In this tutorial, we will use photos I took of a few objects whose textures I found interesting:my winter sweater, my favorite plaid shirts, and some old wooden doors. You will find them in the zipped file provided with this tutorial.
Also we'll be using two stock references available to download at Pixabay:
For higher-quality stock references, I recommend using stock resourcesavailable for purchaseonPhotoDune and GraphicRiver.
1. Draw a Simple Character
You can either do a drawing in Adobe Photoshop or do it the
traditional way: on a paper sheet and then scan it. If you decide to go with a
traditional one, use a black marker. This way you will get nice lines which
later are going to be easier to trace.
Some tips for drawing a character: try to do it in at least three stages:
- Face
- Body
- Details
You can see how the character design goes easier once you
establish the facial features.Make sure all of your lines are closed. This will be very important in the
later steps.
2.Create a New Print Document
Go toFile > New(Control-N). In the dialog box, set the profile to Web and set the Width to800 pxand the Height to900 px.

3. Import the Drawing
Go to File > Place and select the drawing file. Position it in the middle of
the artboard. Try to place the drawing a bit lower at the bottom part of the
artboard, so your character won’t look as if it’s cut in half but rather as if it’s appearing from the bottom of the artboard.

4.Trace the Drawing
Step 1
Once you've positioned the drawing, trace it simply by selecting
it and going to Object > Image Trace > Make and Expand. The drawing will get
vectorized, and it will break in pieces too.
To make things easier to work with, we will need to ungroup
the drawing. Click on the now vectorized object and go to Object > Ungroup.

Step 2
Select the white space around the character and delete it.

5.Import Photo Content
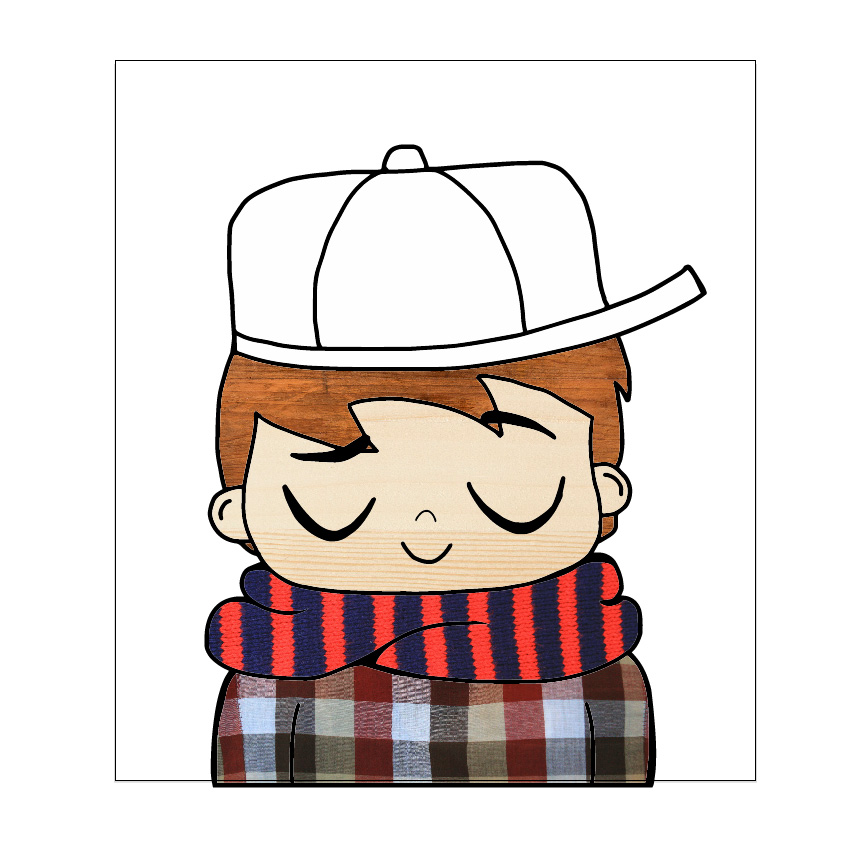
We can start importing the textures. Each part of the
character will be assigned a corresponding texture. I decided to go with
wood textures for the face and hair, plaid fabric texture for the hat and the
shirt, a knitted wool texture for the scarf, and rusty metal for the background.

I encourage you to take photos of patterns around you: your favorite sweater, the bricked wall around the corner, the neighbor’s wooden door, the tiles at the train station… Patterns are all around us; we just need to notice them better.
Step 1
We will start with the face.Now that we've ungrouped the image, we'll need to merge a few
parts which belong to the same group, such as the face and the ears. Select
those three parts and go to Object > Compound Path > Make. This will merge
these three shapes, and they will act as one. Click on it again and copy it
(Control-C).

Step 2
Download theface texture.
Go to File > Place and open the downloaded texture. Once you've imported it, click on it and Paste in Front (Control-F) the
already copied face elements.

Step 3
Select both the texture image and the face shape and do a
right-click anywhere on the working area. Select the Make Clipping Mask option.

Once you've done this, the Clipping Mask will be created and the
wood texture will be visible only on the face area.

Step 4
Let’s do the same with the other parts.
Using the Direct Selection Tool (A), select the white surface of the scarf and
copy it (Control-C).

Step 5
Import the scarf texture. Go to File > Place and import the
photo texture labeled as Scarf.
Paste in Place (Control-F) the copied scarf shape over the
texture. Select them both and right-click on them. From the menu, select Make
Clipping Mask. You can also do this by following the menu Object > Clipping
Mask > Make.

The illustration should look like this so far.

Step 6
Let's move on to the shirt. Using the Direct Selection Tool (A),
select the white surface of the shirt and copy it (Control-C).

Step 7
Import the texture. Go to File > Place and import the photo
texture labeled as Shirt. Position it over the body part, scaling it down if necessary.Paste in Front (Control-F) the copied shirt shape over the
texture. Select them both and right click on them. From the menu, select Make
Clipping Mask.

We can see how the patterns slowly start filling our
illustration, and it looks good!

Step 8
We have two more objects to fill with patterns: the hair
and the cap.
Using the Direct Selection Tool (A), carefully select the
parts of the hair, including the parts near the eyebrows and behind the ears.

Step 9
Open the Pathfinder panel and click the Unite
command.Then go to Object > Compound Path > Make, or simply use the shortcut version
Control-8.

Step 10
Once we've made sure all of the hair parts are united, we can
import the designated texture for this area. Just as in the steps before, we go to File > Place and import the photo
texture labeled as Hair. Position it over the hair part, scaling it down to fit
the area.
Paste in Front (Control-F) the copied selection in front of the photo texture.

Step 11
Select both, the photo texture and the vector hair shape and
right click on them. From the menu, select Make Clipping Mask.
Step 12
Once we are done with the hair, we move to the last part,
the cap. We will divide it into two groups: the panels as the first, main group, and
the peak together with the button as a second group.

First, we will start with the side panels. Using the Direct
Selection Tool (A), select the two side panels and merge them, using the Unite
command from the Pathfinderpanel. Also, go to Object > Compound
Path > Make. Copy them (Control-C).

Step 13
Import the texture labeledCap 1 and place it over the cap part. Paste in Front (Control-F) the side
panels. Select them both and right click over them. From the menu, choose Make
Clipping Mask.

Step 14
For the central cap panel, we
will again import the same texture, only this time we will rotate it 180
degrees so we can get a different position of the plaid.
So once again, copy the central panel (Control-C) and import the texture. Go to
File > Place and select the texture labeledCap 1. Right-click on it and go to Transform > Rotate.

Step 15
A dialog box will appear.
Just enter 180 as an Angle value and click OK.

Step 16
Paste in front (Control-F)
the central panel and right-click on it. From the menu, choose Make Clipping
Mask.

Step 17
Using the Direct Selection Tool (A), click on the middle
panel and adjust the texture in a way which will be different than the rest of
the panels. This way we have the same texture only differently juxtaposed so we
can visually distinguish the three panel parts.

Step 18
Finally, we will add texture to the last empty part of our illustration: the button and the peak of the cap. Use the Direct Selection Tool (A) to select them both. Open the Pathfinder panel and use the Unite command. Then, go
to Object > Compound Path > Make (Control-8). Copy the merged objects
(Control-C).

Step 19
Import (File > Place) the texture labeledCap 2.
Position it so that it covers the entire cap part. Scale down the size
if necessary. Select both the texture and the pasted vector shape and right-click on them. From the menu, choose Make Clipping Mask.

The illustration so far should look like this. We assigned a
texture to every part of the illustration. Let’s add a background to it.

Step 20
Download thebackground texture. Import (File > Place) the downloaded texture.Right-click on it and go to Transform > Rotate.

Step 21
A dialog box will appear. Enter 90 as an Angle value and
click OK.

Step 22
Select the background texture file and right-click on it. Go
to Arrange > Send to Back.

We have a space background! We are almost done—let’s add
some final touches.

Step 23
Using the Direct Selection Tool (A), select one of the
character’s eyes.

Step 24
Go to Select > Same > Fill Color. All of the
illustration’s black color, including the outline, will be selected.

Step 25
Now just press Delete. Every vector outline and line should
disappear, leaving the dark background to fill those gaps. This will only work
with dark backgrounds because lighter ones may cause confusion.

Step 26
Let’s put all of this into a nice frame which will fit
our 800 x 900 pixel artboard.
Select the Rectangle Tool and click once anywhere on the working area. A dialog
box will appear. Enter 800 px as a Width value and 900 px as a Height
value. Click OK.

Step 27
A white rectangle will appear.Open the Align panel (Window > Align). From the Align To
option, select Align to Artboard. Then use the Horizontal Align Center and
Vertical Align Center commands in order to align the rectangle perfectly to our
artboard.

Step 28
For the final step,Select everything you have on your working
area and Right-click on it. Select Make Clipping Mask.

Awesome Work! You're Done!
I hope you had fun while making
this digital collage. Using textures is a good idea not only in illustration, but alsoin other fields, such as graphic or web design. You can even print it and find a nice place for it in your room.
Now, try making it with your own drawing and photo textures and show us the results in the comments below.

Original Link:
TutsPlus - Design
More About this Source Visit TutsPlus - Design