
An Interest In:
Web News this Week
- April 30, 2024
- April 29, 2024
- April 28, 2024
- April 27, 2024
- April 26, 2024
- April 25, 2024
- April 24, 2024
Some of Our Sources
- Just Creative
- Fuel Your Creativity
- Inspiredology
- Naldz Graphics
- Fudge Graphics
- Reencoded
- CSS Globe
- Wal You
- Willems Lab
- Dev To
Help Webnuz
Referal links:
How to Draw Creatively Using Photo References

Drawing from imagination sounds cool, but we rarely know enough about the subject to draw it perfectly. You could try and guess, just to impress others with your guessing skills, but is it really worth it? Using a reference to support your memory isn't cheating. It's just getting know what you're trying to draw!
There are three main ways of using a reference:
- Visual tracing: you look at a reference and try to copy every line and every shade.
- Inspiration: you look at a reference to induce some kind of visual idea.
- Support: you look at a reference, but you copy only a chosen part of it.
That first way, indeed, looks like cheating, because it's not really your creation. You can only impress people with your manual skills this way. The other two ways, however, are a recipe for success!
Let's say you want to draw a wolfish bull with ruby horns. You can't find a direct reference for this creature, but you can easily find photos of wolves, bulls, and rubies. If you don't copy them, but rather use a part of each to incorporate into your artwork, you'll get something completely new without guessing. And the end result will look as if you knew what you were doing!
In this tutorial I'll show you how you can use photo references to achieve the right perspective, pose, proportions, silhouette, anatomy, and details of your imagined creature. You don't need to follow my actions strictly—rather, you should understand why I do them. Each case is different—sometimes you'll only need one reference, and sometimes you'll work with them from start to finish. I'll show you the most complete way, so that you know all the options.
Tutorial Assets (Optional)
These are all the materials I will be using in this tutorial. Feel free to find your own, depending on what creature you want to create.
- Elk photo (pose reference)
- Horse photo (proportions reference)
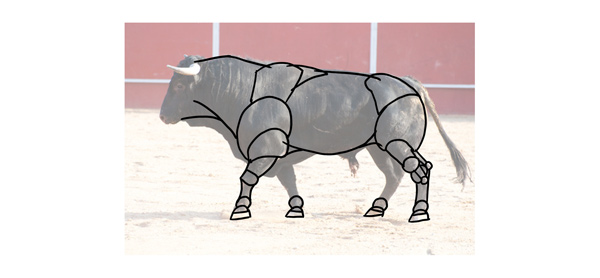
- Bull photo (silhouette reference)
- Lion photo (head reference)
- How to draw deer tutorial (anatomy reference)
- How to draw cows tutorial (anatomy reference)
- Horse photo (lighting reference)
1. Find the Right Pose
Step 1
When the idea in your mind is so huge, it's hard to limit it to that first line, especially when the first lines become a base for everything later! That's why it's good to start with nothing spectacular but a pose of the creature.
But posing isn't easy, either. You need to know perspective, anatomy, and proportions even for a seemingly simple sketch. However, if you find a good reference, all these are taken care of.
My goal is to draw a deer, but not an ordinary deer. I want it to look royal and powerful, like a beast that doesn't flee when approached, but rather proudly stands its ground. The elk in this photo looks nothing like this, but I really like its pose. Let's use it!
If you draw digitally, feel free to place the reference somewhere in the canvas, with a lower Opacity. If you draw traditionally, you may find it useful to print your reference, even if it's small and in black and white.

Step 2
Let's copy the pose and the pose only, because that's all that interests us. First, imagine (or draw) points on the reference that define an outline of the body.

Draw them exactly the same way in your preferred scale.

Step 3
Use the dots to copy a few lines that will make the body outline clear. Again, you don't need to draw directly on the reference—these should be the lines you can see without making them 100% obvious.


Step 4
Use a set of points to measure and copy the length of the limbs.


Step 5
Connect the dots to create a simplified version of limbs.


Step 6
Add the head and neck using other lines as points of reference.


Step 7
Establish the perspective of the head with as few lines as possible.


Step 8
Take a closer look at the joints in the legs and the hooves, leaving nothing to guesswork.


Step 9
Your sketch should now have enough lines to recreate perspective lines from them. They will be useful as a reference for further modifications.


2. Adjust the Proportions
Step 1
We have the pose now, but the proportions are not necessarily what I wanted. This may happen if you take a pose from a completely different animal than you want in the end. But that's the power of using multiple references—they're flexible!
Elks have a stocky body with thin legs, which gives it all an unbalanced look. I want my deer to have the elegance of a horse, so I looked for a reference presenting the side view clearly.

Step 2
Imagine or draw the basic pose lines. You can add some new ones, if they're important for defining the silhouette.

Step 3
Adjust the pose to the new proportions. If you draw traditionally, you may need to use another sheet of paper for it.

3. Add the Body Shape
Step 1
This was like a skeleton, so now we need to add some body to it. I want my deer to look powerful and strong, so I'm going to use a bull's body for this purpose.
Start by defining the clearest forms:


Step 2
Adjust the hooves.


Step 3
Carefully analyze the legs. Try to convert them to simple shapes and to recreate them in your sketch.


Step 4
Adjust the torso, staying faithful to the "horse" silhouette you have established before.


Step 5
Add the neck.

4. Create the Head
Step 1
To create a powerful version of a deer, I decided to mix its head with a lion's.
You need to place both references next to each other to clearly see the difference and similarity. Analyze them to understand what makes deer a deer and a lion a lion. You may also need more references to understand certain structures.

Step 2
Create the head, copying most features from the deer's head (it must stay a deer!), and adding some from the lion's.

5. Add the Details
Step 1
Most of the body is well defined now, so let's add the "skeletons" of the details.
Use the first reference once again to create the antlers. If you rotated the head in the process, you'll need to find another reference for them.


Step 2
To stress the fact that my deer isn't a normal deer, I have modified the antlers using the "real" ones as a reference.

Step 3
Add all the other details. You can draw them from imagination, or use a lot of other references, for example for the deer mane.

Step 4
Time to make it all more detailed. Make the anatomy clearer and sketch everything you want to see in the final version.
Whatever animals you base your creature on, chances are I've already written a tutorial about them! Check them out to find a reference for anatomy. Besides cows and horses, we've got tutorials about:
- Dogs and wolves
- Small cats
- Lions, tigers, cheetahs, snow leopards
- Leopards, jaguars, cougars, lynxes
- Bears
- Birds
- Foxes
- And many more!


6. Finish the Picture
Step 1
Finally, you can start drawing the final version. Most of the body is clearly established, but you still may need some references for details, for example for the exact shape of the hooves or nose. Even the flow of fur shouldn't be guessed!

Step 2
The last way to use a reference is as a so-called "lighting reference". Find a creature with a similar pose to yours, shaded in a way you'd like to apply to your picture.

Step 3
Edit it in Photoshop or another program to first convert it to black and white...

... increase its contrast...

... and limit the number of shades (for example by using Filter > Filter Gallery > Artistic > Cutout).

Step 4
Shade your creature using the previous picture as a reference.

Your Creation Is Finished!
We have created a mighty deer creature using references as a support for our imagination. Photos of an elk, horse, bull, and lion have been combined to create a new kind of creature. I hope I managed to convince you that using references isn't cheating, and that forcing yourself to draw from memory only is pointless. It takes many years to achieve mastery at drawing, but you don't need to wait this long to be proud of your work!

Original Link:
TutsPlus - Design
More About this Source Visit TutsPlus - Design