
An Interest In:
Web News this Week
- April 17, 2024
- April 16, 2024
- April 15, 2024
- April 14, 2024
- April 13, 2024
- April 12, 2024
- April 11, 2024
Some of Our Sources
- Simplebits
- Web Designer Wall
- Spoon Graphics
- FanExtra - PSD
- Crazy Leaf Design
- My Ink Blog
- Wal You
- Freelance Switch
- Web Resource Source
- Android Headlines
Help Webnuz
Referal links:
How to Create a Detailed Chocolate Chip Cookie in Adobe Illustrator

Follow
this tutorial and learn how to draw a pretty detailed chocolate chip
cookie in vector form. First, you'll create the whole cookie and
after that, you'll learn to create the bite and the cookie crumbs.
This tutorial is a great example of what you can do with the brushes
available in Illustrator. Let's begin!
If
you are hungry for morefood iconsorvector iconsin general, thenEnvato Markethas
you covered with plenty of designs to choose from.
1.Start
a New Project
Launch
Illustrator
and
go to File
> New to
open a blank document. Type a name for your file, set up the
dimensions, and then select Pixels
as
Units
and
RGB
as
Color
Mode.
Make sure that Align
New Objects to Pixel Grid is
not checked.
Next,
go to Edit
> Preferences > General and
set the Keyboard
Increment to
1
px. While there, go to Units
to
make sure they are set as in the following image. I usually work with
these settings and they will help you throughout the drawing process.

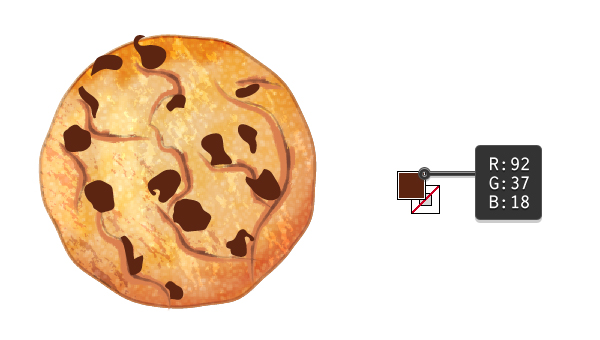
2.Create
the Shape of the Cookie
Step
1
Use
the Ellipse Tool (L) to draw a 184 x 184 px circle; then fill it with
the radial gradient shown.

Step
2
While
the circle stays selected, go to Effect > Distort & Transform
> Roughen and apply the settings shown below. Next, go to Effect >
Distort & Transform > Transform, select a 10 degrees Angle in
the Rotate field and hit OK.

Step
3
With
the circle still selected, Copy and Paste it in Front (Control-F) and
then choose Expand Appearance from the Object menu. Ungroup
(Shift-Control-G) if necessary. This will be the “cookie shape”.
Now,
take a look at the Appearance panel. Press Add New Fill and select
black as the fill color. Next, go to Effect > Sketch >
Reticulation and apply the settings shown. Set this Fill attribute to
Blending Mode Screen and 50% Opacity.

Step
4
With
“cookie shape” still selected, add a 2 pt Inside Stroke and then
go to Effect > Stylize > Feather and apply a Radius of 3 px.

Step
5
If
you take a closer look at the cookie, you will notice the pixelated
edges that have been generated by the Reticulation effect. To fix
that, you will create a mask.
Select
“cookie shape” and then Copy and Paste in Place
(Shift-Control-V). Remove all existing appearances. Now, select
everything on your artboard and go to Object > Clipping Mask >
Make (Control-7).

3.Create
the Texture of the Cookie
Step
1
Use
the Pen Tool (P) to draw a straight path over the cookie as shown in the
following image. Select black as the stroke color and the Chalk Art
Brush from the Brush Libraries Menu > Artistic >
Artistic_ChalkCharcoalPencil. Increase the Stroke Weight to3 pt;
then set to Blending Mode Color Dodge and 85% Opacity.

Step
2
Draw
another path in the bottom left side and use the Chalk Art Brush
again. Set the Stroke Weight to2 pt, the Blending Mode to Color Burn
and the Opacity to 20%.

Step
3
Draw
a new path over the cookie and use the Chalk Art Brush again to
stroke it. Increase the Stroke Weight to4 pt and select a light
brown color this time. Next, go to Effect > Blur > Gaussian
Blur and apply a Radius of 2 px. Set this path to Blending Mode Color
Burn and 50% Opacity.

Step
4
Next,
draw a curved path at the bottom of the cookie. Stroke this path with
the Charcoal-Rough Art Brush from the Brush Libraries Menu >
Artistic > Artistic_ChalkCharcoalPencil and increase the Stroke
Weight to2 pt. Go to Effect > Blur > Gaussian Blur, apply a
Radius of 2 px, and then set to Blending Mode Overlay and 30% Opacity.

Step
5
Draw
another path like in the following image. Stroke it with the
Chalk-Scribble Art Brush from the Brush Libraries Menu > Artistic
> Artistic_ChalkCharcoalPencil. Apply a 2 px Gaussian Blur; then
set to Blending Mode Overlay and 50% Opacity.

Step
6
You
are almost done. Draw another path at the top of the cookie and use
the Chalk–Scribble Art Brush to stroke it. Increase the Stroke
Weight to2 pt, apply a 2 px Gaussian Blur and set the Blending Mode
to Overlay.

Step
7
Draw
the last two paths in the left side of the cookie as in the image
below. Stroke them with the Chalk-Scribble Art Brush, set the Stroke
Weight to2 pt, apply a 2 px Gaussian Blur and then set to Blending
Mode Color Dodge.

Step
8
It's
time to clean up all the mess. Select the “cookie shape” and Copy
and Paste in Place (Shift-Control-V). Remove all existing appearances
from the Appearance panel. Now, select this copy along with the eight
stroked paths and go to Object > Clipping Mask > Make
(Control-7). You can name the resulting group “cookie texture”.

4.Create
the Cracks on the Cookie
Step
1
Take
the Pencil Tool (N) and draw a few random paths on the surface of the
cookie. The number of paths depends on how many cracks you want on
your cookie.
Select all of them and use the Charcoal-Rough Art Brush
to stroke them. The two green paths have a 1 pt Stroke (bigger
cracks) and the rest of the paths have a 0.75 pt Stroke (smaller
cracks). Next, go to Effect > Stylize > Feather and apply a
Radius of 2 px to all of them.

Step
2
Select
all the paths and then Copy and Paste in Front (Control-F). Change
the color, reduce the Stroke Weight to0.25 pt, apply a 2 px Feather
Radius and reduce the Opacity to 65% for all of them.

5.Create
the Chocolate Chips
Step
1
Use
the Pen Tool (P) to draw some random shapes next to the cracks and
between them. Add as many as you want. Fill these shapes with dark brown.
Step
2
Let's
add some shine. On each chocolate chip, draw another smaller shape or
two. Fill the smaller shapes (blue) with the first gradient and the
slightly bigger shapes (pink) with the second gradient shown.
At
this point the cookie is ready, but let's not stop here....

6.Create
a Bite in the Cookie
Step
1
First,
select all the shapes that make up the cookie, Group (Control-G) them, and then make a copy of the group.
Use
the Pen Tool (P) to draw a path as shown in the following image that will
define the shape of the bite. Starting from the end points, close the
path around the cookie to obtain a shape. Set this shape to fill-none
and stroke-none. Now, select the cookie group along with this path
and go to Object > Clipping Mask > Make (Control-7).

Step
2
Follow
the edge of the bite and draw the blue and red paths. Stroke both of
them with the Charcoal-Rough Art Brush and set the Stroke Weight to0.75 pt.

Step
3
Draw
a new path as shown in the following image, use the Charcoal-Rough Art
Brush again, and set the Stroke Weight to0.5 pt.

Step
4
Draw
another path as shown below, use the Charcoal-Rough Art Brush again, and
set the Stroke Weight to0.5 pt.

Step
5
Draw
a smaller path on the front left side of the bite, use the
Charcoal-Rough Art Brush again, and then set the color and the Stroke
Weight to0.25 pt.

Step
6
The
bite in the cookie is ready, and in the next image you can see both of
them.

7.Create
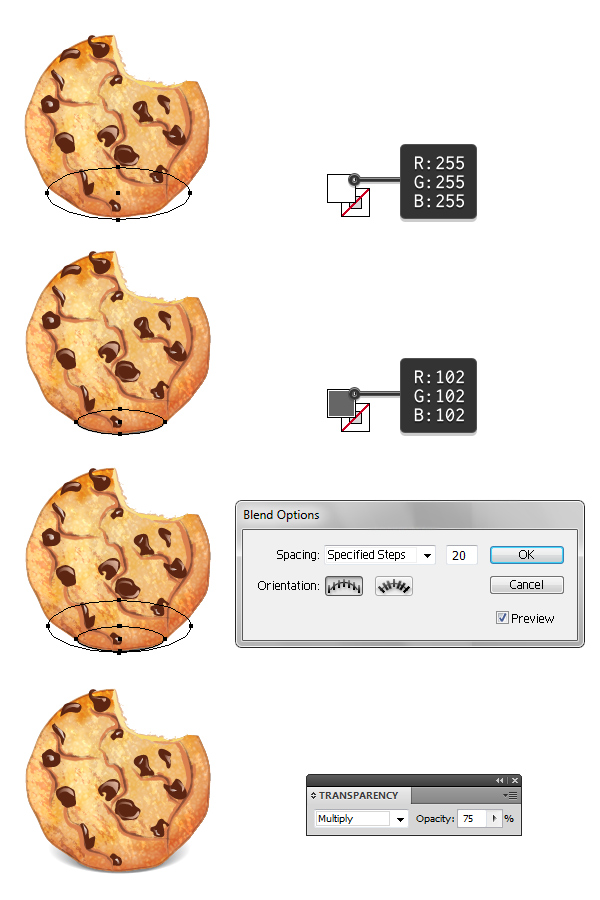
the Shadow under the Cookie
Step
1
Use
the Ellipse Tool (L) to draw a 143 x 53 px ellipse filled with white
and then a 88 x 25 px ellipse filled with gray. Arrange both shapes
at the bottom of the cookie, as in the image below, and send them in
back.
Having
both shapes selected, go to Object > Blend > Blend Options,
choose 20 Specified Steps and hit OK. Now, go back to Object >
Blend > Make (Alt-Control-B). Set the resulting blend group to
Blending Mode Multiply and 75% Opacity.
Step
2
Make
a copy of the blend group from the previous step and arrange it
behind the other cookie as well.

8.Create
the Cookie Crumbs
Step
1
Go
to the Symbols panel and in the Brush Libraries Menu > Nature find
the Rock 5 symbol. Drag it onto your artboard and press the Break
Link to Symbol icon at the bottom of the Symbols panel in order to
expand it. Make the rock smaller by moving the sides of the bounding
box closer to each other.
Use
the Direct Selection Tool (A) to select only the main shape of the
rock and then Copy and Paste in Place (Shift-Control-V). Fill this
copy with orange and change the Blending Mode to Hard Light. Finally,
make a copy of the shadow under the cookie, make it smaller, and
arrange it behind the cookie crumb.

Step
2
Move
the cookie crumb next to the cookie and make a smaller copy or as
many as you want. That's it!

Congratulations!
You're Done
I
hope you enjoyed this tutorial, and if you recreate these cookies,
don't forget to share an image with us. I bet they're gonna be yummy.

Original Link:
TutsPlus - Design
More About this Source Visit TutsPlus - Design