
An Interest In:
Web News this Week
- April 15, 2024
- April 14, 2024
- April 13, 2024
- April 12, 2024
- April 11, 2024
- April 10, 2024
- April 9, 2024
Some of Our Sources
- Mashable
- TutsPlus - Code
- Joshua Blankenship
- Pearsonified
- Six Revisions
- Abduzeedo
- Inspiredology
- Naldz Graphics
- CSS Globe
- 24 Ways
Help Webnuz
Referal links:
How to Draw Vehicles: Motorcycles
Motorcycles
differ greatly from model to model, especially as there are two main sitting
positions on a motorcycle: sitting upright if you are on a cruising or a
historic motorcycle, and hunched over if you are riding a sports or superbike.
In this tutorial, you'll learn how to construct both types of motorcycle from scratch using very basic shapes and methods.
1.Establish Perspective
Step 1
In this tutorial, we are going to
work in two-point perspective. To start with, we are going to draw a horizon
line, which is simply a line going straight across the page at a certain point.
This is a main guide to place vanishing points which will help us establish our
perspective. In this picture, we are placing our line just below halfway down
the page.

Step 2
You now want to plot out where your points are going to go.
For a convincing perspective, I find that vanishing points are not often placed on
the paper itself, and for this particular piece that theory is no different.
To
help you, use your steel ruler to
further measure your horizon line off the page, and then take a piece of masking tape and draw your point on
that, marked below with a cross. Do this for both points on the right and left of the page.

Step 3
Then, again using your steel
ruler, draw a couple of light
lines from your vanishing point on the right-hand side that will establish the length of our bike in perspective. You can have these lines going right across
the page if you want to do so.

Step 4
Then, from the left-hand side, draw in lines that will establish the width of the bike.

Step 5
Move on to the upper perspective, again using our vanishing
points as a guide, but take into account that you want the final image to be
convincing to the eye, so be careful not to incorrectly draw your perspective
lines. Practicing on scrap paper will be very helpful.

Step 6
Now we have our perspectives, you can draw in lines going
upward that will act as parameters for our bike. You don't have to do this if
you don't want to, but it is a good idea to at least have a rough idea how far
your vehicle will go across or up the page.

2. Use Basic Shapes to Form the Body
Step 1
With the two riding positions in mind, we are going to look
at both types of motorcycle build. However, for this tutorial we are going to primarily
focus more on the sports bike position. We shall begin by constructing the frame, and all we need to do is to draw a simple three-dimensional triangle with the long edge
horizontally and the point rising slightly upwards.

Step 2
Next, draw a second triangle with the long end at the top,
next to our original triangle, which will make up the tail of the frame.

Step 3
Then add a cube between these two triangles that will
encase the motorcycle engine as well as another triangle at an angle at the rear of our frame that will act as support for the tail of the bike.

Step 4
At the front of the frame, we need to add a small triangle, point
raised upward, which will act as a connection for our steering.

Step 5
Moving to the rear of our frame again, we now need to add yet
another triangle with point facing downward that will provide a guide for our
suspension.

Step 6
To complete our sketch of the frame, I find it best to
include some guides for the steering and of course the wheels.
To make these up,
simply draw a cylinder at an angle that's attached to your
steering and suspension points which we added earlier, as demonstrated in the
screenshot.
For your wheels, it is very straightforward to draw two of these
using ellipses (ovals).

Step 7
Now we have a complete frame for our sports bike. I have also included a complete frame for our cruising
bike in a profile view, but you should note that this bike has a very high point for the
steering and a low back end to accommodate the upright seating position.
Also
take note of the different wheel sizes on the cruising bike, again to
accommodate the different seating and steering position.

3. Construct the Body
Step 1
We are now going to move on to constructing the motorcycle
body. As previously, I shall also be drawing comparisons with the cruising bike
as we go along but, to start off, we are going to draw a simple cube in the
middle of our frame.

Step 2
We then draw in another cube just in front of your first, which
will make up the front of the body. This should be pointing upward on your drawing paper/canvas.

Step 3
On top of your original cube you should draw another smaller cube, which will be the fuel tank.

Step 4
Next, to make a base for the rear of the bike, draw in a long cube, right side pointing upward, attached to the square we have drawn previously.

Step 5
You should then add a thin triangle with the long side on top of this cube running
from the end of the cube on the right to just over halfway down it.

Step 6
Draw an additional series
of other triangles of various sizes, which will be additional
support for the body and dirt guards for the wheels. Note that because of perspective, some of these parts will obscure the rear wheel.

Step 7
For the frame of the windshield, you want to draw a
rectangle, again at an angle sloping left. We also need to add some rough guides for the handlebars. So we need to draw a small cylinder coming off the top of the thin cylindrical shafts for the steering in a downward direction.

Step 8
We should now have a
complete guide for drawing our body and technical parts in more detail, and I
have once again brought up a comparison of our cruising bike to show you the
difference between the two types of motorcycle.

4.Build on Your Groundwork
Step 1
Now that we have a good base for our motorcycles, we are going to draw them in more detail and end up with a complete image. Begin by
drawing a basic body—if you have done your groundwork properly, this should not
be too hard.

Step 2
Once you have your basic body, draw in the fuel tank on
top of the bike, and then the seat, front and rear mudguards, and suspension.

Step 3
Now we start moving into drawing more fine details such as
the handlebars, the brake handle, and all the dials on the bike's small dash. Take
note that with the brake handle, it curves away from the main handlebar so that the
rider can easily grab it to slow down. The principle is the same for our
cruising bike.

Step 4
We then come to drawing all the parts for the engine. I have
again called upon our cruising bike here to show you the different types of
engine for different motorcycles.
Note how the engine on the cruising bike is
much more exposed than on the racing bike and looks more like a car engine. A racing bike often has a smaller engine capacity than a
cruising bike, but is much higher geared to achieve racing speeds.

Step 5
We are going into finer detail now, as we need to work on
the drive wheel and chain for our bike. Be aware that these details are small but nevertheless very important, and I would stress to take extra care when
drawing them. I would advise you to draw ellipses for the driving wheel at
this point.

Step 6
Then, for the chain, draw two circles close together and link them with a small rectangle. Linking the two circles gives the points
on the driving sprocket something to fall into, thus providing drive from the
engine to the wheels.
However, we now need to draw a second rectangle that will
act as a pivot to allow our chain to thread around our sprockets and
link our circles together.

5.Work on the Wheels
Step 1
The first step for constructing our wheels involves drawing a basic ellipse. If you are feeling confident enough, you can do this freehand, but don't be afraid to do a few tests first if you need to. Using our rough guideline we
created earlier, draw a slightly smaller ellipse than the one we already have.

Step 2
Now draw a second smaller ellipse that will be our inner rim. Note how it is affected by perspective.

Step 3
Before we move on to drawing the spokes, we shall draw a
small ellipse in the middle of our wheel that will serve as the centre.

Step 4
Now we are going to focus on the spokes for the rim. I am sure
you are aware that there are literally thousands of designs for wheel rims, so
which one you choose to do is up to you, but for this tutorial I will be going
for a simplistic design.
To start with, I will draw a simple line that goes to
the centre of the wheel, using the centre ellipse as a guide.

Step 5
Then draw a second line that completes the body of our spoke.
You will notice the two spokes are starting to converge in the centre of the
rim but, unless you are drawing wire wheels (which are consist of many
individual spokes), you do not want
them to meet completely in the centre. Drawing the inner part of our spokes, which again involves drawing converging lines within our spoke body, this time we want to cut off our lines about halfway in and then do a small line across to finish the inner spoke.

Step 6
Now that we have a completed spoke, we can move on to drawing in
the rest. At this point I would strongly
suggest that you take care when drawing in the additional spokes to make
sure they match up with each other as demonstrated in the screenshot. Incorrect
placing of spokes can be common and is very easy to do, so taking time to get
this right is worth it.

Step 7
Now we need to add the brake disc/s on the wheels. First, draw
one medium sized ellipse and then, within this first ellipse, draw a second, smaller ellipse.

Step 8
Next, we want to make a rough
guide for the brake calliper that holds the brake pads that stop the bike. To
do this, start by drawing a small cube.

Step 9
You then need to draw smaller cylinders around each corner of
the calliper as this will add to the overall style later. For the back bone of the calliper, a guideline can be made with a small oval.

Step 10
Now that you have a base, you can carefully draw the calliper in
more detail. Remember to include drawing in the brake pipe, otherwise there will
be no indication of how the brakes will work. Also include on the left of the calliper two circles that are bolts that hold parts of the calliper body together.

Step 11
To complete your brake disc, you need to draw in holes that
act as vents to dissipate heat when the bike is under braking and, if you
notice in the screenshot, there is a small pattern of the holes spiralling
inward. Retain this pattern around the wheel and you will have made up your
disc correctly.

Step 12
I have brought our cruising bike image up again to compare how,
once again, bike wheels and callipers can differ so much. It is a fact that superbike wheels
will be designed with racing efficiency in mind whereas cruising bikes, which
do not have the emphasis on speed, will have wheels that are made more for
style and image. Remember to clean any loose lines that you may have remaining once you are finished.

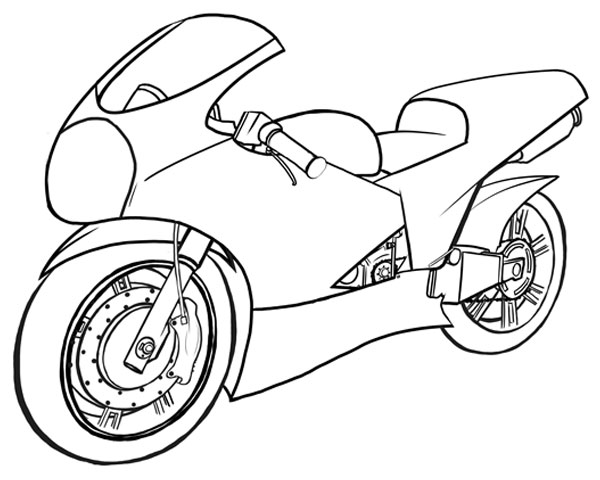
And There We Have It!
Thanks for hanging around and allowing me to show you how to
draw different types of motorcycles. Of course, there are so many customs and
kits available for these machines that you can do whatever you wish to do, but
hopefully now you have a basic understanding of how these vehicles are
constructed.
Have fun drawing until the next time!
Original Link:
TutsPlus - Design
More About this Source Visit TutsPlus - Design