
Some of Our Sources
- Web Designer Wall
- Just Creative
- Joshua Blankenship
- Pearsonified
- Spoon Graphics
- Smashing Magazine
- Creative Curio
- Fudge Graphics
- CSS Globe
- Hashedout
Help Webnuz
Referal links:
How to Draw Transport: Trucks & HGVs

Trucks
are seen by many as the kings of the road and they are very imposing, so for
this tutorial we are going to look at how to draw one in perspective, and we'll also compare different types of these big rigs.
1. Establish Perspective
Step 1
For this tutorial, we are going to keep things simple and
work in two-point perspective.
To start with, we are going to draw a horizon line, which is simply a line going straight across the page at a certain point. This
is a main guide to place vanishing points which will help us establish our
perspective. For this piece, we are placing our line just below halfway down
the page.

Step 2
You now want to plot out where your points are going to go.
For a convincing perspective, I find that vanishing points are seldom placed on
the paper itself, and for this particular piece that theory is no different.
To
help you, use your steel ruler to
further measure your horizon line off the page, and then take a piece of masking tape and draw your point on
that. Do this for both points on the right and left of the page.

Step 3
Then, again using your steel
ruler, draw a couple of light lines
from your vanishing point on the right-hand side that will establish the width
of our truck in perspective. You can have these lines going right across the
page if you want to—the choice is yours.

Step 4
Now draw in the perspective lines for the left-hand side.

Step 5
Move on to the upper perspective, again using our vanishing points
as a guide. Remember that you want the final image to be convincing
to the eye, so be careful to draw your perspective lines correctly. Practising on scrap paper may be beneficial before you move
on to your final picture.

Step 6
Now that we have our perspectives, you can draw in lines going
upward that will act as parameters for our truck. You do not have to do this if
you don't want to, but it is a good idea to at least have a rough idea how far
your vehicle will go across or up the page.

2. Construct the Body and Wheels
Step 1
If you have completed the previous section correctly, you
should not have a problem building on the groundwork you have already done on
the truck. We are going to start this section by drawing a tall cube in perspective;this will house the engine.

Step 2
The cab sections are firstly made by drawing a small cube
for the front section.

Step 3
Then a larger cube is attached to the back of the first, and
that will be the driver's sleeping area of the cab.

Step 4
Next, yet another small cube will make up the hitch area for
the trailer.

Step 5
We then move to the front again and work in two tall cubes
that will be our front mudguards.

Step 6
We now move from drawing cubes to cylinders, and we shall
start these by drawing a simple small cylinder for the tank on the side of
the truck's engine area. If you feel uncomfortable with drawing cylinders, I
recommend doing some practice examples on a separate sheet of paper.

Step 7
Next we draw a taller cylinder that will be the truck's
exhaust. European trucks have their exhausts at the rear of the driver's cab, and so they would be hidden.

Step 8
Now we draw two smaller cylinders to finish off the top of
the exhaust pipe. Note how the lower exhaust stack on the passenger side will be obscured by the cab of the truck thanks to perspective. This is called overlapping.

Step 9
We now move to the bottom of the truck and add a horizontal
cylinder, which will be the fuel tank.

Step 10
Next we come to drawing the wheels of this truck, and I would
strongly suggest you practise
drawing ellipses (ovals) before you begin the following steps, as we'll be doing
a lot them.

Step 11
Start by drawing the front driver’s side wheel.

Step 12
Then move on to the passenger side wheel, remembering to use
your vanishing point to make sure your perspective is properly established.

Step 13
Moving on to drawing the rear wheels, bear in mind that to
distribute the weight of a load properly, some trucks will have twin axles and
wheels to help spread the load. As our truck will be based on one of these
examples, draw in two smaller ellipses for the outer wheels.

Step 14
And then two more for the inner wheels—we shall come to
putting in the finer detail later.

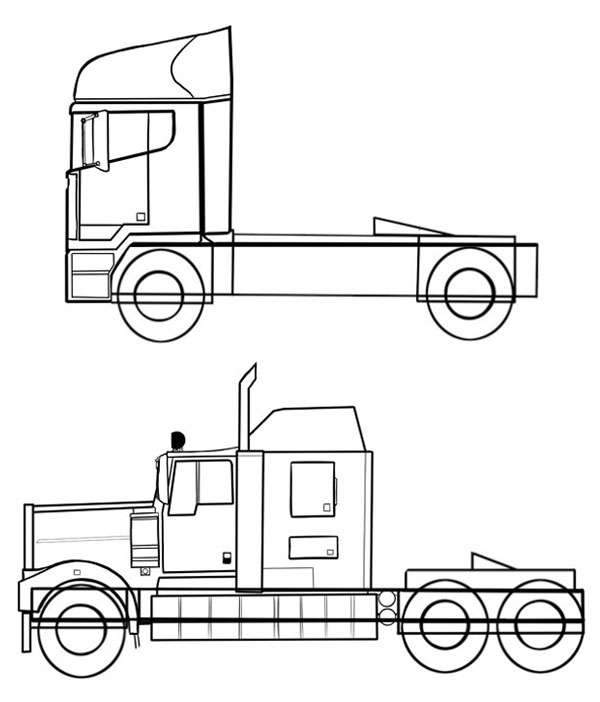
Step 15
In profile, I have decided to show you the common
differences between European and American trucks, and it is clear how different
American trucks are built to cope with often heavier loads that have to be
transported over the vast mileages of the United States, in comparison to
European trucks whose loads are usually lighter and do not cover as many miles.

3. Refine Your Groundwork
Step 1
We are now going to move on to drawing parts of the truck in
more detail, going from left to right (if you are left-handed you can do this
part right to left). As I am right-handed, I am going to start with refining
the bumper/fender.

Step 2
Then, moving upwards to begin drawing the grille, I prefer
to work first on the bars going upwards.

Step 3
Next, I work on the bars going across the grille. Use only a
light touch as you draw this step as it is easy to make mistakes. You might
want to use a detailed eraser after
you have finished, making sure your line work is clear.

Step 4
We now move on to drawing the front headlamps and the
mudguards.

Step 5
Moving across, we come to working on the hood and all the
trim that goes with it.

Step 6
Now comes the cab area. Remember that the rear-view mirror
protrudes quite a distance outward from the cab itself, which may obscure the
side window quite a bit. Getting this part right will help create
believability.

Step 7
Then work on the rear section of the cab and, again, you
need to bear in mind that perspective means some areas will be hidden by the
front part of the cab.

Step 8
We move on to the rear section of the truck at this stage;
here we need to include the hitch plate, which on all trucks sits at a slight
angle to prevent the trailer slipping and to lock the tow hook in place.

Step 9
Referring back to our comparison
of the different types of truck, you can now clearly see how the ideas are
similar between the continents, but in reality they are so different.
4. Work on the Wheels
Step 1
We already have a guide established for our outer wheel, and
now we are going to do the outside of the rim. Using a careful hand, draw a
simple oval to establish this, remembering to use your vanishing points to
assist you with perspective.

Step 2
Now do the same for the inner rim and the hub cap in the wheel centre. Again, perspective affects these ellipses too; note how they are positioned more to the right of the centre of the wheel.

Step 3
With trucks being such heavy vehicles, none of them have
spoked wheels as these types of rims would not be able to manage the weights
trucks have to haul around. Instead they have strong steel rims that may have
a chrome finish, and they have small circular vents cut in them to clear heat
from the brake discs. To create these, we simply draw a small circle; you can
make use of yourcompass here.

Step 4
With our truck being in perspective, the other vents, which
are also circles, will appear more oval, so we need to draw some small ellipses
to make these.

Step 5
Moving on to the rear wheels, we are going to start these by
drawing another small ellipse in the centre of both the front and the rear
wheels.

Step 6
A slightly larger ellipse needs to be drawn that will create
a lip for the outer part of the rim. At this point too, I must mention that the
rear wheels do include vents for cooling purposes, but because of the
perspective of our drawing, these are obscured. Do be aware that they should be
there if you are drawing a truck that is at less of an angle.

Step 7
Lastly, to complete our rear wheels, we need to draw in the
middle of the tyres and join up our inner and outer ellipses.

5. Additional Details
Step 1
Now here is your chance to add any small details that might
give your truck its own personality, and for American trucks these touches can
be either subtle or very flamboyant. We are going to start by finishing off our tank on the side of the truck's engine compartment, as well as the upper
exhaust stacks, which are normally shiny chrome.

Step 2
Now we can also do the fuel tank. Both types of truck carry two of these tanks, one on either side.

Step 3
We also need to include the steps up to the cab; remember
these mighty machines are very tall!

Step 4
As a final comparison, you can see in our profile shots how American and European trucks differ from each other.

And We Are Done!
Now, erase your guidelines. If you wish to do so, to personalise your truck you can add
your own little touches such as bull bars on the American truck or light clusters on the European one, depending upon the type of truck you are drawing.
The choice is yours!
Thanks for coming with me and looking at this insight into how to draw heavy, articulated trucks. I hope that some basic knowledge of perspective and using some simple shapes can help you draw one of the mightiest machines on the road. Keep on trucking!

Original Link:
TutsPlus - Design
More About this Source Visit TutsPlus - Design