
Some of Our Sources
- Mashable
- Simplebits
- TutsPlus - Design
- Reencoded
- Wal You
- Specky Boy
- CSS Tricks
- Android Dissected
- Codrops
- Hashedout
Help Webnuz
Referal links:
How to Create a 50s Fashion Illustration in Adobe Illustrator

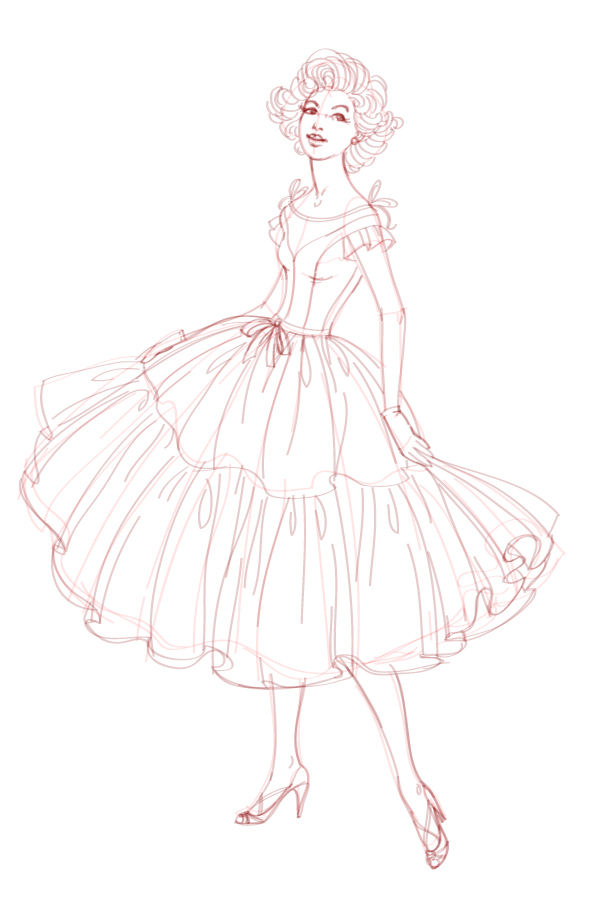
In this tutorial you’ll learn to create a vintage-style fashion illustration. The “Grease” movie with gorgeous costumes, wonderful music and a 50s atmosphere will serve as an inspiration for us. Let's fantasize together about how an ideal dress for a dance should look.
1. Make a Sketch
Step 1
Create a New document, 600 x 900 px, RGB. Change the first layer name to “sketch”.
Step 2
At the beginning, let's draw a schematic sketch using a silhouette and some attributes inherent to
this period. If you need more inspiration before you start sketching, you can get lots of ideas from looking at50s dresseson Envato Market!
I create my sketch directly in Adobe Illustrator using my graphics
tablet. For the sketch, any brush from the default Brushes panel will be suitable. I chose the Oval
Calligraphic Brush with 2 ptdiameter, 20% Opacity.
2. Create a Brush for the Contour
Step 1
Create a New Layer for the lines. We’ll draw all the lines in this layer, because the color of all the lines will be the same.
Step 2
First open the Paintbrush Tool Options by double-clicking on the Paintbrush Tool (B) icon. Use
the settings below and press OK.

Step 3
Now we need to create
a New Calligraphic Brush. Press the
icon New Brush on the Brushes panel and choose the Calligraphic Brush type. Then press OK,
and the window with brush options will appear. Use the settings shown below.

Step 4
Choose our new brush, and make a few trial lines. The thickness
of the line depends on the pressing force of the stylus. Try to sense the
lines.

Step 5
It's time to apply our skills in practice. Let’s
begin to create our line art.
Start drawing the face. Draw lines as smoothly as you
like. Don’t worry about crooked lines, because you can always fix them using the Direct Selection Tool (A). Our mission
is to draw “live” lines and imitate ink.

Step 6
Now draw the hairstyle. First make just the main
lines, and then add the details.

At once use our brush
to add some volume and deep contrast shadows to the hairstyle.

Step 7
Now draw the dress.
Let’s start with the bodice. Draw this way, making the lines thicker on the
shadowy area. The fabric on the sleeves will be transparent, so make the lines
of the folds thinner.

Step 8
Next let’s draw the hands and legs. Make the lines of
the body smoother. Decorate the shoes with straps.


Step 9
We still have to finish the underside of the dress. The
skirt consists of two parts: petticoat and upper transparent skirt. We’ll draw
the lower part with thinner lines to make them almost imperceptible.

Step 10
Make the “sketch” layerinvisible. Add some deep
contrast shadows and admire the result.

3. Create the Main Shapes
Step 1
First let’s color the contours of our character. Select
all lines and go to Object > Expand
Appearance. Open the Pathfinder
panel and click Unite holding the Alt button. Then press OK to create one solid object.

Now fill the line art
with Bordeaux color.

Step 2
We need to create the swatch of the main colors.
I chose blue for the dress and pink for the accessories.

Step 3
Add a New Layer for the background. Create a 570 x 870 px rectangle using the Rounded Rectangle Tool, and fill it
with color from your swatch.

Open the Align panel and choose Align to Artboard, and then Align Objects: Horizontal and Vertical.

Step 4
Now it’s time to begin painting. Choose the colors
from your swatch. You can use the Pencil
Tool (N) or the Pen Tool (P), whichever you prefer. The Blob Brush Tool
(Shift-B) can be convenient for the main shapes.

Step 5
Use white for the petticoat, and the main blue with 50% Opacity for the upper skirt.

For a convenient work
process, we’ll create separate layers for each part of the character. Organize
the layers as shown in the screenshot below.

Step 6
And here’s what we’ve got at this stage.

4. Add Shadows and Highlights
Step 1
It’s time to draw the
beautiful face of our character. We’ll work on the “body” layer.
Let’s draw the blush
first. Create two shapes: a smaller pink shape on top, and a bigger shape in the main skin color. Then go to Object >
Blend > Blend Options, and chooseSpecified Steps: 50. And now go to Object > Blend > Make. We’ve got too bright a shade of the blush,
so reduce the Opacity to 75% on the Transparency panel.

This way, add some
blushes to the second cheek, nose, neck and elbow. So add some blushes to the
legs on the “body_back” layer too.

Step 2
Let’s add some shadows to the skin. Choose the color
of the contour, and reduce the Opacity
to 8%. We’ll draw basic shapes
on the shadowy area, using the Pencil
Tool (N) or the Pen Tool (P).


Step 3
Now draw deeper shadows on the eyes and neck, and under the nose and lips. Change the Opacity to
20%.

This way, add some shapes of the shadows to the hands
and legs.


Step 4
Let’s add the falling shadows. Choose the same color
from the contour, and reduce the Opacity
to 50%. Draw shadows under the eyes
and hair growth line, on the neck, hands and legs, and under the folds of her dress.


Step 5
Next let’s add some highlights. Select a lighter
tint starting from the base skin color, and reduce the Opacity to 20%. We’ll
draw basic shapes on the lightened area.


Step 6
Change the Opacity to 60%, and add some bright highlights and twinkles to the outer edge
of the lightened area.

Step 7
Now choose blue color
with 60% Opacity, and draw
highlights on the left side of the character.


Step 8
Now we’ll get work on the eyes and lips on the “face”
layer. Draw eyeshadow using a blue color with 20% Opacity, and then add some bright twinkles with cyan color.
The left side of the face is in the shadow, so draw some
Bordeaux shapes with 8-20% Opacity on
the white part of the left eye.
Now add the Bordeaux shape with 50% Opacity between the lips, and the shape with 25% Opacity to the left side of the
lips. In the end draw a bright twinkle on the right side of the bottom lips.

Step 9
Let’s start coloring the hairstyle. First select the
shape of the hair and fill it with linear gradient from light brown to brown.

Next draw the shapes of the highlights, and then
select them and press Unite on the Pathfinder panel. Fill this solid
shape with vertical linear gradient from yellow to orange, reducing the Opacity to 60%.

In the end, add some blue shapes to the left side of
the hairstyle and some bright highlights to the right side. Just select these
colors from the skin using the Eyedropper
Tool (I).

Step 10
It’s time to add some volume to the dress. Let’s start
with the bodice. Draw the shapes of the shadows, and fill them with dark blue
color, 30% Opacity. Then add the
falling shadows using the same color with 60%
Opacity.

Now draw the shapes of the highlights, and fill them
with light blue color, 30-60% Opacity.

Let’s add some volume to the transparent details of
the bodice. First use the Eyedropper
Tool (I) to choose the main color from these details, and draw the shapes
on the area where the fabric folds. Then use the same colors
for the shadows and highlight from the bodice to draw volume on the sleeves and
neckline. Reduce the Opacity to 20%.

Add some blue shapes to the left side of the bodice
and some bright highlights to the right side. Use the Eyedropper Tool (I) to choose these colors from the body.

Step 11
Now we’ll draw the petticoat. First make the “skirt”
layer invisible. It will make our work on the white part of the skirt easier.
Add some shadows using the gray color with 50% Opacity. Here you can draw the
shapes not as neatly.

Choose the color from the contour, reduce the Opacity to 60%, and draw the deep shadows.

Now make the “skirt” layer visible. Here’s how the
skirt looks now.

Step 12
We’ll draw the skirt using the same principles as we
used on the transparent details of the bodice.
First we’ll draw the shapes on the area where the
fabric forms creases. Use the base blue color from
the dress with 35% Opacity.

Then draw the main shadows using the same dark blue
color from the bodice. Reduce the Opacity
to 20%.

Now add some deep shadows to the small folds using the
same color with 40% Opacity.

Choose the white color with 15% Opacity, and draw the highlights on the lightest area.Don’t forget to add some volume to the back side of
the skirt.

In the end, add some bright gloss to the right side of
the skirt.

Step 13
It’s time to add some volume to the accessories. Let’s
start with the gloves. Choose the gray color from the petticoat, and draw the
shapes of the shadows using 35-50%
Opacity. Then draw the blue shapes with 15% Opacity, adding some reflections from the skirt.

We’ll add some volume to the dress’s decorative
elements and shoes following this method. Use the Bordeaux color from the
contour for the shadows, reducing the Opacity
to 50%.

Use the pink color for the highlights, and reduce the Opacity to 70%.

In the end, add some blue and bright reflections.

Step 14
Finally our character is ready!

5. Create a Pattern for the Dress
Step 1
Create a New
Layer over the “bodice” layer. Here we’ll draw a simple pattern for the
decoration of the dress.
Create two circles 3 x 3
px and 4 x 4 px using the Ellipse Tool (L). Draw some simple
flowers using our brush, 2 pt
Stroke. Select each of them, expand and press Control-G.

Step 2
Duplicate these shapes, pressing Alt, and place them
on the dress randomly as you like. Delete unnecessary details on the creases
using the Eraser Tool (Shift-E) with
2-3 pt Diameter.

Step 3
Select the entire pattern and reduce the Opacity to 70%.

6. Create a Simple Background
Step 1
First fill the background with linear vertical
gradient from dark to light color based on the main color.

Step 2
Let’s draw a pattern. Create a 10 x 10
px rectangle
using the main color of the background.
Now
create two 5 x 5 px circles, and align them using
the Align panel as shown below.

Then
unite these circles, select both objects (circles and rectangle), and clickMinus Front on the Pathfinder panel.

As a
result we’ve got a rectangle with two holes. Drag this shape to the Swatches panel.

Select
the background shape, press Control-C
and Control-F, and apply our pattern
from the Swatches panel.

Wow! We’re Finished!
I
like this old fashion style so much, and I hope you enjoyed the process. Thank
you for creating with me! Please, share your result!

Original Link:
TutsPlus - Design
More About this Source Visit TutsPlus - Design