
Some of Our Sources
- Techcrunch
- Technology Review
- Web Designer Wall
- Joshua Blankenship
- Smashing Magazine
- Creative Curio
- CSS Globe
- Line 25
- Wal You
- Hashedout
Help Webnuz
Referal links:
Design a Floral Pattern for Fabric in Adobe Photoshop

Sometimes you walk into a store and you think to yourself, "Aw man, all these clothes are ugly. I wish I could sew my own things, with my own floral designs on them." And you absolutely can. Let me guide you through the process of designing your own floral fashion print, which you can later use for awesome and unique DIY projects!
1.Make Some Motifs
Designing a pattern for use on fabric requires you to consider a few things before you start drawing.
Step 1
First, consider your scale. If your motifs are too large, they will look awkward on the final product, and if they are too small, the details will be lost.
Aim for a scale that will let a good portion of your repeat be seen. If you plan to make large items like clothing, cushions, or kitchen towels, you can go with larger motifs. If you want to make accessories like wallets or hairbands, the scale needs to be smaller or the pattern will not be visible.

The safest bet is to make the design larger than you think you will need, since it is easy to reduce image size in Adobe Photoshop, but it isn't possible to increase it without loss of quality. But make sure that the level of detail and the thickness of your lines are suitable for your choice of scale.
Lines that looked great while you were drawing them could look spidery and thin at a radically smaller scale, or conversely they might appear thick and overpowering if the pattern is used at a large scale.

Step 2
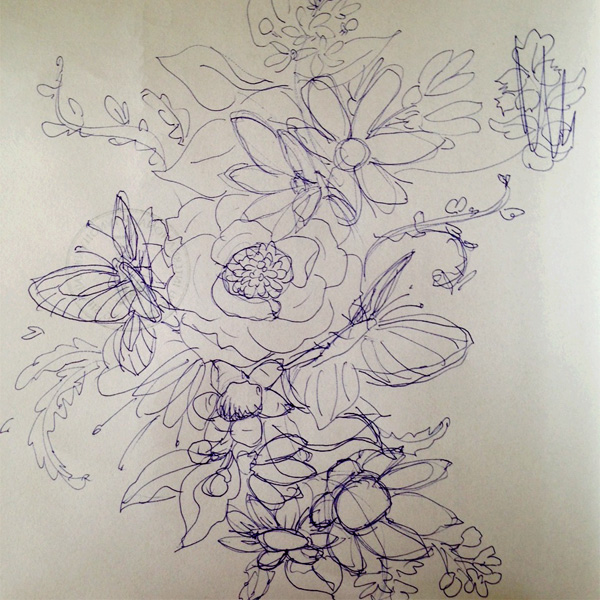
Start sketching your motifs. You can use as many or as few different flowers as you like, but my preference is always for a variety of blooms in different shapes and sizes, because this will later help you achieve a more dynamic repeat.
You can sketch out individual flowers and leaves and put them together later, but they will never fit together quite as well as when you sketch them out in a big bunch. The sketch can be very rough and loose because we will only use it as a guide.
Step 3
If you have sketched your flowers in the actual size you want to use in your final pattern, scan your sketch at 300 dpi, as this is the image quality needed for a clear fabric print. Then you can use that scan as your working document, and you don't need to resize the image at all before you start drawing the clean linework over thesketch.
If you sketched your motifs smaller than you'd like them to be in the final pattern, feel free to stretch your scan to any desired size by clicking Control-A > Control-Tto access the FreeTransform Tool controls, and then Shift-dragging one of the corners outwards until your sketch has grown sufficiently large. This will damage the image quality of your scan, but you shouldn't really care, as the sketch will only be used to guide your linework.

Step 4
Now you can select theHard Round Brush Tool, or any other clean Photoshop brush of your choice, and start to draw out clean lines over your sketch.
As you draw, your line width should vary, to make your lines more dynamic. You don't have to close each shape neatly—you can let the line trail off or fade out for a more hand-drawn feel. If you plan on using a darker color for the lines, you can immediately draw shadows where petals meet or overlap, so the flowers have moredepth.

Step 5
Outline different motifs on different layers, so that you can easily manipulate them later, making additional copies and usingEdit > Transform > Flip, Rotate, or Scale to create more variety in your design without drawing new motifs.

Step 6
You should now have a clean line version of your initial sketch, that looks something like this.

2.Bring in Some Color
Once the main part of your outline is done, you can start thinking about colors for your floral pattern. If you intend to have the fabric screen printed commercially, limit the number of colors you use to as few as possible, since every additional color screen will increase the price of printing. If you intend to have the fabric printed digitally (e.g. at Spoonflower), you can use as many colors as your inspiration desires.
Step 1
Lay in the base colors. You can do this by using the Magic Wand Tool to select the empty space within each motif, and choosingSelect > Modify > Expand and expanding your entire selection by one or two pixels. This ensures that there will be no gap between your line and your color.
Move onto a new layer, andthenclickAlt-Delete to fill the selection with your foreground color, or Control-Delete to fill the selection with your background color.
For motifs with lots of line details that cannot be neatly selected, paint in the base color with theHard Round Brush Tool. Be sure to keep all the base colors on separate layers, in case you want to make changes later.

Step 2
The key to a cohesive color palette lies in finding more than one role for each color you use. Challenge yourself to find clever combinations that let you develop a rich colorway while keeping the number of individual colors low.
My rule of thumb is to start with two or three warm tones (pink, yellow, red, orange hues), two or three cool tones (blues, greens and violets), and a few neutrals (white, gray, beige, tan, brown). The lightest tone can be used on top of all others to create highlights.

Step 3
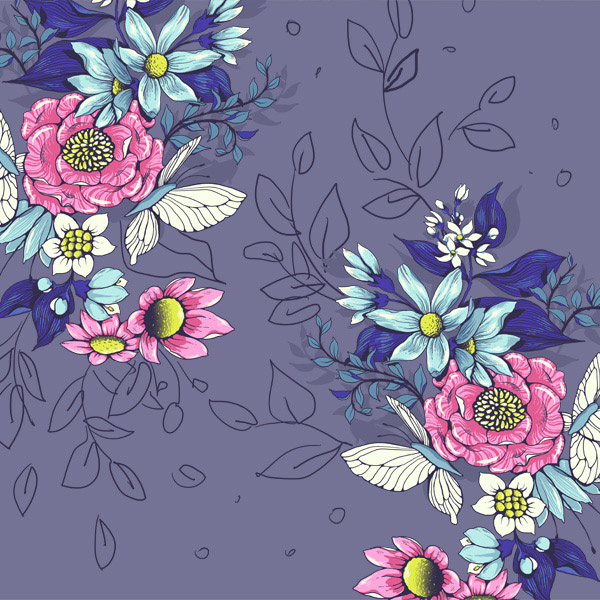
Darker tones can be layered on top of lighter ones to create shadows, like the light blue and gray blue in the example given below.

Step 4
A lighter tone can be used on top of a darker tone to give texture and detail, like the candy stripe pattern on the petals of the pink rose below.

Step 5
Once you have achieved an attractive color palette, you can use the color of your linework to add more shadows between your motifs and layer some additional leaves in the back.
Feel free to keep adding more elements around the core of your design, but start leaving some gaps between them—if your pattern ends up too dense, it can look a bit claustrophobic on the fabric. A balanced mix of dense and sparse parts, along with some open (empty) ground, usually makes for the best fashion floral.

3.Create a Flowing Repeat
Patterns can repeat in many different ways, but the main differentiation we'll make today is between set repeats and flowing repeats.
A set repeat is regular—your main motif repeats in straight or diagonal lines, with each four repetitions forming a square or a diamond shape. Set repeats are often found on prints intended for use in home decor: on wallpapers, curtains, or upholstery.
A flowing repeat is irregular—it attempts to disguise the fact that the motif is repeating at all, trying instead to look as if the elements of the motif were spilled casually across the fabric. It is the most popular type of pattern repeat for use in fashion fabrics and accessories.

Step 1
Creating a flowing repeat requires a bit of intuition. There are no precise rules for it, because the whole point is to achieve a natural scattering of elements. So let's play with our motifs and see what we can come up with.
First, let's group all our layers together, ignoring only the background layer. This is most easily done by selecting all the relevant layers (hold down the Shift key while selecting to select multiple layers at once) and then clicking Control-E to merge them all into one.
Then make a few copies of your new single layer using Control-J, and arrange them next to each other randomly.

Step 2
Move the motifs around and rotate them to see if you can minimize the amount of overlap and large gaps of empty space between the flowers. Note which parts aren't fitting well together, so you can add a few more flowers and leaves to those areas, or delete some which seem to be blocking the pattern flow.
If you feel the design is too dense, move the elements further apart and add some smaller, simpler, and less detailed pieces between them.
Step 3
Go back to your main motif file and add elements to the empty places you marked during the repeat experiment.

Step 4
Paint the newly added elements in the same style as the rest of your motif, but feel free to switch up the colors to include more variety. Also if you are hiding flowers behind leaves, for instance, they might have more shadows and darker colors than similar flowers that aren't obstructed by anything.
When you feel you've added enough elements, merge everything except the background layer once again, and let's try to pull together our final repeat.

Step 5
Make a few copies of your new giant bunch of flowers using Control-J, and start randomly moving and rotating them around until you find an angle at which they seem to fit together well.When you have a few large motifs that look good together, merge them, and then make a copy of the new merged layer and move it down in a straight line by holding down the Shift key while you drag the layer. Place it where it seems to fit the best.
Merge both layers together again and make a new copy, this time Shift-dragging it to the right. Merge everything again. Find one particular point that you can see repeated four times in a regular rectangle, and mark it with your Guides—this is the corner of your final pattern tile.
In the example below it's the pink flower with the large yellow center. You can see it in each corner always in the same place, down and to the right of the crossing Guides.

And You're Done!
You've created a gorgeous, flowing floral pattern that is perfect for printing on fabric. Select your pattern tile using the Rectangular Marquee Tool, click Control-C > Control-N > Control-V to move it to its own perfectly sized canvas, and save it as a JPG or PNG file.
Now you can open an account at Spoonfloweror some other fabric printing website, upload your design, and order a swatch on the fabric of your choice.
Two final tips: first, always read the descriptions of different fabrics and make sure you're getting the one that is the most suited for the type of project you want to do. Natural fibers are always more pleasant to handle, but sadly synthetic fibers handle color a lot better, so you should weigh what's more important to you: bright colors or natural feel.
Second, always order a swatch of your design on the exact fabric you want to use, before you order any larger quantity. Colors get affected by the base color of the fabric, so it's always good to see the print quality and perhaps make color adjustments before making your order.

And now you're ready to order your fabric and sew that dress / duvet cover / cushion / curtain / tote bag! Way to stand out of the crowd, rocking your very own floral design. So cool.
I hope you enjoyed this process, and please let me know if you have any questions about it! Here's that final pattern tile once more:

Original Link:
TutsPlus - Design
More About this Source Visit TutsPlus - Design