
An Interest In:
Web News this Week
- April 27, 2024
- April 26, 2024
- April 25, 2024
- April 24, 2024
- April 23, 2024
- April 22, 2024
- April 21, 2024
Some of Our Sources
- Web Designer Wall
- Pearsonified
- Six Revisions
- Abduzeedo
- You The Designer
- Specky Boy
- Freelance Switch
- Design Modo
- Daily Now
- TechPowerUp
Help Webnuz
Referal links:
Create a Shiny, White and Gold, 3D Text Effect in Adobe Photoshop

Photoshop's 3D environment has multiple tools and settings to create great 3D effects. This tutorial will show you how to use those tools and play around with the settings to create a shiny, elegant, white and gold, 3D text effect. Let's get started!
Tutorial Assets
The following assets were used during the production of this tutorial.
- Panton Black Capsfont
- by Caltha-stock
- by Supertuts007 (load the CSP True Sky Gradients.grd file)
1. Create the Text and Shape Layers
Step 1
Create a new 1500 x 1500 px document, and create the text in All Caps using the font Panton Black Caps. Set the Size to 550 ptand the Tracking value to 100.
The more letters you create, the heavier the scene will be. So it's better to use two or three letters only.
Rename the text layerText.

Step 2
Right click the text layer and choose Convert to Shape. Duplicate the text layer twice, and place the second copy below the original text layer.
Rename the copy on topInner Stroke, and the copy at the bottomOuter Stroke.

2. Modify the Stroke Settings
Step 1
Select the Outer Stroke layer, and pick the Direct Selection Tool.In the Options bar, change the Fill to None, the Stroke Color to Black, and theSize to 25 pt. Then click the Set shape stroke type icon and set the Align to Center.

Step 2
Select the Inner Stroke layer, change the Fill to None, the Stroke Color to White, its Size to 5pt, and set the Align to Inside.

3. Create the Ellipses
Step 1
Pick the Ellipse Tool, click the Settings icon in the Options bar, set the Fixed Size dimensions to 30, and check the From Center box.
Click and drag slightly to create a circle somewhere in the center of the first letter.

Step 2
Click the Combine Shapes icon, and keep creating circles along the letters. Don't add too many ellipses, and make sure to space them out a little bit.
Rename their layerEllipses.

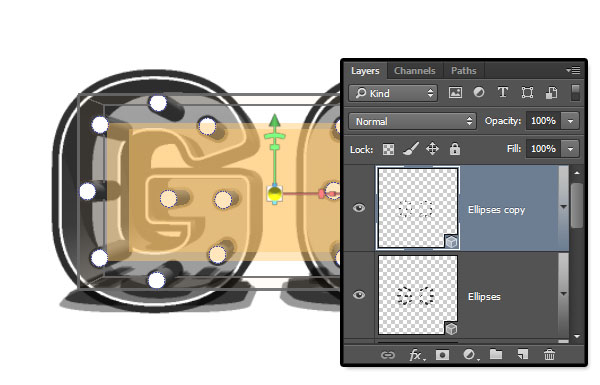
Step 3
Duplicate the Ellipses layer, select it again, and change the Fill to None, the Stroke Color to Black, theSize to 5 pt, andAlign to Outside.

4. Create the 3D Layers
Step 1
For each shape layer you have, select it and go to 3D > New 3D Extrusion from Selected Path.
Step 2
Select all the 3D layers you have, and go to 3D > Merge 3D Layers. This will place them all in one scene. Rename the layer3D Scene.

5. Work With the 3D Scene
Step 1
To access the 3D mesh settings and properties, you’ll need to open two panels: The 3D panel, and the Properties panel (both found under the Window menu).
The 3D panel has all the components of the 3D scene, and when you click the name of any of those, you’ll be able to access its settings in the Properties panel. So make sure to always select the tab of the element you want to modify in the 3D panel before you change its settings in the Properties panel.

Step 2
If you select the Move Tool, you’ll find a set of 3D Modes for it to the right of the Options bar.
When you choose one of those, you can then click and drag to perform changes (on the selected element in the 3D panel). You can also use that to work with the 3D Meshes you have.

6. Modify the Mesh Settings
Step 1
Select the Outer Stroke, Text, and Inner Stroke mesh tabs in the 3D panel, and change the Extrusion Depth in the Properties panel to 100.

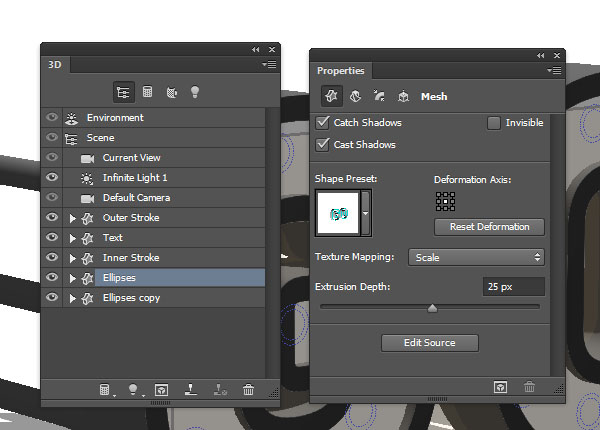
Step 2
Select the Ellipses mesh tab and change the Extrusion Depth to 25.
7. Modify the Cap Settings
Step 1
Select the Outer Stroke mesh tab, and click the Cap icon at the top of the Properties panel.
Change the Bevel Width to 10, the Contour to Cove - Deep, and the Inflate Strength to 7.

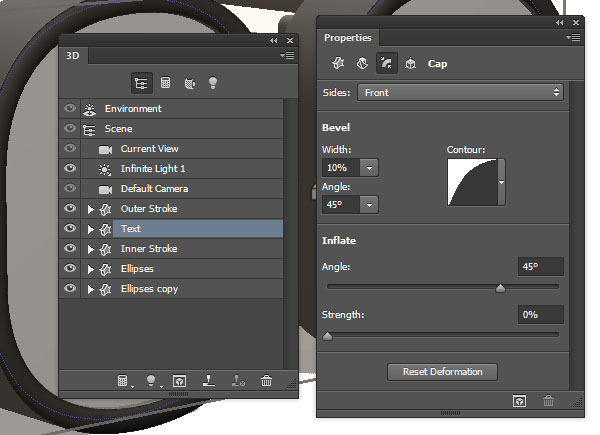
Step 2
For the Text mesh, change the Bevel Width to 10, and the Contour to Half Round.
Step 3
For the Outer Stroke mesh, change the Bevel Width to 28, and the Contour to Cove - Deep.

Step 4
For the Ellipses mesh, change the Bevel Width to 10, the Contour to Ring - Double, and the Inflate Strength to 10.

8. Create the Spheres
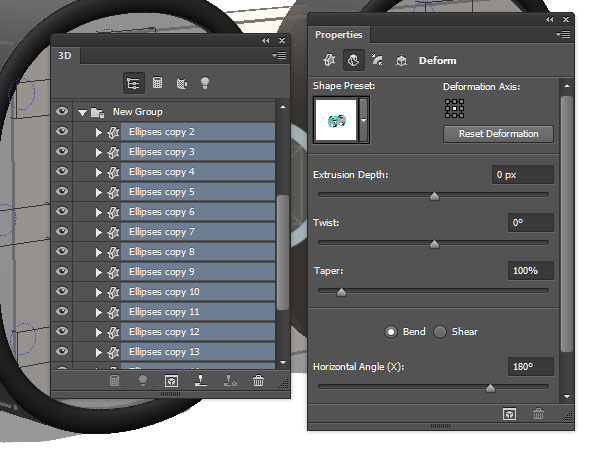
Select the Ellipses copy mesh tab, and go to 3D > Split Extrusion. This will separate the ellipses.
Select all the separated ellipses' mesh tabs, and click the Deform icon at the top of the Properties panel.
Change the Extrusion Depth to 0, and the Horizontal Angle (X) to 180.
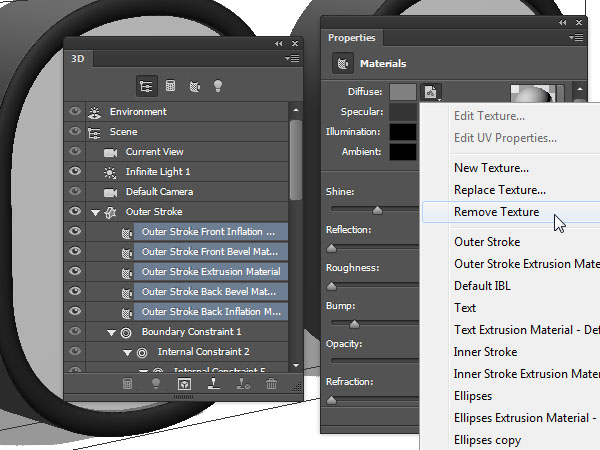
9. Create the Materials
Step 1
Select all the Outer Stroke and the Ellipses mesh material tabs, click the Diffuse texture icon, and choose Remove Texture.
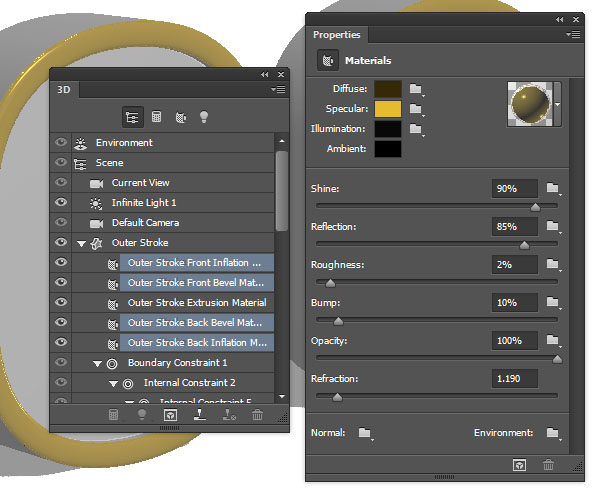
Step 2
Deselect the Outer Stroke Extrusion Material tab, and change the material settings as shown below. The colors in RGB are:
- Diffuse (54, 41, 7)
- Specular (229, 187, 48)
- Illumination (191, 191, 191)
- Ambient (0, 0, 0)
Step 3
Select the Outer Stroke Extrusion Material tab and the Text material tabs, remove the Diffuse texture, and change the material settings as shown below:
- Diffuse (209, 215, 216)
- Specular (134, 143, 144)
- Illumination (0, 0, 0)
- Ambient (0, 0, 0)

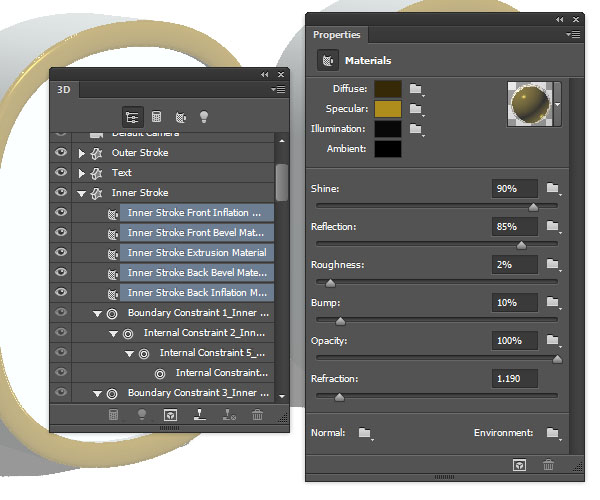
Step 4
Select the Inner Stroke material tabs,remove theDiffusetexture,and change the material settings as shown below:
- Diffuse (54, 41, 7)
- Specular (175, 141, 27)
- Illumination (191, 191, 191)
- Ambient (0, 0, 0)
Step 5
Select all the Ellipses copy material tabs,remove theDiffusetexture,and change the material settings as shown below:
- Diffuse (55, 61, 61)
- Specular (134, 143, 144)
- Illumination (0, 0, 0)
- Ambient (0, 0, 0)

10. Move the 3D Meshes
Step 1
Pick the Move Tool, and use the 3D Axis to move the meshes around.
The arrows at the ends of the axes move the mesh, the part below them is used for rotation, and the cubes are used for scaling. The cube in the center is used to scale the object uniformly. All you need to do is click and drag the wanted part.

Step 2
Move the meshes until you get a result similar to the image below.
You can also keep moving the camera around to see the different angles and make the process easier.

11. Work on the Lighting
Step 1
Select the Infinite Light 1 tab, and change the Intensity to 20% and the Shadow Softness to 30%.

Step 2
Click the Environment tab, and then click the IBL texture icon and choose Replace Texture, and open the place 08 image.

Step 3
Change the Intensity to 65%.

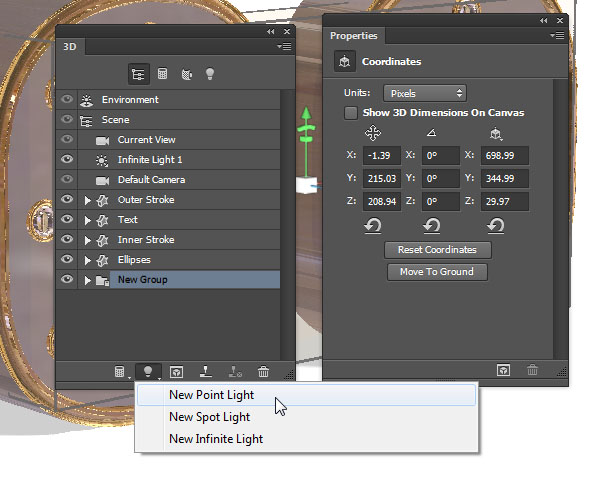
Step 4
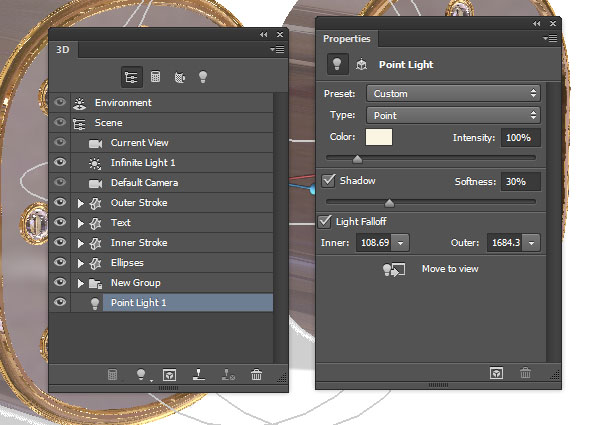
Click the Add new Light to Scene icon at the bottom of the 3D panel, and choose New Point Light.
Step 5
Change the Color to (250, 244, 227) and the Shadow Softness to 30%, check the Light Falloff box, and set the Inner and Outer values to 109 and 1685.
Step 6
What you need to do next is use the Move Tool to move the lights around until you like the result you get.
If the scene feels heavy, it might help if you downsize the document by going to Image > Image Size, and typing in any new dimensions you like. For this tutorial, a 1000 x 1000 pxdocument seemed to work fine.

12. Render the Scene and Adjust the Lighting
Step 1
Go to 3D > Render. The rendering might take a while, but you can stop any time by pressing the Esc key.
Once the rendering is done, right-click the 3D Scene layer, and choose Convert to Smart Object.
Fill the Background with the color #dbd7d2.

Step 2
Click the Create new fill or adjustment layer icon at the bottom of the Layers panel, and choose Gradient Map.

Step 3
Use the gradient fill shown below, and check the Dither box. Then, change the adjustment layer's Blend Mode to Color Burn, and its Opacity to 30%.

This will enhance the coloring of the final result.

Congratulations! You're Done
In this tutorial, we created a simple text, converted it to a shape, and then modified a couple ofotherstroke and shape layers.
After that, we converted the shape layers into 3D layers, and worked on their mesh and material settings.
Then, we adjusted the lighting of the scene and rendered it.
Finally, we added a gradient map to enhance the coloring of the final result.
Please feel free to leave your comments, suggestions, and outcomes below.
Original Link:
TutsPlus - Design
More About this Source Visit TutsPlus - Design