
An Interest In:
Web News this Week
- April 27, 2024
- April 26, 2024
- April 25, 2024
- April 24, 2024
- April 23, 2024
- April 22, 2024
- April 21, 2024
Some of Our Sources
- BoingBoing
- The Logo Smith
- Inspiredology
- Noupe
- Crazy Leaf Design
- My Ink Blog
- Wal You
- Freelance Switch
- Android Headlines
- The Verge
Help Webnuz
Referal links:
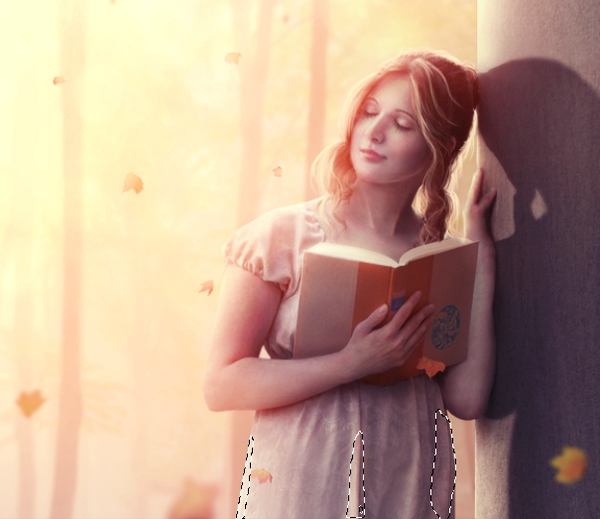
Create a Dreamy Autumn Photo Manipulation Scene With Adobe Photoshop

In this tutorial I'll show you how to create an emotional autumn scene featuring a dreaming girl. You'll learn how to blend different images properly using adjustment layers, masking and brushes. You'll also learn how retouch a model using basic Adobe Photoshop tools, enhance color and contrast, and create lighting and depth of field.
Tutorial Assets
The following assets were used during the production of this tutorial:
1. Add the Forest
Step 1
Create a new 1172 x 1106 px document in Photoshop with the settings below:

Step 2
Open the forest image. Use the Move Tool (V) to drag this image into the
white canvas and convert this layer to a Smart Object. Use the Free
Transform Tool (Control-T) to resize it as shown below:

Step 3
Go to Filter > Blur > Gaussian Blur and set the Radius to 4 px:

This step is to add some depth to the scene.
Step 4
We're aiming to create a soft foggy background with the main
light coming from the left. Go to Layer > New Adjustment Layer >
Curves and increase the lightness:

On this layer mask, use a soft round brush with black color (soft black
brush) with the Opacity about 30% to reduce the lightness on the right
side which is further from the background light.


Step 5
Use a new fill color layer to reduce the forest visibility. Go to Layer
> New Fill Layer > Solid Color and pick the color #8898af:

Lower the Opacity of this layer to 30%:

Step 6
To create the main light source, make a new layer and use a large, soft, white brush to paint on the top left of the scene.

Add a mask to this layer, and use a soft black brush to reduce the light
intensity and avoid making the light too strong and obvious.

Step 7
Use a Color Balance adjustment layer and change the Midtones settings:

2. Isolate the Model and Paint the Hair
Step 1
Open the model image and extract her and the column from the background. Place this extracted one onto a new layer. Make a new layer between the background and the extracted one, and fill with any medium dark colors so you can see the hair painting result in the next steps more clearly.

Step 2
We'll be adding more hairs to the model's head. Create a new layer and change
the foreground to #3e281a (picked from the model's head). Select a hard brush and press F5 to change
the settings for this brush:


Use this brush to paint some dark brown hairs:

Step 3
Change the brush color to #735539 and paint the lighter hairs and cover some of the dark ones.

Step 4
Create a new layer and use a brush with a bright yellow color (I chose #a87e56) to paint the tiny fuzzy hair out of the head and the curls.

3. Retouch the Model
Step 1
Hide the background and the fill color layers. Press Control-Shift-Alt-E
to merge all transparent layers (the extracted model and the hair
ones). Drag the merged model into the forest document and place her on the right side:

Step 2
We'll start doing some basic retouching for the model by using the
Liquify filter. Go to Filter > Liquify and select the Forward Warp
Tool (W):

Use this tool to make the face and neck a bit slimmer, also the mouth
narrower and the chin longer. Don't overdo it as it would look unatural.


Step 3
There are some unwated details on the column and the wrinkles of the dress:

To refine them, make a new layer and set
it as Clipping Mask. Select the Clone Tool (S) to clone over these indicated
details.

Step 4
Make a new layer and use a soft brush with the color #b497a0, the
Opacity and Flow about 22–30% to brighten and soften some parts of the
skin, especially on the arms and the face:

Step 5
Use a new layer and a soft brush with the color #cec7c9 to bring more
lightness and softness to the arms, fingers and face. You may notice that some of the
facial features are removed and the face looks somehow unatural. Don't
worry, we'll use other tools to refine them later.

Step 6
Create a new layer and use a soft brush with the color #826b72 to paint
some shades on the model face and body where are hidden from the light.
Set this layer mode to Multiply 100%:

Step 7
Make a new layer (set as Clipping Mask), change the mode to Overlay 100% and fill with 50% gray.

Select the Dodge and Burn Tool (O) with Midtones Range, Exposure about
20–30% to refine the light and shade of the model and column. You can
see how I did it with Normal mode and the result with Overlay mode:


4. Add the Model's Shadow
Step 1
In this step we'll be adding shadow to the model. In the original stock
image, the light is very soft and the contrast is low, so the shadow is
almost unseen. But in the existing image, the light and contrast are
increased so the shadow should be morevisible.
Make a new layer and use the Polygonal Lasso Tool (L) to select the
model (no need to be so precise). Fill this layer (Shift-F5) with
black:

Convert this layer to a Smart Object and flip it horizontally (Edit >
Transform > Flip Horizontal). Move this shadow to the right:

Step 2
Lower the Opacity of this layer to 50% and add a mask to it. Use a soft
black brush to remove the shadow part overlapping the model. Also
reduce the opacity of the further shadow part (from the model position):

Step 3
Go to Filter > Blur > Gaussian Blur and change the Radius to 4 px:
On the filter mask, use a soft black brush to reduce the blur effect on
the part nearer the model as it must be harder and more solid:

Step 4
Create a new layer and use a semi-soft black brush to paint the missing shadow under the model fingers which lean on the column:

5. Adjust the Color of the Model
Step 1
Select the model layer and all the relevant ones (including the shadow
ones) and press Control-G to make a group for them. Change the mode of
this group from Pass Through (default group mode) to Normal 100%. Create
a Hue/Saturation adjustment layer and change the Master, Reds, Yellows,
Blues and Magentas values:


Step 2
Make a Photo Filter adjustment layer and pick the color #e8b279 to add some warm tone to the model:

6. Add the Leaves
Step 1
Open the leaves image. Select different leaves and arrange them around
the model. You should use Control-T to resize and distort them to make
them appear different:

Step 2
Add more leaves to the space and apply a Gaussian Blur of 4 px to each
of them. The blurred ones willl bring more depth to the scene.

Step 3
Make a group for the leaves using Control-G. The leaves look dark
compared to the background, so add a Curves adjustment layer and
increase the lightness:

On this layer mask, use a soft black brush to erase the effect on the
leaf beside the book and a part of the one near the foreground, since these are less illuminated by the light:

Step 4
Create a Hue/Saturation adjustment layer and reduce the Saturation value to -54:

Step 5
Some
of the leaves still look obvious on a foggy background. To correct it,
add a mask to the leaves group and use a soft black brush with the
Opacity lowered to 20–25% to paint on them to reduce their visibility
and blend them better with the background:

7. Add the Bokeh and Light
Step 1
Move the bokeh image onto the upper half of the scene and change the mode to Screen 100%:


Step 2
Add a mask to this layer and use a soft black brush to remove the bokeh
effect on the model and make it appear mostly on the forest background.

Step 3
To match the softness of the bokeh effect with the forest, go to Filter > Blur > Gaussian Blur and set the Radius to 8 px:

Step 4
Use a Hue/Saturation adjustment layer (set as Clipping Mask) and change the Master settings:

Step 5
To
add light to the left side, create a new layer and take a large, soft
brush with the color #ff9976 to paint on the top left. Change this layer
mode to Hard Light 100%:


Use a layer mask to reduce the light opacity on the right side where the light is less reflected.

8.Apply the Final Adjustments
Step 1
Make a Photo Filter adjustment layer on top of the layers and pick the color #f1e795:

Step 2
Create a Gradient Map adjustment layer and pick the colors #66a1c3 and #7790f9. Change this layer mode to Soft Light 100%:

Step 3
Make another Gradient Map adjustment layer and change the colors to #3a3469 and #ffcd75. Set this layer mode to Soft Light 50%:

Step 4
Add a Color Balance adjustment layer and change the Midtones and Highlights settings:


Step 5
Create a Curves adjustment layer and increase the lightness:

On this layer mask, use a soft black brush to erase the area around the middle section to reduce its brightness and avoid losing the details.

Step 6
Use another Curves adjustment layer and decrease the lightness.

On this layer mask, use a soft black brush to erase the left side and the middle to maintain the brightness there:

Step 7
Create a Selective Color adjustment layer and change the Reds settings:

Step 8
Make a Vibrance adjustment layer to boost the color:

Step 9
Make a new layer and use a semi-hard brush with the color #ffe5c1 to
paint lighter fuzzy hairs in where you think the head is illuminated.

Step 10
Change the brush color to a brighter one (#fffdcc) and start painting more highlights for the hair:

Step 11
Create a new layer and use a soft brush with the color #ffdfbf to paint
on the dress to make some details brighter. Change this layer mode to
Overlay 50%:
Step 12
In the final step we'll make shadow for the hairs which we've painted in
the previous steps. Make a new layer within the model group (above the
shadow layer and under the adjustment layers), and use a soft black brush
with the Opacity about 20–30% to paint on the column where the shadow
should be cast.

Congratulations, You're Done!
I hope you've enjoyed this tutorial as much as I did. Feel free to share your comments and feedbacks in the box below—I'd love to see them. Enjoy photoshoping!

Original Link:
TutsPlus - Design
More About this Source Visit TutsPlus - Design