
An Interest In:
Web News this Week
- April 26, 2024
- April 25, 2024
- April 24, 2024
- April 23, 2024
- April 22, 2024
- April 21, 2024
- April 20, 2024
Some of Our Sources
- Smashing Apps
- Creative Curio
- Fuel Your Creativity
- Noupe
- CSS Globe
- 24 Ways
- CSS Tricks
- Design Modo
- Android Headlines
- TechPowerUp
Help Webnuz
Referal links:
Photoshop For Kids: Up, Up, and Away!

When I was a kid, I used to love to pretend that I had super powers. I'd imagine myself flying high over a city that was under my protection from villainy in all its forms! (OK, so sometimes I still do that.) But I found that my kids are no different. So my daughter was excited to be part of a project that made her look just like a heroine from her comic books.
This tutorial is intended to be done as a team effort between parent and child. As a parent you will help get the photos needed for the project, plus get everything set up in Photoshop. Then your super kid will learn how to use some filters and masking to bring this image to life! Finally, there's a bonus comic-book effect that you will both work on together.
1. Setting Up the Shots
It's important to have a good vision for how the final project should turn out before taking the photographs. It's easier to change positions, and take several photos, during a photo shoot than it is to try to force something in Photoshop later on.
Step 1
The city needs you! What city? Well, whichever one you can find a good picture of! The establishing city shot is what dictates the poses you will need, so be sure to sort that out first. You can download the one we used here: Aerial shot of city.

Step 2
Now it's time to put together a costume! Most kids have several different elements of a hero-type costumes readily available. Even if they don't, capes are easy to create with a length of fabric. Get them to use their imagination and help out in crafting the best look for their hero!

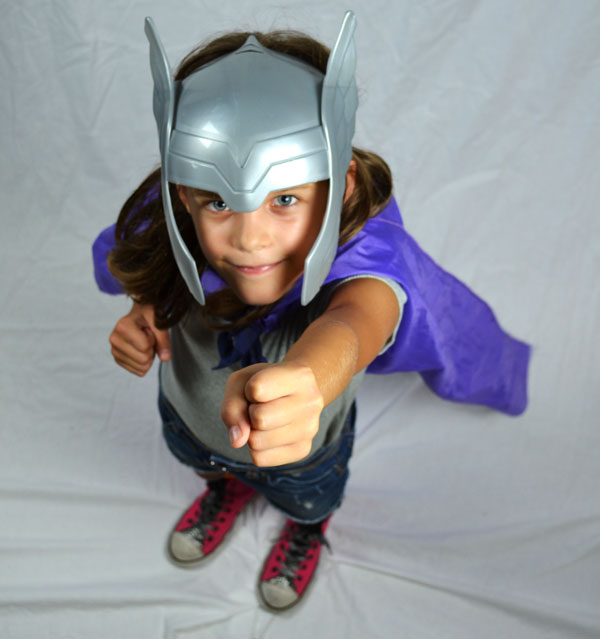
Step 3
Pay close attention to the angle of the city shot. The shot we are working with needs to have an overhead angle. I found climbing up on a stepladder and shooting down towards my little heroine worked just right!

Step 4
Have fun with it! I find the kids to be much more agreeable to posing if I let them suggest other poses just for fun and giggles. Enjoy the time playing around and imagining super-powered battles!

2. Processing the Shots
Before setting your youngster loose on the digital project, spend a bit of time getting things prepared to make their portion of it go smoothly. If you can solve potential problems before they encounter them, they will have more fun and be more excited about the very idea of this project.
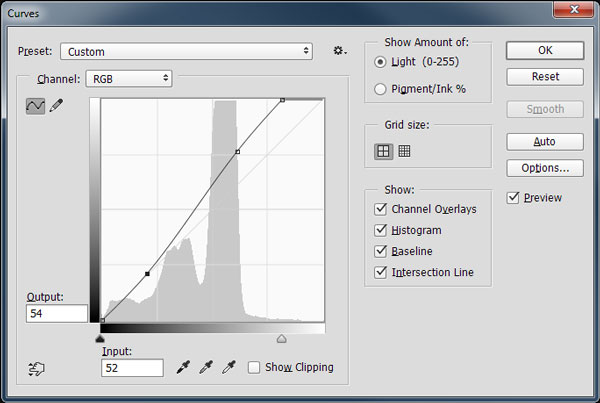
Step 1
Select an image to work with and open it in Photoshop. Begin by addressing any lighting or color issues with the image. One of the best ways to do this is with Image > Adjustments > Curves. Move the curve points to meet the edges of the histogram. Then give a slight S-shape to the curve to increase the contrast of theimage.
Step 2
Now use the Quick Selection Tool (W) to highlight the figure by painting just inside the edge. If the tool selects an area you don't want, hold down the Alt key and paint over that area to Deselect it.

Step 3
Press the Refine Edge button and increase the Radius slider slightly, and push up on the Smooth slider and the Feather slider until the jagged areas around the selected edge disappear. Change the Output to Layer Mask and press OK.

Step 4
Drag the masked hero layer over onto the tab for the city image. When the program shows the city image, drop the layer onto it.

Step 5
Go to Edit > Free Transform (Control-T) and use the transformation cage to scale and rotate the heroine image into place. You want the image to line up with the lines formed by the buildings.

Step 6
Duplicate the layer with Layer > Duplicate Layer. Double click on the name for the original layer and rename it"Blur".

Step 7
Apply the layer mask of this Blur layer by going to Layer > Layer Mask > Apply. The mask thumbnail will disappear because the mask has now been applied to thelayer.

Step 8
Add a Hue/Saturation adjustment layer over the City background layer. Pull down on the Saturation slider to -30. This reduces the color of the background and makes the bright color of our heroine stand out more.

Step 9
Now add a Curves adjustment layer on top of the stack and press the Auto button in the Curves Properties. This adjusts the curve to enhance the contrast of the entire image.

OK, now it's time to call in the younger creative member of this team
and release their real super power! Just be sure to be on hand just in
case they need a bit of assistance from their older sidekick.
3. Hey Super Kids!
Thanks for being so helpful in this project. I bet your costume looks amazing! Are you ready to make yourself fly high over the city? Your parent has gotten things started here, but we really need your help to make this project look great!
Step 1
Towards the right side of the screen you will see a Layers panel. In that panel find the layer called Blur and click on it to make sure it is the active layer. You can tell it is active by the little white outline around the picture of you!

Step 2
Look at the menus at the top of the screen and go to Filter > Blur > Motion Blur. When the new window comes up, try to change the angle to match the buildings in the background. We used -65 degrees. Then adjust the Amount to 600 pixels and press the OK button.

Step 3
Press the V key to get the Move Tool. Then move the blur layer down and towards the right so it's all below your picture, and there's none of it showing above your head.

Step 4
Now go to Edit > Transform > Warp and you will see a type of cage around the blur. Move the bottom corners in towards the center to make the blur look smaller at the bottom. Then press the Enter key to finish the warp. This makes it look as if you've flown up from those buildings really, really fast!

Step 5
Grab the Brush Tool (B) and look up at the top of the screen where it shows the brush options. Click on the the little brush tip icon to open the Brush Options Menu. Select the Soft Round brush from the list and set the Size to 150 px and the Hardness to 0%.

Step 6
Now look back at the Layers panel and look for the little picture of you with a little black and white box next to it. This box is the Layer Mask. It controls what parts of that layer can be seen. Click on it to make it active. Then make sure the paint color is black and use your brush like a type of eraser to remove your feet. You want the blur to blend in with the rest of your hero costume.

Step 7
Now click on the Background layer to make it active. Go to Filter > Blur > Gaussian Blur and enter a Radius of 7 pixels. This makes the background blurry so it really looks like a background!

Nice work, Super Kid! You are saving the city in style now!

In the next few steps you can add some special filters to make the
picture look as if it's in a comic book. But you will probably need the
help of your big sidekick, so make sure they are right here to help!
4. Add a Comic Book Effect
At this point the project should already look pretty impressive. In fact, stopping here is a good option. But if you want to push forward with some more filter work, you can get the image to look almost as if it was pulled right out of a comic book!
Step 1
Click on the topmost layer (it's the Curves adjustment layer.) Hold down the Alt key and go to Layer > Merge Visible. This creates a merged layer of all the layers in the project. Do this twice to create two merged layers.

Step 2
Hide the top merged layer by clicking on the eyeball icon next to its thumbnail. Then click on the thumbnail of the second merged layer to make it the active layer.

Step 3
Go to Filter > Filter Gallery. Open the Sketch folder and select the Halftone Pattern filter and make these settings:
- Size: 5
- Contrast: 15
- Pattern Type: Dot

Step 4
Then set the layer's Blend Mode to Overlay and reduce the Opacity to 30%.

Step 5
Now reveal the top merged layer and make it the active layer. Then go to Filter > Filter Gallery and choose the Photocopy filter from the Sketch folder, selecting the following settings:
- Detail: 5
- Darkness: 50

Step 6
Set this layer's Blend Mode to Multiply. This will render the white areas invisible while the black lines appear to be comic ink lines right from your favorite graphic novels!

You Are Done!
Here she comes to save the day! Nice work! We'd love to see your results too. Post them in the comments below so we can create our own league of Mighty Kids!

Want More?
I hope you and your child had as much fun with this project as my daughter and I did! I've got more Photoshop for Kids! tutorials along with some photo manipulation projects, custom brushes, and even more Photoshop fun. Check out my profile here at Tuts+ for my other tutorials, quick tips, and courses.
Original Link:
TutsPlus - Design
More About this Source Visit TutsPlus - Design