
An Interest In:
Web News this Week
- April 28, 2024
- April 27, 2024
- April 26, 2024
- April 25, 2024
- April 24, 2024
- April 23, 2024
- April 22, 2024
Some of Our Sources
- TutsPlus - Code
- Pearsonified
- Spoon Graphics
- Smashing Magazine
- Abduzeedo
- Creative Curio
- Inspiredology
- Freelance Switch
- Dev To
- The Verge
Help Webnuz
Referal links:
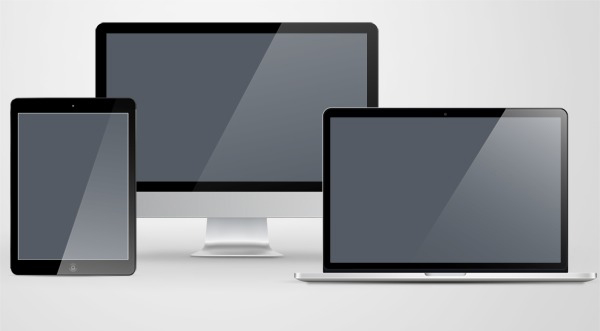
Create a Responsive Screen Mockup Using Smart Objects in Adobe Photoshop

Smart Objects are one of the most powerful features in Photoshop. In this tutorial, you'll learn how to prepare a group of computer screens as a mockup, and then add Smart Object layers to the screens. Once everything is set up, you can change all of the screen images at once by updating the Smart Object. Each Smart Object can contain multiple layers, making it super quick and easy to change up your presentation.
1. Prepare the Mockup
Step 1
I'm starting with three different products. You can find isolated product shots on PhotoDune or GraphicRiver, and you can use as many as you like in your composition. This particular file has separate layers for the products, their shadows, and the glare on each screen.

Step 2
Prepare a separate layer for each screen. Take the Rectangle Tool (U) and draw a rectangle the same size as each screen. Alternately, you can use the Rectangular Marquee Tool (M) and fill the selection with pixels. Whichever method you use, the "screen" must be on a separate layer.

I prefer to use a Shape Layer because it is easier to make fine adjustments to the shape using the Free Transform (Command-T) command.

Step 3
Make a screen layer for each of the other screens. You can fill
the shapes with any color. These "screen" layers will be used later to mask the Smart Objects. Your mockup should now look something like
the image below:

Step 4
It's a good idea to do some housekeeping at this point. Naming and organizing layers will save you time in the long run. In the image below, I have color-coded all of the layers that belong to each product. To change a layer's color, click on the layer to highlight it, and then click the flyout menu on the side of the Layers panel and choose Layer Properties.

You can even create Layer Groups for each product. Select all the layers that belong to one product, and click the flyout menu on the Layers panel. Choose New Group from Layers, as in the image below. You can then color the entire group by choosing Group Properties from the flyout menu.

2. Set Up the Smart Object
Step 1
I'm using a screenshot of the Tuts+ website. Drag the screenshot into the mockup PSD. Move its layer above the Desktop Screen layer. To convert this layer to a Smart Object, you can do one of three things:
- Go to the Layer menu to Smart Objects> Convert to Smart Object.
- Click the flyout menu on the Layers panel and choose Convert to Smart Object.
- Right-click the layer in the Layers panel and choose Convert to Smart Object.
Note: Do not re-size the layer to fit the screen before converting it to a Smart Object.

Step 2
Now you can resize the Smart Object to fit the width of the desktop screen. Press Command/Control-T and use the handles to resize the image. You'll notice a subtle visual cue when working with a Smart Object: the transform handles on a Smart Object are solid, whereas the handles on a regular pixel layer are hollow. Leave the Smart Object hanging off the bottom of the screen for now. If you want, rename the Smart Object layer.

Step 3
Make a duplicate of the Smart Object layer by dragging it to the New Layer icon on the bottom of the Layers panel.

Step 4
Drag the Smart Object copy above the Laptop Screen layer. As you did before, use Free Transform to re-size it to fit the width of the tablet screen. Again, you can leave it extending beyond the bottom of the screen for now.

Step 5
Make another copy of the Smart Object and place it above the Tablet Screen layer. As before, resize it to fit the width of the tablet screen. Do not worry about the excess length.

Step 6
Now that all the Smart Objects are in place, you can clip them to their respective screens. This will mask off the part of the image that extends beyond the bottom of the screen, but it won't actually crop the screenshot. First, select the Smart Object layer, and then click the flyout menu on the Layers panel and choose Create Clipping Mask. You can also use the keyboard shortcut, as shown.

Alternately, you can hold down the Option (Alt) key and click between the two layers. You'll see the cursor change to double circles to let you know you're in the right spot.

Once the clipping mask is created, the screenshot should fill the dimensions of the screen. You'll also see the layer thumbnail has shifted slightly to the right, and has a small downward arrow. This indicates that the Smart Object layer is "clipped" to the layer below. This is why we created those screen layers earlier.

Here is the mockup, with all the Smart Objects clipped to their respective screens:

3. Edit the Smart Object
Step 1
Now that the Smart Object and its copies are in place, you can change the image on all three screens by editing the original Smart Object. Double-click the Smart Object thumbnail to edit. You'll see the following message. Once you become accustomed to working with Smart Objects, you can choose to turn off this warning dialog.

The Smart Object opens as a separate, special file. The file extension is .psb:

Step 2
To edit the Smart Object, I'm just going to drag a different screenshot on top of the existing one. There is no need to flatten the image, as Smart Objects can have multiple layers.

Step 3
Close and save the .psb file. Now the new screenshot will appear on all three screens. There is no need to edit the other two Smart Object layers, because each one is a copy of the original.

You can add or change the image as many times as you like. You could store several screenshots inside the layers in the Smart Object, to quickly present different versions in the same Photoshop document.

Conclusion
Product mockups such as these are a great way to present different designs to a client. Because the Smart Object layers are copies of the original, all three screens can be updated at once. And because multiple screenshots can be stored inside the layers of the Smart Object, you can keep everything in one neatly organized PSD.
Original Link:
TutsPlus - Design
More About this Source Visit TutsPlus - Design