
An Interest In:
Web News this Week
- April 28, 2024
- April 27, 2024
- April 26, 2024
- April 25, 2024
- April 24, 2024
- April 23, 2024
- April 22, 2024
Some of Our Sources
- Mashable
- TutsPlus - Code
- Smashing Apps
- Six Revisions
- You The Designer
- My Ink Blog
- Fudge Graphics
- CSS Tricks
- Android Dissected
- Codrops
Help Webnuz
Referal links:
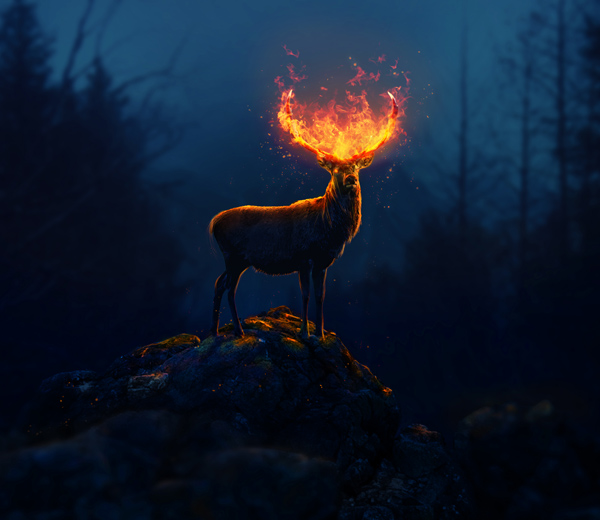
How to Create a Fantasy Flaming Deer With Adobe Photoshop

In this tutorial I'll show you how to create a fantasy deer with a fire effect. You'll work with blending and adjustment layers to combine different stock images into a cohesive scene. You'll also learn how to work with fire, create a lighting effect and enhance the depth of field.
Tutorial Assets
The following assets were used during the production of this tutorial:
1. Creating the Background
Step 1
Create a new 2000 x 1734 px document in Photoshop with the settings below:

Step 2
Open the landscape 1 image. Drag it into the white canvas using the Move Tool (V) and convert it to a Smart Object.

Step 3
Go to Filter > Blur > Gaussian Blur and set the radius to 8 px:

Step 4
Open the landscape 2 image. Add it to our working document using the Move Tool:

Click the second icon at the bottom of the Layers panel to add a mask to
this layer. Use a basic, soft brush with black color (soft black brush)
to erase the sides of the landscape and reveal landscape 1 as shown below:

Step 5
Go to Filter > Blur > Gaussian Blur and change the radius to 8 px.
This step is to match the softness of landscape 2 with that of landscape 1.

Step 6
Use an adjustment layer and set it as Clipping Mask to darken landscape 2. Go to Layer > New Adjustment Layer > Curves and
decrease the lightness:

Step 7
Make a Color Balance adjustment layer (set as Clipping Mask) to change the color of landscape 2. Set the Cyan value of Midtones to -17:

2. Adding the Rock
Step 1
Open the rock image. Select the rock only using the Polygonal Lasso Tool (L):

Place the rock in the foreground and flip it horizontally by choosing
Edit > Transform > Flip Horizontal. Remember to convert this layer
to a Smart Object.

Step 2
To make a better look for the rock, add a mask to this layer and use a hard black brush to remove some upper
rock areas. Remember to follow the rock structure:


Step 3
On the rock layer, select an upper rock area. Right click it, and choose Layer via Copy:

We now get this selected rock part on a new layer. Set this layer under
the big rock one and use the Free Transform Tool (Control-T) to make it smaller:

Step 4
On the big rock layer, go to Filter > Blur > Gaussian Blur and change the radius to 8 px:

On this filter mask, use a soft black brush to erase the middle of the
rock to make it look separated from the rest, and it will help to create a
depth of field. You can see the results on the filter mask and on the
picture:


Step 5
Create a new layer and activate the Clone Tool (S). Use this tool to remove some unwanted white details on the rock:


Step 6
Select all the rock layers and the clone one, and then press Control-G to
make a group for them. Change the mode of this group from Pass Through
(default group mode) to Normal 100%. Create a Curves adjustment layer
within this group to darken the rocks.

On this layer mask, use a soft black brush to erase the upper part of
the rock and some other details as we've aimed to add light there.

3. Darken the Scene
Make a Curves adjustment layer on the top of the layers to darken the whole scene.

4. Adding the Deer
Step 1
Open the deer image. Isolate him from the background and place him onto the rock:

Add a mask to this layer and remove the two small horns on the middle top of the deer's head:

Step 2
To make some changes for the horns, go to Edit > Puppet Warp. Add the
points to hold the body and head areas, and then move the points on the
horns to make them higher and nearer to each other.

Step 3
Create a new layer (set as Clipping Mask), change the mode to Overlay 100% and fill with 50% gray:

Activate the Dodge and Burn Tool (O) with Midtones Range, Exposure varied
from 10–50% to correct the light and shade on the deer. You can see how I
did it with Normal mode and the result with Overlay mode:

Step 4
Create a Color Balance adjustment layer (set as Clipping Mask) and change the Midtones settings:


Step 5
Add a Curves adjustment layer to darken the deer.

On this layer mask, use a soft black brush to erase the following parts, as they're dark already or will be illuminated by the firelight.

Step 6
Create another Curves adjustment layer to reduce the deer contrast, especially on the lower body part.

On this layer mask, use a soft black brush to erase the rest of the deer, especially the horns:

5. Changing the Color and the Look of the Eyes
Step 1
Create a Gradient Map adjustment layer to change the color and lightness
of the whole scene, pick the colors #061947 and #5fb1f7. Change this
layer mode to Soft Light 100%:

Step 2
Make a new layer and change the foreground to #fd802d. Use a small, soft
brush with this color to paint inside the deer eyes to create a fiery
look.

Double click this layer, choose Outer Glow and pick the color #fd802d to add a glowing effect to the eyes.


6. Adding the Fire Effect
Step 1
Open the fire images pack. We'll use image 8 and image 30 to add to
the deer horns. Select a fire part in image 30 using the Lasso Tool.

Place this fire part onto one of the horns and change the mode to Screen 100%:

Add a mask to this layer and use a soft black brush to erase the white hard edges:

Step 2
Take other parts from the fire image and add them to the horns using the same method. You can duplicate, transform, and rotate these layers using Control-T if needed.

Don't worry about the white hard edges, because we'll fix them later.
Step 3
Open image 8. Use the same techniques to take different fire parts to add to the horns to make the fire there
thicker and more intense.

Step 4
Make a group for all the fire layers and change this group mode to
Screen 100%. Create a Levels adjustment layer above all the fire layers
and increase the Shadow value of Input to 48 to remove the white hard
edges completely.

7. Adding the Lighting Effect
Step 1
We'll add some fire light absorbed on the deer and the rock. Make a new layer under the fire group and
use a soft brush with the color #ea6842 to paint along the deer horns,
body and head, and on the rock. Change this layer mode to Overlay 100%:


Step 2
Create a new layer and change the brush color to #f6d778. Use this brush
to paint on the deer horns, body and the rocks to add some highlights
there. Change this layer mode to Overlay 100%:


Step 3
On a new layer, use a soft brush with the color #fc994b to make the
light on the deer and rock stronger. Set this layer mode to Overlay
100%:


Step 4
Make a new layer and use a hard brush with the color #fc994b to paint
some small glowing furs along the deer's body, legs and head. Also lower
the brush Opacity to 10–15% to paint a subtle light effect on the
blurred rocks in the foreground:

Step 5
Create a new layer and use a soft brush with the color #fc994b to paint a more glowing effect for the fire on the head. Change this layer mode to
Hard Light 100%:

Step 6
Make a new layer and change the brush color to #ea6842. Press F5 to change the settings for this brush:


Paint some glowing, scattering dots around the fire area:

8. The Final Adjustment
Step 1
Make a Vibrance adjustment layer on the top of the layers. On this layer mask, use a soft black brush to erase the fire area to keep its glow.

Step 2
Create a Hue/Saturation adjustment layer and increase the Saturation
value to 52. On this layer mask, use a soft black brush to erase the
upper half and the blurred rocks to make sure they're not affected by this
adjustment layer.

Congratulations, You're Done!
Here is the result you should get with this tutorial. Feel free to share your opinions and feedback in the comment box below—I'd love to see them. Enjoy photoshopping!
Original Link:
TutsPlus - Design
More About this Source Visit TutsPlus - Design