
An Interest In:
Web News this Week
- April 17, 2024
- April 16, 2024
- April 15, 2024
- April 14, 2024
- April 13, 2024
- April 12, 2024
- April 11, 2024
Some of Our Sources
- Mashable
- Techcrunch
- Technology Review
- Joshua Blankenship
- Naldz Graphics
- Fudge Graphics
- Line 25
- Wal You
- Spyre Studios
- TechPowerUp
Help Webnuz
Referal links:
Creating a WordPress Contact Form Complete Guide
Ill make you an offer you cant refuse.
Ill tell you how to create a WordPress contact form, covering every imaginable detail, and making sure you wont be reading only code and industry jargon.
So, this article is suitable for beginners and those who already have some experience and wish to get the most from a basic contact form in terms of security and user experience.
Now, get your fingers cracking and lets start.
How to create a contact form in WordPress with a plugin?
The contact form plugin method is the simplest and fastest. Though there are some security limitations and plugins arent as flexible as coding stuff yourself.
Here Ill use WPForms (the WPForms Lite free version) as its most reliable and straightforward. Another honourable option to consider is Ninja Forms.
Whichever plugin you choose, it might be worth considering installing auxiliary add-ons like Jetpack for advanced spam control and security. I wont be going into details of that here, since I cover security, validation, and sanitization the fun way I tell you how to code it yourself.
Here goes the step-by-step tut to install and use arguably the best WordPress contact form plugin.
Step 1: Install and Activate the WPForms Plugin
Go to the sidebar WordPress admin panel. Then, navigate to Plugins > Add New, look for WPForms.
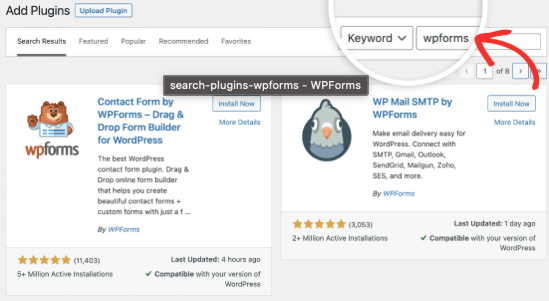
Now, click on the grey Install Now button next to the plugin called Contact Form by WPForms.

The last thing to do is activate the plugin.

Step 2: Create a New Contact Form
After activating WPForms, navigate to WPForms > All Forms in the WordPress dashboard. Then, click the Add New button to open the WPForms drag-and-drop form builder.

In the form builder plugin, give your contact form a name, then select the contact form template. WPForms Lite comes with a few free form templates.
For simplicity, I selected the Simple Contact Form template; itll automatically add the Name, Email, and Message fields. But if youre a small business or ecommerce, the RFQ, Billing, or newsletter signup forms would also work.

Step 3: Customize your form
Click on a form field to bring up a Field Options panel on the left to make changes to the field label or other form settings. You can also use your mouse to drag and drop the fields to change the order.

Here, Im doing a user-friendly Contact Us form without fancy fields. You can create any other type of registration form and align it with your WordPress themes if necessary.
Pro Tip: Dont go overboard with the fields as itll affect form submissions. 3 to 5 fields is usually more than enough.
Step 4: Save your form
Once youre done customizing your form, make sure to click the Save button.

Step 5: How to add a contact form to a Page
You can add it to an existing contact page or create a new page in WordPress. To create a new contact form page, go to Pages > Add New and give your page a name.
Use the WPForms block to add the form to the page.
Click the Plus add block button and search for WPForms. Select the simple form you created earlier from the drop-down menu. WPForms will load the contact form preview inside the editor.

Finally, click Publish or Update to save your form.
Step 6: Using WordPress plugin shortcodes
WPForms comes with a WordPress contact form shortcode. You can use it by visiting WPForms > All Forms and then copying the shortcode next to your form.

Open the page builder where you want to add the shortcode, click the Plus add block button, and search for Shortcode.
Paste the shortcode that you copied above into the box, then click Update or Publish.
How to create a simple contact form in WordPress without a plugin?
Here, Ill tell you how to create more advanced forms without any plugins. With that, youll have more control over the email notifications from the form itself.
Note: This is one of WordPress tutorials that assumes you have basic coding skills.
Step 1: Create a new HTML form inside WP Pages
You can add the form to an existing page or create a new one.
To create a new contact form page, go to Pages > Add New and give your page a name. Afterward, click add block Custom HTML
Step 2: Create the HTML structure of the contact form
Create the HTML structure of your contact form. Heres an example:
<form id="contact-form" action="/wp-admin/admin-post.php" method="post"> <input type="hidden" name="action" value="submit_contact_form"> <label for="name">Name:</label> <input type="text" name="name" id="name" required><br> <label for="email">Email:</label> <input type="email" name="email" id="email" required><br> <label for="message">Message:</label> <textarea name="message" id="message" required></textarea><br> <input type="submit" value="Submit"></form>The form contains, Name, Email, and Message fields, and a form button for submitting the form. But if you want to go super fancy you could also add some conditional logic, pull data from a CRM, add checkbox, etc.
Note: The super fancy stuff would require quite a bit of coding and integration of third-party APIs into the PHP structure of your WordPress site.
Intermediary step: Custom CSS styles
The default HTML style looks a bit bland. Heres a sample CSS to beautify the form:
<style>#contact-form { width: 100%; max-width: 500px; margin: 0 auto; padding: 20px; background-color: #f9f9f9; border: 1px solid #ddd; border-radius: 5px;}#contact-form label { display: block; margin-bottom: 5px; font-weight: bold;}#contact-form input[type="text"],#contact-form input[type="email"],#contact-form textarea { width: 90%; padding: 10px; margin-bottom: 20px; border: 1px solid #ddd; border-radius: 5px;}#contact-form input[type="submit"] { background-color: #007BFF; color: white; padding: 10px 20px; border: none; border-radius: 5px; cursor: pointer;}#contact-form input[type="submit"]:hover { background-color: #0056b3;}</style><form id="contact-form" action="/wp-admin/admin-post.php" method="post"> <input type="hidden" name="action" value="submit_contact_form"> <label for="name">Name:</label> <input type="text" name="name" id="name" required><br> <label for="email">Email:</label> <input type="email" name="email" id="email" required><br> <label for="message">Message:</label> <textarea name="message" id="message" required></textarea><br> <input type="submit" value="Submit"></form>Note/Advanced Tip:
The basic HTML form I created already accepts the styles. The style tag at the beginning of the HTML contains the CSS rules that style the form. These rules apply to all elements within the #contact-form element because of the way CSS works.
However, if you want to separate the CSS from the HTML, you can move the CSS code to a separate .css file and link it to your HTML file. Heres how you can do it:
Create a new .css file in your theme directory, lets call it custom_form.css. Copy the CSS rules from the style tag and paste them into this file.
Link the CSS file in your HTML file. You can do this by adding a link tag in the head section of your HTML file. Heres an example:
<head> <!-- Other head elements --> <link rel="stylesheet" href="https://dev.to/path/to/your/theme/directory/custom_form.css"></head>Replace /path/to/your/theme/directory/ with the actual path to your theme directory.
Now, the styles defined in contact-form.css will be applied to your form.
Step 3: Create a Function to Handle Form Submission
In your themes functions.php file, add the following PHP function to handle form submission:
<?php/** * Some other theme functions */function handle_contact_form_submission() { if( isset($_POST['action']) && $_POST['action'] === 'submit_contact_form' ) { $name = sanitize_text_field( $_POST['name'] ); $email = sanitize_email( $_POST['email'] ); $message = sanitize_textarea_field( $_POST['message'] ); $adminEmail = get_option( 'admin_email' ); // Here, you can add your code to process the form data (e.g., send an email). wp_mail($adminEmail, sprintf("New message from %s email:%s", $name, $email), $message); // Redirect the user back to the main or contact page after form submission. wp_redirect( home_url('/') ); }}add_action( 'admin_post_nopriv_submit_contact_form', 'handle_contact_form_submission' );add_action( 'admin_post_submit_contact_form', 'handle_contact_form_submission' );?>Step 4: Dont forget to sanitize and validate user input
Before processing the form data, you should sanitize and validate it to protect your site from malicious inputs. WordPress provides several functions for this purpose, such as sanitize_text_field(), filter_var(), and validate_email().
Pro Tip: If your form has to handle a file upload on top of other functionalities, you need to sanitize and validate that file as well.
And congrats! Youve created a contact form in WordPress without plugins and extra files.
Create a callback function with validations and a captcha
Here, Ill tell you how to create more advanced forms, get better spam protection, and improve user registration on your WordPress website with some JavaScript tricks
This step is more secure and easier to maintain, with just a tiny code snippet.
To make everything neat and speed up the integration process for a custom form, Ill create a single PHP function from all the code discussed under creating a contact form without a plugin.
Then, you can use the function as the callback function of the shortcode. Here are the steps:
Step 1: Create a shortcode
Create a shortcode that will output your form. This can be done in the functions.php file:
add_shortcode( 'custom_contact_form', 'custom_contact_form_shortcode' );function custom_contact_form_shortcode() { // Code goes here}Step 2: Shortcode function
Inside the custom_contact_form_shortcode function, add the HTML structure of your contact form.
function custom_contact_form_shortcode() { ob_start(); ?> <form id="contact-form" action="<?php echo esc_url( $_SERVER['REQUEST_URI'] ); ?>" method="post"> <input type="hidden" name="action" value="submit_contact_form"> <label for="name">Name:</label> <input type="text" name="name" id="name" required><br> <label for="email">Email:</label> <input type="email" name="email" id="email" required><br> <label for="message">Message:</label> <textarea name="message" id="message" required></textarea><br> <input type="submit" value="Submit"> </form> <?php return ob_get_clean();}Step 3: Handling form submissions
While still inside the custom_contact_form_shortcode function, add the code to handle form submissions, validate data input and display messages.
function custom_contact_form_shortcode() { ob_start(); if( isset($_POST['action']) && $_POST['action'] === 'submit_contact_form' ) { $name = sanitize_text_field( $_POST['name'] ); $email = sanitize_email( $_POST['email'] ); $message = sanitize_textarea_field( $_POST['message'] ); // Initialize an array to hold validation messages $validation_messages = []; // Validate the data if (strlen($name) === 0) { $validation_messages[] = 'Please enter a valid name.'; } if (strlen($email) === 0 || !filter_var($email, FILTER_VALIDATE_EMAIL)) { $validation_messages[] = 'Please enter a valid email address.'; } if (strlen($message) === 0) { $validation_messages[] = 'Please enter a valid message.'; } // Check if there are any validation messages if (!empty($validation_messages)) { foreach ($validation_messages as $validation_message) { echo '<div class="validation-message">' . esc_html($validation_message) . '</div>'; } } else { // If there are no validation messages, send the email $adminEmail = get_option( 'admin_email' ); $headers = array('Content-Type: text/html; charset=UTF-8'); wp_mail($adminEmail, 'New message from ' . $name, $message, $headers); echo '<div class="success-message">Your message has been sent successfully.</div>'; } } // Code for the form goes here return ob_get_clean();}Now, after taking the time to create a callback function, you can just use[custom_contact_form] in your WordPress pages or posts, and the contact form will show up.
Nevertheless, my form isnt ideal yet. For instance, if a user types invalid info, the system gets executed on a reloaded page, so the data is lost. This is as annoying as a floating popup and will surely make people churn.
But, it can be solved if I replicate the PHP validation with JavaScript. Ill be covering that in the JavaScript validation section.
Step 4 Add Captcha to contact form
To implement reCaptcha, youll need to register your site on the Google reCaptcha website to get a site key and secret key. Then, you can add the reCaptcha widget to your form and verify the users response using the secret key.
This may seem as an overkill, but bots are getting smarter, so CAPTCHA gives you the extra edge to ward off malicious submissions.
Step 5: Implement CSRF protection
To protect your form from Cross-Site Request Forgery (CSRF) attacks, you can use WordPresss built-in CSRF API.
First, youll need to generate a nonce (number used once) using the wp_nonce_field() function in your form. Then, you can verify the nonce in process-form.php using the wp_verify_nonce() function.
// In your formwp_nonce_field( 'submit_contact_form_nonce', 'submit_contact_form_nonce_field' );// In custom_contact_form_shortcodeif (!isset($_POST[submit_contact_form_nonce_field]) || !wp_verify_nonce($_POST[submit_contact_form_nonce_field], submit_contact_form_nonce)) { die('Invalid request');}Pro Tip:
Some WordPress hosting providers may offer additional CSRF protection. However, this is typically done at the application level. So, you should better search wordpress.org for add-ons or libraries that fit your use case, or just implement the above.
Step 6: Send Email
Finally, you can send an email using the $wpdb->get_row() function to retrieve the site administrators email address from the WordPress database, and the wp_mail() function to send the email.
Note: This isnt the best solution since the given function is notoriously unreliable. No worries, Ill tell you how to implement a proper email-sending service and avoid wp_mail() limitations.
$adminEmail = get_option( 'admin_email' );$headers = ['Content-Type: text/html; charset=UTF-8'];wp_mail($adminEmail, 'New message from ' . $name, $message, $headers);Thank you for reading the snippet on Creating a WordPress Contact Form, in order to get more information about JavaScript validation and sending email with WP contact form - read the full article on Mailtrap blog.
Original Link: https://dev.to/veljkoristic/creating-a-wordpress-contact-form-complete-guide-1d1j
Dev To
More About this Source Visit Dev To