
An Interest In:
Web News this Week
- April 16, 2024
- April 15, 2024
- April 14, 2024
- April 13, 2024
- April 12, 2024
- April 11, 2024
- April 10, 2024
Some of Our Sources
- Mashable
- Just Creative
- Smashing Apps
- Creative Curio
- Noupe
- Crazy Leaf Design
- Design Modo
- Codrops
- Daily Now
- Dev To
Help Webnuz
Referal links:
How to implement HLS Video Streaming in a React App
TL;DR: A tutorial to build a ReactJS app with HLS video streaming capabilities. Developed a Node.js and Express backend to convert videos to HLS format using FFmpeg, serving the converted video URL upon user request. Utilized Video.js to implement a video player for seamless HLS video playback on the frontend.
Hey! You might have opened this blog because a Client may have asked you to "Add adaptive video quality according to the internet speed" or your video player might be loading the full video at load time which is making the users with slower internet wait for an eternity. Maybe you are trying to build the next big Video Platform with the best streaming experience.
I'm writing this tutorial because of a similar reason where the client asked me add adaptive bitrate and then I went out looking for resources but was not able to get a complete solution and got frustrated. I'll try my best to give you a simple implementation of HLS to convert a video to multiple qualities using FFmpeg in the backend and then stream the HLS video in the frontend using Video.js.
What is HLS (HTTP Live Streaming)?
HTTP Live Streaming (HLS) is an adaptive bitrate streaming protocol developed by Apple for delivering media content over the internet. It breaks the video into small chunks and serves them over standard HTTP protocols. HLS adjusts the quality of the video stream dynamically based on the user's available bandwidth and device capabilities, ensuring smooth playback without buffering.
But wait! What does actually happen?
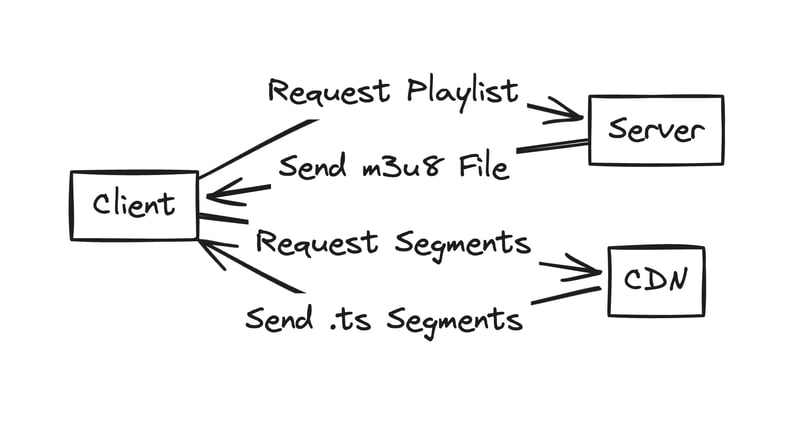
When we convert a .mp4 or .mov (or any other video format) to HLS, it splits up the video file into smaller segments and creates a playlist file with .m3u8 extension. The server then serves the .m3u8 files to the Video Player and then the player requests the .ts segments & automatically adjusts the video bitrate.
Prerequisites
Before we begin, make sure you have the following installed:
- Node.js and npm (Node Package Manager)
- React.js
- Express.js
- Postman
Converting Video to HLS Format
First, we have to install FFmpeg in our machine, we will use ffmpeg to convert our videos. You can read more about ffmpeg here
- Mac
brew install ffmpegBackend
1 - Initialize a new NodeJs app and install express, cors, multer & uuid
npm i express cors multer uuid2 - Create an index.js file:
const express = require('express')const cors = require('cors')const PORT = 3000;const app = express();const corsOptions = { origin: "*",};app.use(cors(corsOptions));app.use(express.json());app.listen(PORT, () => { console.log(`Server is running on port ${PORT}`)})3 - Create a middlewares folder and add a multer.js file and export the upload middleware.
Make sure to create an
uploadsfolder in the root directory
const multer = require('multer');// Set up storage for uploaded filesconst storage = multer.diskStorage({ destination: (req, file, cb) => { cb(null, 'uploads/'); }, filename: (req, file, cb) => { cb(null, Date.now() + '-' + file.originalname); }});// Create the multer instanceconst upload = multer({ storage: storage });module.exports = upload;4 - In the index.js file create a /upload POST route and add the following code:
const upload = require('./middlewares/multer')const { exec } = require('child_process');const fs = require('fs');const uuid = require('uuid');const path = require('path')const chapter = {} // We will create an in-memory DB for nowapp.use("/public", express.static(path.join(__dirname, "public")));app.post('/upload', upload.single('video'), (req, res) => { const chapterId = uuid.v4(); // Generate a unique chapter ID const videoPath = req.file.path; const outputDir = `public/videos/${chapterId}`; const outputFileName = 'output.m3u8'; const outputPath = path.join(outputDir, outputFileName); // Check if output directory exists, create if not if (!fs.existsSync(outputDir)) { fs.mkdirSync(outputDir, { recursive: true }); } // Command to convert video to HLS format using ffmpeg const command = `ffmpeg -i ${videoPath} \ -map 0:v -crf 23 -preset medium \ -map 0:v -crf 28 -preset medium \ -map 0:v -crf 32 -preset medium \ -map 0:a? -c:a aac -b:a 128k \ -hls_time 10 -hls_list_size 6 -f hls ${outputPath}`; // Execute ffmpeg command exec(command, (error, stdout, stderr) => { if (error) { console.error(`ffmpeg exec error: ${error}`); return res.status(500).json({ error: 'Failed to convert video to HLS format' }); } console.log(`stdout: ${stdout}`); console.error(`stderr: ${stderr}`); const videoUrl = `public/videos/${chapterId}/${outputFileName}`; chapters[chapterId] = { videoUrl, title: req.body.title, description: req.body.description }; // Store chapter information res.json({ success: true, message: 'Video uploaded and converted to HLS.', chapterId }); });});In the above code we are basically taking video as the input file and the video title then storing it in our uploads folder.
Then we are converting the files to HLS format using ffmpeg command.
- Let me take a minute to explain you the command:
const command = `ffmpeg -i ${videoPath} \ -map 0:v -crf 23 -preset medium \ -map 0:v -crf 28 -preset medium \ -map 0:v -crf 32 -preset medium \ -map 0:a? -c:a aac -b:a 128k \ -hls_time 10 -hls_list_size 6 -f hls ${outputPath}`;ffmpeg: This is the command-line tool for handling multimedia files.-i ${videoPath}: This option specifies the input file.${videoPath}is a placeholder for the path to the input video file.-map 0:v: This option selects the first stream from the input file for inclusion in the output and then the encoding is done on it.Here we have three
map 0:vwhich indicates that we are creating an output with multiple video streams, each encoded with different quality settings, but they will all be part of the same HLS output.-crf 23,-crf 28,-crf 32: These options specify the Constant Rate Factor (CRF) for video encoding. CRF is a quality-based encoding method in which a target quality level is set, and the encoder adjusts the bitrate to achieve that quality level. Lower CRF values result in higher quality but larger file sizes.-preset medium: This option specifies the encoding preset, which determines the trade-off between encoding speed and compression efficiency. The medium preset is a balance between speed and compression. Other presets includeveryslow,slow,fast,veryfast.-map 0:a? -c:a aac -b:a 128k: This option selects the first audio stream (?means if any) from the input file and specifies the audio codec (aac) and bitrate (128k) for encoding.-hls_time 10: This option sets the duration of each segment in the HLS playlist. In this case, each segment will be 10 seconds long.-hls_list_size 6: This option sets the maximum number of entries in the HLS playlist. When this limit is reached, older segments are removed from the playlist.Example: A 60s video will have 10 segments and the playlist file will load the first 6 segments and when its time to load the 7th segment the 1st will be removed from the file and if 1st segment is visited again it need to be loaded again from the server.
-f hls: This option specifies the format of the output file, which in this case is HLS (HTTP Live Streaming).${outputPath}: This is the path to the output directory where the HLS files will be saved.
Learn more about the FFmpeg options here
- The following code is used to serve the HLS files statically in the
publicroute
app.use("/public", express.static(path.join(__dirname, "public")));
5 - Now, we will create a /getVideo route where the user will provide the chapterId as the query and the video url and title will be sent back
app.get('/getVideo', (req, res) => { const { chapterId } = req.query; if (!chapterId || !chapters[chapterId]) { return res.status(404).json({ error: 'Chapter not found' }); } const { title, videoUrl } = chapters[chapterId]; console.log(title, " ", videoUrl) res.json({ title: title, url: videoUrl });});- Finally, the backend file structure should look something like this

- Final
index.jsfile:
const express = require('express')const upload = require('./middlewares/multer')const { exec } = require('child_process');const fs = require('fs');const uuid = require('uuid');const path = require('path')const cors = require('cors')const PORT = 3000;const app = express();const corsOptions = { origin: "*",};app.use(cors(corsOptions));app.use(express.json());app.use("/public", express.static(path.join(__dirname, "public")));const chapters = {}app.post('/upload', upload.single('video'), (req, res) => { const chapterId = uuid.v4(); // Generate a unique chapter ID const videoPath = req.file.path; const outputDir = `public/videos/${chapterId}`; const outputFileName = 'output.m3u8'; const outputPath = path.join(outputDir, outputFileName); // Check if output directory exists, create if not if (!fs.existsSync(outputDir)) { fs.mkdirSync(outputDir, { recursive: true }); } // Command to convert video to HLS format using ffmpeg const command = `ffmpeg -i ${videoPath} \ -map 0:v -crf 23 -preset medium \ -map 0:v -crf 28 -preset medium \ -map 0:v -crf 32 -preset medium \ -map 0:a? -c:a aac -b:a 128k \ -hls_time 10 -hls_list_size 6 -f hls ${outputPath}`; // Execute ffmpeg command exec(command, (error, stdout, stderr) => { if (error) { console.error(`ffmpeg exec error: ${error}`); return res.status(500).json({ error: 'Failed to convert video to HLS format' }); } console.log(`stdout: ${stdout}`); console.error(`stderr: ${stderr}`); const videoUrl = `public/videos/${chapterId}/${outputFileName}`; chapters[chapterId] = { videoUrl, title: req.body.title }; // Store chapter information res.json({ success: true, message: 'Video uploaded and converted to HLS.', chapterId }); });});app.get('/getVideo', (req, res) => { const { chapterId } = req.query; if (!chapterId || !chapters[chapterId]) { return res.status(404).json({ error: 'Chapter not found' }); } const { title, videoUrl } = chapters[chapterId]; console.log(title, " ", videoUrl) res.json({ title: title, url: videoUrl });});app.listen(PORT, () => { console.log(`Server is running on port ${PORT}`)})Uploading videos using Postman
- Start the backend server:
node index.js
Open Postman (Download it here)
Make a
POSTrequest tolocalhost:3000/uploadroute with the followingform datafields:
video: videoPath: filetitle: videoTitle: string
This will be the response if the video is valid and successfully converted:

Copy the
chapterIdfrom the response.Now, Make a new
GETrequest to thelocalhost:3000/getVideoroute with thechapterIdas a param.

- If the
chapterIdis valid you will get back the video title and url as a response.

Your video is successfully uploaded and converted.
Check you backend
public&uploadsfolder. One or Multipleoutput.tsfiles will be generated and a singleoutput.m3u8file will be present which is the playlist file.

Now, we need to create the frontend.
Frontend
- Initialize a new React app using Vite:
npm create vite@latest hls-frontend- Intall
video.js
npm i video.js- Create a
VideoPlayer.jsxcomponent with the following code:
import React, { useRef, useEffect } from 'react';import videojs from 'video.js';import 'video.js/dist/video-js.css';export const VideoPlayer = (props) => { const videoRef = useRef(null); const playerRef = useRef(null); const { options, onReady } = props; useEffect(() => { // Make sure Video.js player is only initialized once if (!playerRef.current) { // The Video.js player needs to be _inside_ the component el for React 18 Strict Mode. const videoElement = document.createElement("video-js"); videoElement.classList.add('vjs-big-play-centered'); videoRef.current.appendChild(videoElement); const player = playerRef.current = videojs(videoElement, options, () => { videojs.log('player is ready'); onReady && onReady(player); }); // You could update an existing player in the `else` block here // on prop change, for example: } else { const player = playerRef.current; player.autoplay(options.autoplay); player.src(options.sources); } }, [options, videoRef]); // Dispose the Video.js player when the functional component unmounts useEffect(() => { const player = playerRef.current; return () => { if (player && !player.isDisposed()) { player.dispose(); playerRef.current = null; } }; }, [playerRef]); return ( <div data-vjs-player style={{ width: "600px" }}> <div ref={videoRef} /> </div> );}export default VideoPlayer;- Write the following code in
App.jsx:
import { useRef } from 'react'import './App.css'import VideoPlayer from './VideoPlayer';function App() { var videoSrc = 'http://localhost:3000/public/videos/2d7b06b6-4913-4f75-907f-9c8c738a3395/output.m3u8'; const playerRef = useRef(null); const videoJsOptions = { autoplay: true, controls: true, responsive: true, fluid: true, sources: [{ src: videoSrc, type: 'application/x-mpegURL' }], }; const handlePlayerReady = (player) => { playerRef.current = player; // You can handle player events here, for example: player.on('waiting', () => { videojs.log('player is waiting'); }); player.on('dispose', () => { videojs.log('player will dispose'); }); }; return ( <> <div> <VideoPlayer options={videoJsOptions} onReady={handlePlayerReady} /> </div> </> )}export default AppCurrently we are using the video
urlwhich we got after making thegetVideorequest on Postman. Replace your video url in thevideoSrcvariable with yourhostname:port/url. You can later makeaxiosrequests to the backend and then get the url dynamically, the fancy stuff.
- Start the vite app
npm run dev
Congrats Your HLS App is ready! You can make other improvements on top of this and make it a better app. The goal here was to provide you a basic skeleton on which you can build your next big app!
Thanks for reading this tutorial. This was my first Blog Post ever and I'm planning to write similar interesting blogs in future too!
Do Like this blog if you found it helpful
Share if you think someone needs it
Comment and share your insights and tips for me
Follow me if you want to read more blogs!
Original Link: https://dev.to/indranilchutia/how-to-implement-hls-video-streaming-in-a-react-app-2cki
Dev To
More About this Source Visit Dev To