
Some of Our Sources
- Techcrunch
- Just Creative
- Pearsonified
- Spoon Graphics
- Smashing Magazine
- Abduzeedo
- TutsPlus - Design
- Vandelay Design
- You The Designer
- Wal You
Help Webnuz
Referal links:
Let's Dockerize your Django & React JS App.
Ah, the infamous words of a developer: "but it works on my machine!" - a phrase that strikes fear into the hearts of anyone who's ever had to deploy their code. We've all been there - you spend hours trying to debug an issue, only to realize that it was caused by differences in your development environment and the production environment. This is where Docker comes in.
Introduction
Docker is a platform that enables you to package your application and its dependencies into a single container, which can be run anywhere, regardless of the host operating system or hardware. With Docker, you can ensure that your code runs smoothly across all machines, without having to worry about environment discrepancies.
Here are a few benefits of using Docker for your Python and React.js app:
Portability: Package your app and its dependencies into a single container to deploy and scale your app across different environments.
Consistency: Define your app's environment in a Dockerfile to ensure that all developers and machines are using the same setup.
Isolation: Provide a secure and isolated environment for your app to run in to improve security and prevent conflicts.
Efficiency: Use resources more efficiently than traditional virtual machines to reduce infrastructure costs and easily manage your containers.
Flexibility: Modular architecture to break down your app into smaller, more manageable components and easily update and deploy individual components without disrupting the rest of the app.
Prerequisites
- Basic knowledge of Django and React.js frameworks
- Docker and Docker Compose installed on your system
- Python and Node.js installed on your system
Docker Compose
Docker Compose is a tool for defining and running multi-container Docker applications. It allows you to define all the services that your application needs in a single file, called a docker-compose.yml file. With Docker Compose, you can start and stop all the containers that your application needs with a single command.
Setting Up the Project
Let's get our ducks in a row, or in this case, our directories in order! Before we dive into dockerizing our Python and React app, let's take a quick tour of the project structure. This way, you'll be able to keep your code organized and tidy, just like your closet (or at least we hope so!).
django-react-docker/ api/ manage.py project/ __init__.py settings.py urls.py wsgi.py Dockerfile frontend/ node_modules/ public/ index.html ... src/ App.js ... package.json ... Dockerfile docker-compose.ymlNow, let's start by building our API.
Inside the folder 'django-react-docker`, let's make another folder api. This is where the code for API will be located.
Inside the api folder, let's make a django project using the command django-admin startproject project.
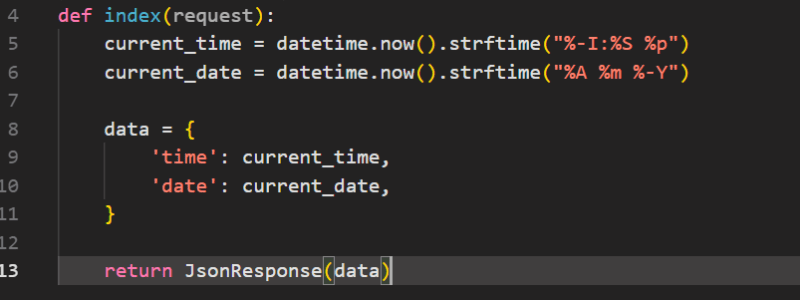
Let's create our views.py file in project folder and fetch the current time and date.
Let's first import all JsonResponse and datetime.from django.http import JsonResponsefrom datetime import datetime
Now let's make a view to return the current time and date
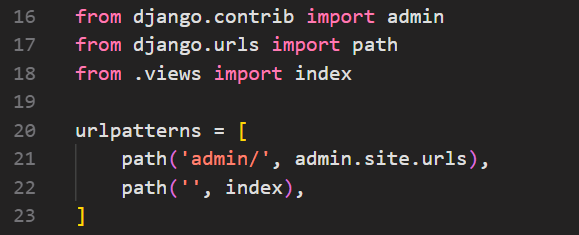
Now, let's update our urls.py file to direct the view to homepage.
Now, let's manage our settings in project's 'settings.py'
- Let's add our allowed hosts
ALLOWED_HOSTS = ['0.0.0.0', 'http://localhost:8000/', '127.0.0.1']
- We need to add
corsheadersunder installed apps.
INSTALLED_APPS = [
    'django.contrib.admin',
    'django.contrib.auth',
    'django.contrib.contenttypes',
    'django.contrib.sessions',
    'django.contrib.messages',
    'django.contrib.staticfiles',
    'corsheaders'
]
- Let's add our
http://localhost:3000to allowedCORS_ORIGIN_WHITELIST
CORS_ORIGIN_WHITELIST = [
     'http://localhost:3000'
]
- Now let's add a middleware class to listen in on responses:
MIDDLEWARE = [
    ...,
    "corsheaders.middleware.CorsMiddleware",
    "django.middleware.common.CommonMiddleware",
    ...,
]
Building a Docker Container for Django
Now to dockerize our django app, we need to make a Dockerfile inside the api folder.

Let's break this down for a better understanding.
FROM python:3.8-slim-buster: This specifies the base image to use for building the container. In this case, it's the official Python 3.8 slim version based on Debian 10 (Buster) image.
ENV PYTHONUNBUFFERED=1: This sets an environment variable to prevent Python from buffering standard output and standard error streams, which can cause delays in log messages.
WORKDIR /api: This sets the working directory inside the container to /api. This means that any subsequent commands will be executed in the context of this directory.
RUN pip install django django-cors-headers: This installs the required Python packages, Django and Django-cors-headers, using pip.
COPY . .: This copies the contents of the current directory (where the Dockerfile is located) to the working directory inside the container, /api.
EXPOSE 8000: This exposes port 8000 of the container to the host machine.
Building the frontend
Let's build the frontend to display the time and date recieved from api.
Let's run the boilerplate command to make a React app.
npx create-react-app frontend
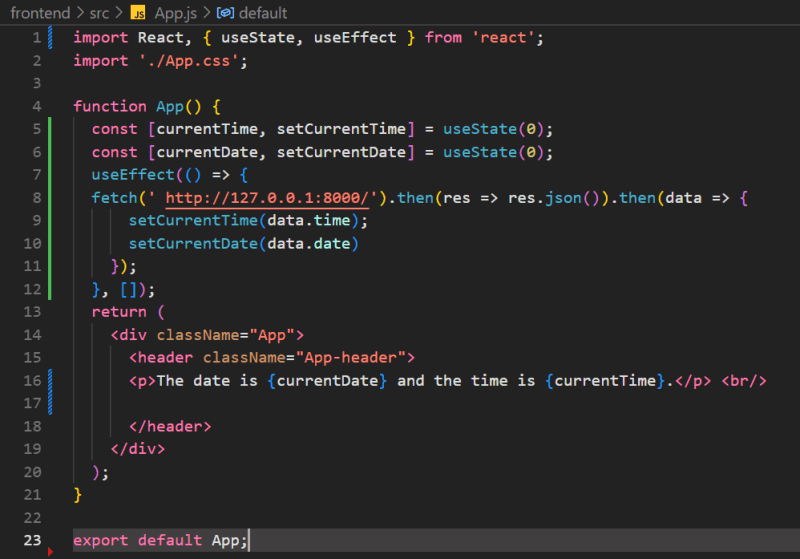
Now, let's navigate to App.js file and fetch the data from api and set the data fetched data in useState.
Building a Docker Container for React App
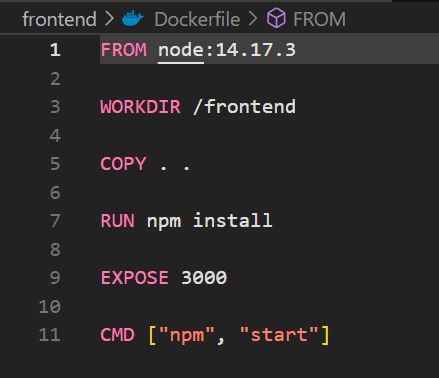
Now to dockerize our React app, we need to make a Dockerfile inside the frontend folder.
Creating a Docker Compose File
Now, let's make a docker compose file which will run both are images Django app image and React App image together.
Remember this file should be in root folder.

Now, let's break down the docker compose file:
services: This section defines the two services that will be created by Docker Compose: api and web.
build: This section specifies the path to the Dockerfile that will be used to build the container for each service.
ports: This section maps the container port to the host port, allowing the services to be accessed from the host machine.
volumes: This section maps the local directory on the host machine to the directory in the container, allowing changes made to the code on the host to be reflected in the container.
command: This section specifies the command that will be executed when the container is started. In the case of the api service, it starts the Django server and exposes it to the container network, and for the web service, it starts the React app.
Building the Image
Now, the final step, to build the image we will be using docker command docker-compose build.
After exciting this command it will take some time to build the image. Once the image has been built, you can see the image in your docker desktop app.

Once the building of image has been completed, we can run the app using the docker command docker-compose up

You can see all the images that are being used in the terminal.

Once all the images are running, you can access the web app on local host.
If you're interested in the code mentioned above, you can find it on GitHub. If you find it useful or valuable, consider giving the repository a star to show your support!
Conclusion
In this tutorial, we learned how to dockerize a Python and React.js app using Docker Compose. We also saw how to create a Docker container for our Django app and run it in a container. By following these steps, developers can ensure that their application runs consistently and reliably across different environments, reducing errors and improving performance. With Docker, deploying applications has never been easier.
If you have any questions or feedback, feel free to leave a comment.
Original Link: https://dev.to/adii9/lets-dockerize-your-django-react-js-app-4k23
Dev To
More About this Source Visit Dev To